function [BITS-1:0] med; input [BITS-1:0] a, b, c; begin med = (a < b) ? ((b < c) ? b : (a < c ? c : a)) : ((b > c) ? b : (a > c ? c : a)); end endfunction

时间: 2024-04-25 09:26:56 浏览: 87
这段代码是一个 Verilog 函数,用于求三个整数 a、b、c 的中间值。它使用了条件运算符 ?: 来判断 a、b、c 的大小关系,从而得到中间值 med。具体地,如果 a < b,则比较 b 和 c,如果 b < c,则中间值为 b,否则中间值为 a < c ? c : a。如果 a >= b,则比较 b 和 c,如果 b > c,则中间值为 b,否则中间值为 a > c ? c : a。最终得到的中间值 med 的位宽为 BITS。
相关问题

function [BITS-1:0] min; input [BITS-1:0] a, b, c; begin min = (a < b) ? ((a < c) ? a : c) : ((b < c) ? b : c); end endfunction

这是一个Verilog函数`min`的定义,它有三个输入参数`a`、`b`和`c`,它们的位宽都是`BITS`,函数的返回值也是`BITS`位宽的无符号整数。 该函数用于计算`a`、`b`和`c`三个数中的最小值,并将其赋值给函数的返回值`min`。具体实现方法是使用三目运算符来进行比较,首先比较`a`和`b`,将其中的较小值与`c`进行比较,得到最小值并返回。 需要注意的是,该函数中使用了三目运算符`? :`,它的语法是`表达式1 ? 表达式2 : 表达式3`,表示如果表达式1成立,则返回表达式2的值,否则返回表达式3的值。在这里,它被用于比较三个数的大小,并返回最小值。

def f(x): if -2≤x<0: return x-1 if 0<=x<=1: return x+1

There seems to be an indentation error in the code provided. Here's the corrected code: def f(x): if -2 <= x < 0: return x - 1 if 0 <= x <= 1: return x The function f(x) takes a value x as input and returns a value based on the following conditions: - If x is between -2 and 0 (inclusive), return x minus 1. - If x is between 0 and 1 (inclusive), return x. - If x is outside the range of -2 to 1, the function does not return anything. For example, f(-1) would return -2 because -2 ≤ -1 < 0, and therefore x-1=-1-1=-2. f(0.5) would return 0.5 because 0 ≤ 0.5 ≤ 1. And f(2) would not return anything because 2 is outside the range of -2 to 1.

相关推荐

<!DOCTYPE html> <html> <head> <meta charset="UTF-8"> <meta http-equiv="X-UA-Compatible" content="IE=edge"> <title>登录界面</title> <style> body { margin: 0; padding: 0; background-color: #f2f2f2; font-family: 'Lucida Sans', 'Lucida Sans Regular', 'Lucida Grande', 'Lucida Sans Unicode', Geneva, Verdana, sans-serif; } #page_login { display: flex; justify-content: center; align-items: center; height: 100vh; } .loginContainer { display: flex; flex-direction: column; align-items: center; justify-content: center; background-color: white; border-radius: 5px; box-shadow: 0px 0px 10px rgba(0,0,0,0.2); padding: 30px; } .loginContainer > div { font-size: 36px; margin-bottom: 20px; text-align: center; } input[type="text"], input[type="password"] { width: 100%; padding: 10px; margin-bottom: 10px; border: none; border-radius: 5px; box-shadow: 0px 0px 5px rgba(0,0,0,0.1); } #loginButton { background-color: #007bff; color: white; padding: 10px 20px; border: none; border-radius: 5px; box-shadow: 0px 0px 5px rgba(0,0,0,0.1); transition: all 0.2s ease-in-out; } #loginButton:hover { transform: scale(1.05); box-shadow: 0px 0px 10px rgba(0,0,0,0.2); } </style> </head> <body> Login <input type="text" name="account" id="account" placeholder="account"> <input type="password" name="password" id="password" placeholder="password"> <button id="loginButton" onclick="getLogin()">login</button> <button id="checkinto">select</button> </body> <script> document.getElementById('checkinto').addEventListener('click', function() { window.location.href = 'select.html'; }); </script> <script type="text/javascript" src="./js/index.js"></script> <script src="./js/jquery-3.3.1.js"></script> </html>美化这段代码

<template> <a-form :style="{ width: '600px' }" @submit="handleSubmit"> <a-form-item label="任务名称"> <a-input v-model="form.name" placeholder="网站名称" /> </a-form-item> <a-form-item label="采集网址"> <a-input v-model="form.gather" placeholder="例如:https://ecp.sgcc.com.cn" /> </a-form-item> <a-form-item label="网站介绍"> <a-space direction="vertical" size="large" style="width: 100%"> <a-mention v-model="form.introduction" :data="['Bytedance', 'Bytedesign', 'Bytenumner']" type="textarea" placeholder="请输入网站介绍" /> </a-space> </a-form-item> <a-form-item label="模板名称"> <a-button class="custom-button" html-type="submit">选择模板</a-button> </a-form-item> <a-form-item> <a-button class="save-button">保存设置</a-button> </a-form-item> </a-form> </template> <script lang="ts" setup> import { reactive, defineExpose } from 'vue'; interface FormData { name: string; gather: string; introduction: string; } const form = reactive<FormData>({ name: '', gather: '', introduction: '', }); function handleSubmit() { console.log('Form submitted:', form); } defineExpose({ form, handleSubmit, }); </script> <style lang="less" scoped> .custom-button { border: 1px solid rgb(25, 141, 147); color:rgb(25,141,147); } .custom-button:hover{ border: 1px solid rgb(25, 141, 147); color:rgb(25,141,147); } .box-content { width: 100%; background-color: #ffffff; border-radius: 4px; padding: 16px; margin: 16px; } .save-button { width: 120px; background-color: rgb(25, 141, 147); color: #ffffff; } </style>请检查代码并修复

帮我优化下面的代码,我不喜欢下面代码的风格<!DOCTYPE html> <html> <head> <title>Login</title> <script src="https://cdn.bootcdn.net/ajax/libs/jquery/3.6.0/jquery.min.js"></script> <style> body { background-color: #f2f2f2; } form { display: flex; flex-direction: column; align-items: center; margin-top: 50px; background-color: #ffffff; padding: 50px; border-radius: 10px; box-shadow: 0 4px 8px 0 rgba(0, 0, 0, 0.2), 0 6px 20px 0 rgba(0, 0, 0, 0.19); } label { font-size: 18px; margin-bottom: 5px; } input[type=text], input[type=password] { padding: 10px; border-radius: 5px; border: none; margin-bottom: 20px; width: 300px; } input[type=button] { background-color: #4CAF50; color: white; border: none; border-radius: 5px; padding: 10px 20px; cursor: pointer; font-size: 18px; margin-bottom: 20px; width: 300px; } input[type=button]:hover { background-color: #3e8e41; } h1 { text-align: center; margin-top: 50px; font-size: 36px; color: #4CAF50; } </style> </head> <body> Login <form> <label for="username">Username:</label> <input type="text" id="username" name="username"> <label for="password">Password:</label> <input type="password" id="password" name="password"> <input type="button" id="submit" value="Submit"> </form> <script> $(document).ready(function() { $("#submit").click(function() { var username = $("#username").val(); var password = $("#password").val(); $.ajax({ url: "/login", type: "POST", data: { username: username, password: password }, success: function(response) { if (response == "success") { window.location.href = "/dashboard"; } else { alert("Invalid username or password."); } }, error: function() { alert("Error occurred."); } }); }); }); </script> </body> </html>

继续优化帮我设计出更加美观的界面<!DOCTYPE html> <html> <head> <title>Login</title> <script src="https://cdn.bootcdn.net/ajax/libs/jquery/3.6.0/jquery.min.js"></script> <style> form { display: flex; flex-direction: column; align-items: center; margin-top: 20px; } label { font-size: 18px; margin-bottom: 5px; } input[type=text], input[type=password] { padding: 10px; border-radius: 5px; border: none; margin-bottom: 20px; width: 300px; } input[type=button] { background-color: #4CAF50; color: white; border: none; border-radius: 5px; padding: 10px 20px; cursor: pointer; font-size: 18px; margin-bottom: 20px; width: 300px; } input[type=button]:hover { background-color: #3e8e41; } h1 { text-align: center; margin-top: 50px; font-size: 36px; } </style> </head> <body> Login <form> <label for="username">Username:</label> <input type="text" id="username" name="username"> <label for="password">Password:</label> <input type="password" id="password" name="password"> <input type="button" id="submit" value="Submit"> </form> <script> $(document).ready(function() { $("#submit").click(function() { var username = $("#username").val(); var password = $("#password").val(); $.ajax({ url: "/login", type: "POST", data: { username: username, password: password }, success: function(response) { if (response == "success") { window.location.href = "/dashboard"; } else { alert("Invalid username or password."); } }, error: function() { alert("Error occurred."); } }); }); }); </script> </body> </html>

.input-group { margin-bottom: 10px; } .input-group label { display: block; margin-bottom: 5px; } .input-group input { width: 100px; padding: 5px; border: 1px solid #ccc; border-radius: 4px; box-sizing: border-box; } .input-group select { width: 100px; padding: 5px; border: 1px solid #B0E0E6; border-radius: 4px; box-sizing: border-box; } .login-btn { width: 100%; height: 10px; background-color: #aaffaa; color: #fff; padding: 30px 25px; border-radius: 4px; cursor: pointer; float: right; box-sizing: border-box; } .container div input:focus { background-color: #ffe4e1; } .login-btn:hover { background-color: #45a049; } </style> <script> function showAdminInput() { var userType = document.getElementById("user-type").value; if (userType == "admin") { document.getElementById("username-label").innerHTML = "管理员用户名:"; } else { document.getElementById("username-label").innerHTML = "请输入用户名:"; } } function login() { var username = document.getElementById("username").value; var password = document.getElementById("password").value; var userType = document.getElementById("user-type").value; } </script> </head> <body style="background-image: url(image/bk8.gif); background-size: cover; background-repeat: no-repeat;color: pink;"> Login <label id="username-label">请输入用户名:</label> <input type="text" id="username" name="username" style="border-bottom: 1px solid black;padding-bottom: 2px;display:inline-block;"> <label>请你输入密码:</label> <input type="password" id="password" name="password" style="border-bottom: 1px solid black;padding-bottom: 2px;display:inline-block;"> <label>选择用户类型:</label> <select id="user-type" name="user-type" onchange="showAdminInput()" style="color: blue;"> <option value="normal">普通用户</option> <option value="admin">管理员</option> </select> <button class="login-btn" onclick="login()" >GO</button> 为什么标签和输入框不能在同一行

请把一下代码每一行的用途注释上:<!DOCTYPE html> <html> <head> <meta charset="utf-8" /> <title>登录表单</title> <style> body { background-image: url("background.jpg"); background-size: cover; font-family: "宋体"; font-size: 30px; } form { margin: auto; width: 50%; background-color: rgba(255,255,255,0.8); padding: 20px; border-radius: 10px; } input[type=text], input[type=password] { width: 100%; padding: 12px 20px; margin: 8px 0; display: inline-block; border: 1px solid #ccc; border-radius: 4px; box-sizing: border-box; } input[type=submit], input[type=reset] { background-color: #4CAF50; color: white; padding: 14px 20px; margin: 8px 0; border: none; border-radius: 4px; cursor: pointer; } input[type=submit]:hover, input[type=reset]:hover { background-color: #45a049; } .error { color: red; } </style> </head> <body> <form> 登录 <label for="username">用户名</label> <input type="text" id="username" name="username" >
<label for="password">密码</label> <input type="password" id="password" name="password" >
<label for="confirm_password">确认密码</label> <input type="password" id="confirm_password" name="confirm_password" >
<input type="submit" value="登录"> <input type="reset" value="重置">
忘记密码? </form> <script> document.querySelector("form").addEventListener("submit", function(event) { var password = document.querySelector("#password").value; var confirm_password = document.querySelector("#confirm_password").value; if (password != confirm_password) { document.querySelector("#password_error").innerHTML = "密码不一致"; event.preventDefault(); } }); </script> </body> </html>

<view class="top-box"> <view>Hi</view> <view class="next-text">欢迎使用!</view> </view> <view class="center-box"> <view class="nav"> <view class="left {{current==1?'select':''}}" bindtap="click" data-code="1"> <text>登录</text> </view> <view class="right {{current==0?'select':''}}" bindtap="click" > <text>注册</text> </view> </view> <view class="input-box" hidden="{{current==0}}"> <view class="wei-input"> <icon type="waiting" color="#44ADFB" size="16"></icon> <input class="input" auto-focus placeholder="请输入手机号/登录名"/> </view> <view class="wei-input"> <icon type="success" color="#44ADFB" size="16"></icon> <input class="input" auto-focus placeholder="请输入登录密码"/> </view> <view class="forget"> <text>忘记密码?</text> </view> </view> <view class="input-box" hidden="{{current==1}}"> <view class="wei-input"> <icon type="waiting" color="#44ADFB" size="16"></icon> <input class="input" auto-focus placeholder="请输入手机号"/> </view> <view class="wei-input"> <icon type="waiting" color="#44ADFB" size="16"></icon> <input class="input" auto-focus placeholder="请输入6位验证码"/> <text class="input-code" bindtap="getCode">{{codeText}}</text> </view> <view class="wei-input"> <icon type="success" color="#44ADFB" size="16"></icon> <input class="input" auto-focus placeholder="请输入密码"/> </view> <view class="wei-input"> <icon type="success" color="#44ADFB" size="16"></icon> <input class="input" auto-focus placeholder="请确认密码"/> </view> </view> <view class="sumbit-btn"> <button class="button" style="background-color: #33ccff;font-size: 30rpx;" type="primary">立即{{current==1?'登录':'注册'}}</button> </view> </view> <view class="shadow shadow-1"></view><view class="shadow shadow-2"></view> 这段代码怎么实现注册页面和登陆页面的切换,如果不能,给出解决代码

最新推荐

recommend-type

解决angularJS中input标签的ng-change事件无效问题

然而,在实际开发过程中,我们可能会遇到`ng-change`在某些情况下不起作用的问题,特别是在`&lt;input type="file"&gt;`的场景下。本文将详细探讨这个问题的原因以及如何解决。 首先,我们要理解`ng-change`的工作原理。`...
recommend-type

基于opencv实现象棋识别及棋谱定位python源码+数据集-人工智能课程设计

基于opencv实现象棋识别及棋谱定位python源码+数据集-人工智能课程设计,含有代码注释,满分课程设计资源,新手也可看懂,期末大作业、课程设计、高分必看,下载下来,简单部署,就可以使用。该项目可以作为课程设计期末大作业使用,该系统功能完善、界面美观、操作简单、功能齐全、管理便捷,具有很高的实际应用价值。 基于opencv实现象棋识别及棋谱定位python源码+数据集-人工智能课程设计,含有代码注释,满分课程设计资源,新手也可看懂,期末大作业、课程设计、高分必看,下载下来,简单部署,就可以使用。该项目可以作为课程设计期末大作业使用,该系统功能完善、界面美观、操作简单、功能齐全、管理便捷,具有很高的实际应用价值。 基于opencv实现象棋识别及棋谱定位python源码+数据集-人工智能课程设计,含有代码注释,满分课程设计资源,新手也可看懂,期末大作业、课程设计、高分必看,下载下来,简单部署,就可以使用。该项目可以作为课程设计期末大作业使用,该系统功能完善、界面美观、操作简单、功能齐全、管理便捷,具有很高的实际应用价值。基于opencv实现象棋识别及棋谱定位python源码+数据集
recommend-type

基于Python实现的Cowrie蜜罐设计源码

该项目为基于Python实现的Cowrie蜜罐设计源码,共计380个文件,涵盖166个Python源代码文件,以及包括RST、SQL、YAML、Markdown等多种类型的配置和文档文件。Cowrie蜜罐是一款用于记录暴力攻击和攻击者执行的SSH及Telnet交互的中等交互式蜜罐。
recommend-type

批量文件重命名神器:HaoZipRename使用技巧

资源摘要信息:"超实用的批量文件改名字小工具rename" 在进行文件管理时,经常会遇到需要对大量文件进行重命名的场景,以统一格式或适应特定的需求。此时,批量重命名工具成为了提高工作效率的得力助手。本资源聚焦于介绍一款名为“rename”的批量文件改名工具,它支持增删查改文件名,并能够方便地批量操作,从而极大地简化了文件管理流程。 ### 知识点一:批量文件重命名的需求与场景 在日常工作中,无论是出于整理归档的目的还是为了符合特定的命名规则,批量重命名文件都是一个常见的需求。例如: - 企业或组织中的文件归档,可能需要按照特定的格式命名,以便于管理和检索。 - 在处理下载的多媒体文件时,可能需要根据文件类型、日期或其他属性重新命名。 - 在软件开发过程中,对代码文件或资源文件进行统一的命名规范。 ### 知识点二:rename工具的基本功能 rename工具专门设计用来处理文件名的批量修改,其基本功能包括但不限于: - **批量修改**:一次性对多个文件进行重命名。 - **增删操作**:在文件名中添加或删除特定的文本。 - **查改功能**:查找文件名中的特定文本并将其替换为其他文本。 - **格式统一**:为一系列文件统一命名格式。 ### 知识点三:使用rename工具的具体操作 以rename工具进行批量文件重命名通常遵循以下步骤: 1. 选择文件:根据需求选定需要重命名的文件列表。 2. 设定规则:定义重命名的规则,比如在文件名前添加“2023_”,或者将文件名中的“-”替换为“_”。 3. 执行重命名:应用设定的规则,批量修改文件名。 4. 预览与确认:在执行之前,工具通常会提供预览功能,允许用户查看重命名后的文件名,并进行最终确认。 ### 知识点四:rename工具的使用场景 rename工具在不同的使用场景下能够发挥不同的作用: - **IT行业**:对于软件开发者或系统管理员来说,批量重命名能够快速调整代码库中文件的命名结构,或者修改服务器上的文件名。 - **媒体制作**:视频编辑和摄影师经常需要批量重命名图片和视频文件,以便更好地进行分类和检索。 - **教育与学术**:教授和研究人员可能需要批量重命名大量的文档和资料,以符合学术规范或方便资料共享。 ### 知识点五:rename工具的高级特性 除了基本的批量重命名功能,一些高级的rename工具可能还具备以下特性: - **正则表达式支持**:利用正则表达式可以进行复杂的查找和替换操作。 - **模式匹配**:可以定义多种匹配模式,满足不同的重命名需求。 - **图形用户界面**:提供直观的操作界面,简化用户的操作流程。 - **命令行操作**:对于高级用户,可以通过命令行界面进行更为精准的定制化操作。 ### 知识点六:与rename相似的其他批量文件重命名工具 除了rename工具之外,还有多种其他工具可以实现批量文件重命名的功能,如: - **Bulk Rename Utility**:一个功能强大的批量重命名工具,特别适合Windows用户。 - **Advanced Renamer**:提供图形界面,并支持脚本,用户可以创建复杂的重命名方案。 - **MMB Free Batch Rename**:一款免费且易于使用的批量重命名工具,具有直观的用户界面。 ### 知识点七:避免批量重命名中的常见错误 在使用批量重命名工具时,有几个常见的错误需要注意: - **备份重要文件**:在批量重命名之前,确保对文件进行了备份,以防意外发生。 - **仔细检查规则**:设置好规则之后,一定要进行检查,确保规则的准确性,以免出现错误的命名。 - **逐步执行**:如果不确定规则的效果,可以先小批量试运行规则,确认无误后再批量执行。 - **避免使用通配符**:在没有充分理解通配符含义的情况下,不建议使用,以免误操作。 综上所述,批量文件改名工具rename是一个高效、便捷的解决方案,用于处理大量文件的重命名工作。通过掌握其使用方法和技巧,用户可以显著提升文件管理的效率,同时减少重复劳动,保持文件系统的整洁和有序。
recommend-type

管理建模和仿真的文件

管理Boualem Benatallah引用此版本:布阿利姆·贝纳塔拉。管理建模和仿真。约瑟夫-傅立叶大学-格勒诺布尔第一大学,1996年。法语。NNT:电话:00345357HAL ID:电话:00345357https://theses.hal.science/tel-003453572008年12月9日提交HAL是一个多学科的开放存取档案馆,用于存放和传播科学研究论文,无论它们是否被公开。论文可以来自法国或国外的教学和研究机构,也可以来自公共或私人研究中心。L’archive ouverte pluridisciplinaire
recommend-type

RestTemplate性能优化秘籍:提升API调用效率,打造极致响应速度

![RestTemplate性能优化秘籍:提升API调用效率,打造极致响应速度](https://media.geeksforgeeks.org/wp-content/uploads/20220309145320/WorkingOfRESTTemplate.jpg) # 
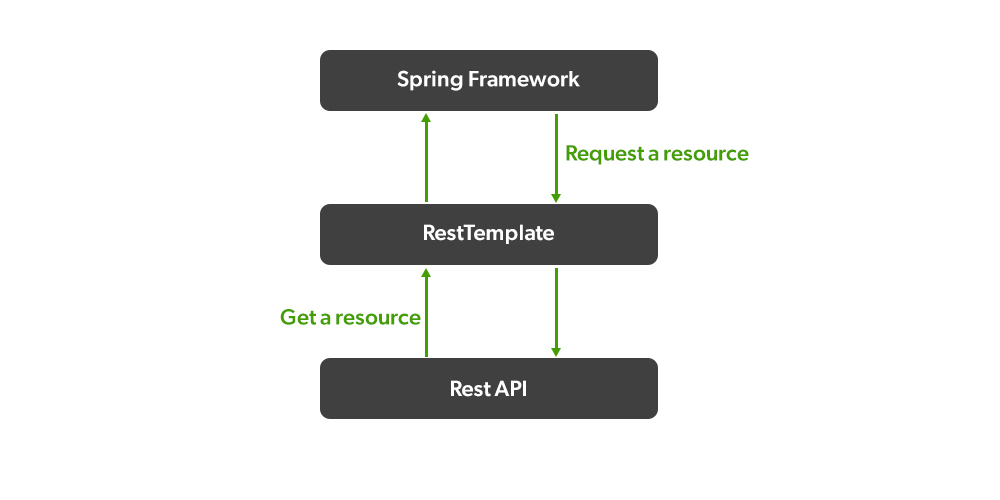
1. RestTemplate基础与API调用概述 ## 1.1 RestTemplate简介 `RestTemplate`是Spring框架提供的一个同步HTTP客户端,设计用来简化客户端HTTP请求的发送以及HTTP响应的接收。它是针对Java开发者的REST API调用的高级抽象,为调用RESTful服务提供了便利。
recommend-type

Leader和follower 位置反了如何调换zookeeper

在ZooKeeper中,Leader和Follower的角色通常是静态分配的,并通过选举机制确定。如果需要调整它们的位置,通常是在集群初始化或者节点失效的情况下,会触发重新选举过程。 1. **停止服务**:首先,停止ZooKeeper服务的所有节点,包括当前的Leader和Follower。 2. **修改配置**:打开zoo.cfg配置文件,更改服务器列表(server.X=IP:port:角色),将原来的Leader的地址设为Follower,Follower的地址设为Leader。例如: ``` server.1=old_leader_ip:old_leader_po
recommend-type

简洁注册登录界面设计与代码实现

资源摘要信息:"在现代Web开发中,简洁美观的注册登录页面是用户界面设计的重要组成部分。简洁的页面设计不仅能够提升用户体验,还能提高用户完成注册或登录流程的意愿。本文将详细介绍如何创建两个简洁且功能完善的注册登录页面,涉及HTML5和前端技术。" ### 知识点一:HTML5基础 - **语义化标签**:HTML5引入了许多新标签,如`<header>`、`<footer>`、`<article>`、`<section>`等,这些语义化标签不仅有助于页面结构的清晰,还有利于搜索引擎优化(SEO)。 - **表单标签**:`<form>`标签是创建注册登录页面的核心,配合`<input>`、`<button>`、`<label>`等元素,可以构建出功能完善的表单。 - **增强型输入类型**:HTML5提供了多种新的输入类型,如`email`、`tel`、`number`等,这些类型可以提供更好的用户体验和数据校验。 ### 知识点二:前端技术 - **CSS3**:简洁的页面设计往往需要巧妙的CSS布局和样式,如Flexbox或Grid布局技术可以实现灵活的页面布局,而CSS3的动画和过渡效果则可以提升交云体验。 - **JavaScript**:用于增加页面的动态功能,例如表单验证、响应式布局切换、与后端服务器交互等。 ### 知识点三:响应式设计 - **媒体查询**:使用CSS媒体查询可以创建响应式设计,确保注册登录页面在不同设备上都能良好显示。 - **流式布局**:通过设置百分比宽度或视口单位(vw/vh),使得页面元素可以根据屏幕大小自动调整大小。 ### 知识点四:注册登录页面设计细节 - **界面简洁性**:避免过多的装饰性元素,保持界面的整洁和专业感。 - **易用性**:设计简洁直观的用户交互,确保用户能够轻松理解和操作。 - **安全性和隐私**:注册登录页面应特别注意用户数据的安全,如使用HTTPS协议保护数据传输,以及在前端进行基本的输入验证。 ### 知识点五:Zip文件内容解析 - **登录.zip**:该压缩包内可能包含登录页面的HTML、CSS和JavaScript文件,以及相关的图片和其他资源文件。开发者可以利用这些资源快速搭建一个登录界面。 - **滑动登录注册界面.zip**:该压缩包内可能包含了两个页面的文件,分别是注册和登录页面。文件可能包含用HTML5实现的滑动动画效果,通过CSS3和JavaScript的结合实现动态交互,提供更流畅的用户体验。 通过这些知识点,开发者能够创建出既简洁又功能完善的注册登录页面。需要注意的是,尽管页面设计要简洁,但安全措施不可忽视。使用加密技术保护用户数据,以及在用户端进行有效的数据验证,都是开发者在实现简洁界面同时需要考虑的安全要素。
recommend-type

"互动学习:行动中的多样性与论文攻读经历"

多样性她- 事实上SCI NCES你的时间表ECOLEDO C Tora SC和NCESPOUR l’Ingén学习互动,互动学习以行动为中心的强化学习学会互动,互动学习,以行动为中心的强化学习计算机科学博士论文于2021年9月28日在Villeneuve d'Asq公开支持马修·瑟林评审团主席法布里斯·勒菲弗尔阿维尼翁大学教授论文指导奥利维尔·皮耶昆谷歌研究教授:智囊团论文联合主任菲利普·普雷教授,大学。里尔/CRISTAL/因里亚报告员奥利维耶·西格德索邦大学报告员卢多维奇·德诺耶教授,Facebook /索邦大学审查员越南圣迈IMT Atlantic高级讲师邀请弗洛里安·斯特鲁布博士,Deepmind对于那些及时看到自己错误的人...3谢谢你首先,我要感谢我的两位博士生导师Olivier和Philippe。奥利维尔,"站在巨人的肩膀上"这句话对你来说完全有意义了。从科学上讲,你知道在这篇论文的(许多)错误中,你是我可以依
recommend-type

【RestTemplate安全宝典】:OAuth2整合与API调用安全性的终极解决方案

![【RestTemplate安全宝典】:OAuth2整合与API调用安全性的终极解决方案](https://p1-jj.byteimg.com/tos-cn-i-t2oaga2asx/gold-user-assets/2020/2/29/1708eca87ee0599f~tplv-t2oaga2asx-zoom-in-crop-mark:1304:0:0:0.awebp?x-oss-process=image/resize,s_500,m_lfit) # 1. RestTemplate与OAuth2概述 在现代Web开发中,集成OAuth2和使用RestTemplate进行HTTP调用是经