请说明ADC中单次、连续、扫描的含义。
时间: 2024-06-05 15:07:11 浏览: 150
ADC是模拟信号转换为数字信号的模块,其中包含单次、连续和扫描三种转换模式。
单次转换模式是指ADC只进行一次转换,转换一次后输出结果,然后停止转换。
连续转换模式是指ADC会不断地进行转换,每次转换完成后,自动开始下一次转换。输出结果可以实时地从数据寄存器中读取,但需要注意数据的更新速度。
扫描转换模式是指ADC可以对多个模拟信号进行转换,将它们依次转换成数字信号,输出到相应的数据寄存器中。扫描模式可以实现对多个信号的自动转换,适用于多路信号的采集。
相关问题
请实现java中单点登录需求
在Java中实现单点登录(Single Sign-On,简称SSO)需求可以通过使用一些开源框架来简化开发过程。以下是一个简的示例,使用Spring Security和Spring Boot来实现SSO:
1. 添加依赖:
在pom.xml文件中添加以下依赖:
```xml
<dependencies>
<dependency>
<groupId>org.springframework.boot</groupId>
<artifactId>spring-boot-starter-security</artifactId>
</dependency>
<dependency>
<groupId>org.springframework.security.extensions</groupId>
<artifactId>spring-security-saml2-core</artifactId>
<version>1.0.10.RELEASE</version>
</dependency>
</dependencies>
```
2. 配置SSO:
创建一个`WebSecurityConfig`类,并配置Spring Security以启用SSO:
```java
@Configuration
@EnableWebSecurity
public class WebSecurityConfig extends WebSecurityConfigurerAdapter {
@Override
protected void configure(HttpSecurity http) throws Exception {
http
.authorizeRequests()
.antMatchers("/sso").permitAll() // 允许访问SSO登录页面
.anyRequest().authenticated()
.and()
.apply(saml())
.userDetailsService(userDetailsService()); // 配置SAML身份验证提供程序
}
private SAMLConfigurer saml() {
return new SAMLConfigurer();
}
private UserDetailsService userDetailsService() {
// 返回自定义的用户详情服务,用于验证用户身份
return new MyUserDetailsService();
}
}
```
3. 创建用户详情服务:
创建一个自定义的`UserDetailsService`实现,用于验证用户身份:
```java
@Service
public class MyUserDetailsService implements UserDetailsService {
@Override
public UserDetails loadUserByUsername(String username) throws UsernameNotFoundException {
// 根据用户名查询用户信息,并返回Spring Security的UserDetails对象
// 例如,可以查询数据库或其他存储
}
}
```
4. 创建SSO登录页面:
创建一个简单的登录页面,用于SSO登录:
```html
<!DOCTYPE html>
<html>
<head>
<title>SSO Login</title>
</head>
<body>
<h1>SSO Login</h1>
<form action="/login" method="post">
<label for="username">Username:</label>
<input type="text" id="username" name="username"><br><br>
<label for="password">Password:</label>
<input type="password" id="password" name="password"><br><br>
<input type="submit" value="Login">
</form>
</body>
</html>
```
以上是一个简单的实现单点登录的示例,使用了Spring Security和Spring Boot框架。实际应用中,还需要根据具体需求进行更详细的配置和实现。
绘制 2011 年 4 月 20 日—2011 年 4 月 21 日中单 次载客时长的直方图(组距宽度为 5 分钟);
要绘制2011年4月20日至2011年4月21日之间的单次载客时长的直方图,可以按照以下步骤进行操作:
1. 首先,从给定的数据中筛选出日期在2011年4月20日至2011年4月21日期间的数据,以获取单次载客时长的数据。
2. 接下来,计算每次载客的时长,并将其以5分钟为组距进行分组。
3. 使用Python中的matplotlib库绘制直方图,将组距宽度设置为5分钟。
以下是一个示例代码,用于实现这个任务:
```python
import matplotlib.pyplot as plt
# 假设已经有了单次载客时长的列表 durations,包含了所有在指定日期范围内的单次载客时长数据
# 计算组距
bin_width = 5 # 组距宽度为5分钟
# 计算直方图数据
bins = range(0, max(durations) + bin_width, bin_width) # 计算组距范围
plt.hist(durations, bins=bins, edgecolor='black') # 绘制直方图
# 设置图表标题和坐标轴标签
plt.title("Histogram of Single Trip Durations (April 20-21, 2011)")
plt.xlabel("Duration (minutes)")
plt.ylabel("Frequency")
# 显示图表
plt.show()
```
请注意,上述代码中的 `durations` 是一个包含单次载客时长数据的列表,你需要根据你的具体数据进行替换。
这段代码将绘制出指定日期范围内单次载客时长的直方图,横轴表示时长(以分钟为单位),纵轴表示频率。
阅读全文
相关推荐
大家在看
二阶有源带通滤波器设计及参数计算.doc
二阶有源带通滤波器设计及参数计算,有详细的计算过程,应用在全国大学生电子设计竞赛的综合测评里,提取基波,三次谐波,五次谐波
基于Android Studio开发的安卓的通讯录管理app
功能包含:新增联系人、编辑联系人、删除联系人、拨打电话、发送短信等相关操作。 资源包含源码:1、apk安装包 2、演示视频 3、 基本安装环境、4、运行文档 5、以及源代码
seadas海洋遥感软件使用说明
这是一个海洋遥感软件seadas的使用文档,希望这个资料能对学习海洋遥感的朋友有所帮助
DX200 使用說明書.pdf
安川機器人DX200系統控制文檔,包含安川机器人操作说明,安裝解說,基础操作,使用和簡易设置说明。
[ExDui自绘]动态创建控件-易语言
功能简单,动态创建控件 排列
方便自己使用的一个小工具
(图中数据仅测试用而已)
最新推荐
K3单点登录二次开发指导文档
【K3单点登录二次开发指导文档】是针对金蝶K3系统中单点登录功能进行集成应用的技术文档,旨在帮助具有相应开发经验的人员理解并实现与K/3门户、K/3、K/3HR等应用系统的无缝对接。单点登录(Single Sign-On,SSO)是...
幼儿园安全教育管理.pptx
幼儿园安全教育管理
Pokedex: 探索JS开发的口袋妖怪应用程序
资源摘要信息:"Pokedex是一个基于JavaScript的应用程序,主要功能是收集和展示口袋妖怪的相关信息。该应用程序是用JavaScript语言开发的,是一种运行在浏览器端的动态网页应用程序,可以向用户提供口袋妖怪的各种数据,例如名称、分类、属性等。"
首先,我们需要明确JavaScript的作用。JavaScript是一种高级编程语言,是网页交互的核心,它可以在用户的浏览器中运行,实现各种动态效果。JavaScript的应用非常广泛,包括网页设计、游戏开发、移动应用开发等,它能够处理用户输入,更新网页内容,控制多媒体,动画以及各种数据的交互。
在这个Pokedex的应用中,JavaScript被用来构建一个口袋妖怪信息的数据库和前端界面。这涉及到前端开发的多个方面,包括但不限于:
1. DOM操作:JavaScript可以用来操控文档对象模型(DOM),通过DOM,JavaScript可以读取和修改网页内容。在Pokedex应用中,当用户点击一个口袋妖怪,JavaScript将利用DOM来更新页面,展示该口袋妖怪的详细信息。
2. 事件处理:应用程序需要响应用户的交互,比如点击按钮或链接。JavaScript可以绑定事件处理器来响应这些动作,从而实现更丰富的用户体验。
3. AJAX交互:Pokedex应用程序可能需要与服务器进行异步数据交换,而不重新加载页面。AJAX(Asynchronous JavaScript and XML)是一种在不刷新整个页面的情况下,进行数据交换的技术。JavaScript在这里扮演了发送请求、处理响应以及更新页面内容的角色。
4. JSON数据格式:由于JavaScript有内置的JSON对象,它可以非常方便地处理JSON数据格式。在Pokedex应用中,从服务器获取的数据很可能是JSON格式的口袋妖怪信息,JavaScript可以将其解析为JavaScript对象,并在应用中使用。
5. 动态用户界面:JavaScript可以用来创建动态用户界面,如弹出窗口、下拉菜单、滑动效果等,为用户提供更加丰富的交互体验。
6. 数据存储:JavaScript可以使用Web Storage API(包括localStorage和sessionStorage)在用户的浏览器上存储数据。这样,即使用户关闭浏览器或页面,数据也可以被保留,这对于用户体验来说是非常重要的,尤其是对于一个像Pokedex这样的应用程序,用户可能希望保存他们查询过的口袋妖怪信息。
此外,该应用程序被标记为“JavaScript”,这意味着它可能使用了JavaScript的最新特性或者流行的库和框架,例如React、Vue或Angular。这些现代的JavaScript框架能够使前端开发更加高效、模块化和易于维护。例如,React允许开发者构建可复用的UI组件,Vue则提供了数据驱动和组件化的编程方式,而Angular则是一个全面的前端框架,提供了模板、依赖注入、客户端路由等功能。
在文件名称列表中提到了"Pokedex-main",这很可能是应用程序的主文件或者项目的根目录名称。在这种情况下,主文件可能包含程序的入口点,即整个JavaScript应用程序开始执行的地方,它通常会包含对其他JavaScript文件的引用,以及初始化应用程序的代码。
综上所述,Pokedex作为一个JavaScript应用程序,涉及了前端开发的多个关键技术和概念。通过JavaScript,开发者能够实现一个功能丰富、响应用户交互、动态更新内容的应用程序,为用户提供口袋妖怪的详细信息和互动体验。
【提升R-Studio恢复效率】:RAID 5数据恢复的高级技巧与成功率
# 摘要
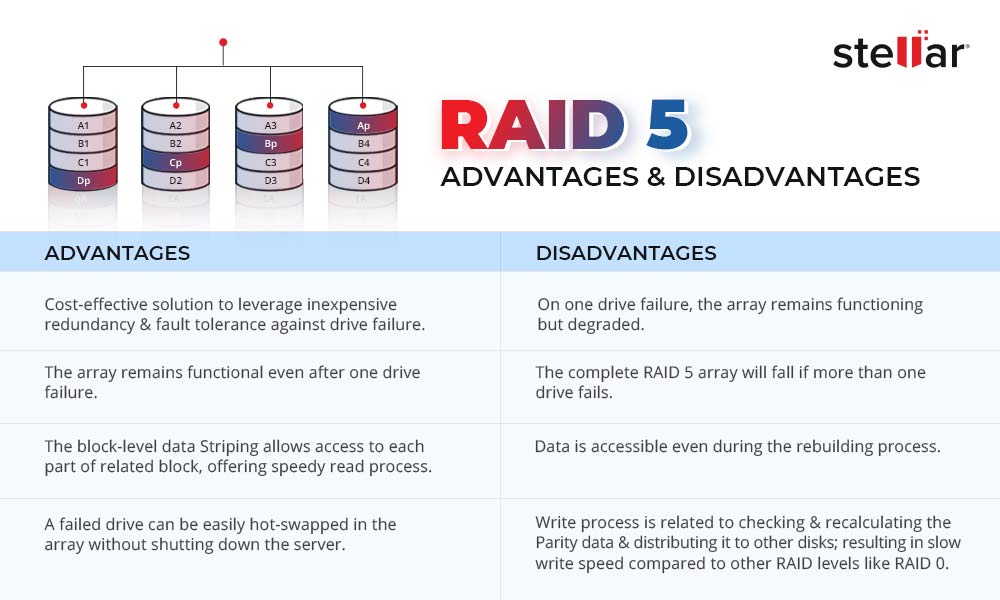
RAID 5作为一种广泛应用于数据存储的冗余阵列技术,能够提供较好的数据保护和性能平衡。本文首先概述了RAID 5数据恢复的重要性,随后介绍了RAID 5的基础理论,包括其工作原理、故障类型及数据恢复前的准备工作。接着,文章深入探讨了提升RAID 5数据恢复成功率的高级技巧,涵盖了硬件级别和软件工具的应用,以及文件系统结构和数据一致性检查。通过实际案例分析,
帮我写一段Python代码:sin波生成,设定rate,fin,size,幅值
当然可以。在Python中,我们可以使用`numpy`库来创建正弦波,并通过`tqdm`库添加进度条。下面是一个简单的示例代码,它会生成指定频率(rate)、持续时间(fin),以及样本大小(size)的正弦波,幅度可以自定义:
```python
import numpy as np
from tqdm import trange
# 定义函数生成sin波
def generate_sine_wave(rate=44100, fin=5, size=None, amplitude=1):
# 检查参数是否合理
if size is None:
size =
Laravel实用工具包:laravel-helpers概述
资源摘要信息:"Laravel开发-laravel-helpers 是一个针对Laravel框架开发者的实用程序包,它提供了许多核心功能的便捷访问器(getters)和修改器(setters)。这个包的设计初衷是为了提高开发效率,使得开发者能够快速地使用Laravel框架中常见的一些操作,而无需重复编写相同的代码。使用此包可以简化代码量,减少出错的几率,并且当开发者没有提供自定义实例时,它将自动回退到Laravel的原生外观,确保了功能的稳定性和可用性。"
知识点:
1. Laravel框架概述:
Laravel是一个基于PHP的开源Web应用框架,遵循MVC(Model-View-Controller)架构模式。它旨在通过提供一套丰富的工具来快速开发Web应用程序,同时保持代码的简洁和优雅。Laravel的特性包括路由、会话管理、缓存、模板引擎、数据库迁移等。
2. Laravel核心包:
Laravel的核心包是指那些构成框架基础的库和组件。它们包括但不限于路由(Routing)、请求(Request)、响应(Response)、视图(View)、数据库(Database)、验证(Validation)等。这些核心包提供了基础功能,并且可以被开发者在项目中广泛地使用。
3. Laravel的getters和setters:
在面向对象编程(OOP)中,getters和setters是指用来获取和设置对象属性值的方法。在Laravel中,这些通常指的是辅助函数或者服务容器中注册的方法,用于获取或设置框架内部的一些配置信息和对象实例。
4. Laravel外观模式:
外观(Facade)模式是软件工程中常用的封装技术,它为复杂的子系统提供一个简化的接口。在Laravel框架中,外观模式广泛应用于其核心类库,使得开发者可以通过简洁的类方法调用来执行复杂的操作。
5. 使用laravel-helpers的优势:
laravel-helpers包作为一个辅助工具包,它将常见的操作封装成易于使用的函数,使开发者在编写Laravel应用时更加便捷。它省去了编写重复代码的麻烦,降低了项目的复杂度,从而加快了开发进程。
6. 自定义实例和回退机制:
在laravel-helpers包中,如果开发者没有提供特定的自定义实例,该包能够自动回退到使用Laravel的原生外观。这种设计使得开发者在不牺牲框架本有功能的前提下,能够享受到额外的便利性。
7. Laravel开发实践:
在实际的开发过程中,开发者可以通过引入laravel-helpers包来简化代码的编写。例如,该包可能提供了一系列用于验证输入数据的快速方法,或者是一些处理常见任务的辅助函数,如快速生成响应、执行数据库查询、发送邮件等。
8. 开源贡献和社区支持:
laravel-helpers作为一个开源包,它的维护和更新依赖于社区的贡献。开发者在使用过程中也可以参与到包的开发与改进中,为Laravel社区做出贡献,并从社区中获取帮助和反馈。
总结而言,laravel-helpers包通过提供一系列的getters和setters工具函数,极大地提升了Laravel开发的效率与便利性。它不仅遵循了Laravel的核心设计理念,还通过回退机制保证了与框架原生功能的兼容性。对于希望优化其开发流程的Laravel开发者来说,这无疑是一个宝贵的资源。
【R-Studio技术路径】:从RAID 5数据恢复基础到高级操作

# 摘要
随着信息技术的发展,数据丢失问题日益突出,RAID 5作为常见的数据存储解决方案,其数据恢复技术显得尤为重要。本文首先介绍了RAID 5数据恢复的基础知识,然后详细解析了R-Studio软件的界面和核心功能,重点探讨了其在RAID 5数据恢复中的应用实践,包括磁盘镜像创建、数据提取、数据重组策略及一致性验证。进一步,本文还涉及了R-Studio的进阶技术,如脚本编
如果我想要排除从这周周一开始的数据,应该怎么改,<date_sub(next_day(now(), 'Mon'), 7)吗?
要排除从这周周一开始的数据,你可以使用以下SQL语句:
```sql
WHERE date_column < date_sub(next_day(date_sub(current_date, dayofweek(current_date) - 2), 'Mon'), 7)
```
解释一下这个语句:
1. `current_date` 获取当前日期。
2. `dayofweek(current_date) - 2` 计算出本周周一的日期。
3. `date_sub(current_date, dayofweek(current_date) - 2)` 获取本周周一的日期。
4. `nex
Elasticsearch Analysis IK插件7.6.0版本发布
资源摘要信息:"elasticsearch-analysis-ik-7.6.0.zip包含的文件主要用于扩展Elasticsearch在中文分词处理上的能力。Elasticsearch是一个基于Lucene构建的开源搜索引擎,广泛用于全文检索和数据分析。随着互联网中文内容的爆发式增长,对于中文的搜索和分析需求日益增加,Elasticsearch默认的分词器对于中文的处理能力有限,因此需要引入专门的中文分词插件来提升其处理能力。IK分词器(Intelligent Keyword)是一个流行的中文分词插件,它提供了基于词典和统计两种分词模式,能够对中文文本进行更加智能的分词处理。"
详细知识点:
1. Elasticsearch简介:
Elasticsearch是一个分布式的、RESTful接口的搜索和分析引擎。它能够近乎实时地存储、搜索和分析大量数据。由于其快速、可扩展以及易于使用的特性,Elasticsearch在日志分析、安全、电商、社区搜索等多个领域得到了广泛的应用。Elasticsearch使用Lucene作为其搜索引擎的核心。
2. 中文分词:
中文分词是将连续的文本切割成有意义的词汇序列的过程。由于中文语言的特殊性,它不像英文有明确的单词边界,因此中文分词是中文信息处理的一个重要环节。分词的效果直接影响到搜索引擎的搜索准确度和效率。
3. Elasticsearch的中文分词插件IK:
IK分词器是一款基于Java语言开发的开源中文分词器,广泛应用于搜索引擎和文本挖掘领域。它能够适应多种分词场景,包括通用分词、搜索分词、新词发现等。IK分词器支持两种分词模式,一种是基于最大匹配算法的ik_max_word模式,它会尽可能多地切分出所有可能的词;另一种是ikSmart模式,它是一种更为精确的分词模式。
4. Elasticsearch Analysis插件:
Elasticsearch的分析模块(Analysis)负责文本的处理,包括分词(Tokenization)、标准化(normalization)和过滤(Filtering)。分析插件是Elasticsearch的核心组成部分,它允许用户扩展和自定义分析过程。通过添加自定义分析插件,Elasticsearch可以支持多种语言和特定的文本处理需求。
5. Elasticsearch 7.6.0版本特性:
Elasticsearch的每个版本都会带来一系列的更新和改进。在7.6.0版本中,可能会包含性能优化、新特性添加、bug修复等。用户在升级使用时,需要特别关注版本更新日志,了解与旧版本相比的具体改进之处。
6. 压缩包文件说明:
"elasticsearch-analysis-ik-7.6.0.tar.zip"压缩包内除了包含核心的分词器插件"elasticsearch-analysis-ik-7.6.0.jar"外,还包含了一些可能用于插件运行时所必需的其他JAR包,如:"httpclient-4.5.2.jar"、"httpcore-4.4.4.jar"、"commons-codec-1.9.jar"、"commons-logging-1.2.jar"。这些文件是运行插件时依赖的网络和工具类库。此外,还包含了安全策略文件"plugin-security.policy"和插件描述文件"plugin-descriptor.properties",以及一个配置文件夹"config",用于存放分词器相关的配置文件。
7. 应用IK分析插件:
在Elasticsearch集群中应用IK分析插件通常需要下载相应版本的插件压缩包,解压后将插件文件拷贝到Elasticsearch安装目录的"plugins"文件夹下。接着需要重启Elasticsearch服务使插件生效。配置IK分词器时,可以在Elasticsearch的配置文件中指定IK分词器的相关参数,或者在索引的映射中直接指定分词器。
总结上述知识点,我们可以看出,Elasticsearch-analysis-ik-7.6.0.zip是一个专门为Elasticsearch 7.6.0版本设计的中文分词插件压缩包,它的目的是为了增强Elasticsearch对于中文文本的搜索和分析能力。通过对IK分词器的理解和应用,用户可以更好地利用Elasticsearch进行中文内容的处理和检索。
【R-Studio恢复工具解析】:RAID 5恢复的功能优势与实际应用
# 摘要
RAID 5技术因其高效的数据存储和容错能力被广泛应用。然而,数据丢失问题仍时有发生,R-Studio作为一种功能强大的恢复工具,为解决这一问题提供了有效的技术方案。本文概述了RAID 5的基本概念、R-Studio的理论基础及其数据恢复原理。通过分析R-Studio的主要功能和恢复流程,本文还探讨了该工具