Python深度学习实战:计算机视觉入门指南
需积分: 0 141 浏览量
更新于2024-07-17
收藏 9.56MB PDF 举报
《深度学习计算机视觉实战指南:Python版》(Deep Learning for Computer Vision with Python Practitioner)是由Adrian Rosebrock博士编写的实用教材,适合那些希望深入了解深度学习在计算机视觉领域应用的Python开发者。该书是第一版的1.1.0,版权由Adrian Rosebrock持有,发布于PyImageSearch.com。
本书的核心内容围绕深度学习技术在计算机视觉中的实践展开,重点介绍如何使用Python进行实现。作者强调了数据增强在训练深度学习模型中的关键作用,它能够帮助提高模型的泛化能力,防止过拟合,并通过实例来演示其效果。第2章“数据增强”深入探讨了数据增强的概念,包括:
1. **什么是数据增强?** 数据增强是一种策略,通过对原始数据进行一系列变换(如旋转、翻转、缩放、裁剪等),生成多样化的训练样本,使模型能更好地适应各种输入变化。
2. **可视化数据增强** - 通过可视化展示,读者可以直观地理解数据增强过程对图像带来的变化,这对于理解其背后原理至关重要。
3. **对比训练与数据增强** - 分别比较使用和不使用数据增强时模型的训练效果。例如,书中提到的Flowers-17数据集,通过对比实验展示了数据增强显著提高了模型在花卉分类任务上的性能。
4. **具体案例** - 提供了Flowers-17数据集的不同处理方式,比如无数据增强的情况和有数据增强的情况,对比分析了两种情况下模型的训练结果和验证准确率。
5. **预处理技巧** - 除了数据增强,还介绍了“aspect-aware preprocessing”,即考虑图像宽高比的预处理方法,以确保在不同尺度下的图像都能得到有效处理。
此外,书籍还鼓励读者购买正版支持作者,以推动更多高质量的IT教育资源的产生。全书旨在通过实际操作和实例,帮助读者掌握深度学习在计算机视觉中的应用,无论你是初学者还是有一定经验的开发人员,都能从中受益匪浅。通过阅读这本书,你将能构建自己的深度学习项目,解决实际的计算机视觉问题。
14 Chapter 2. Data Augmentation
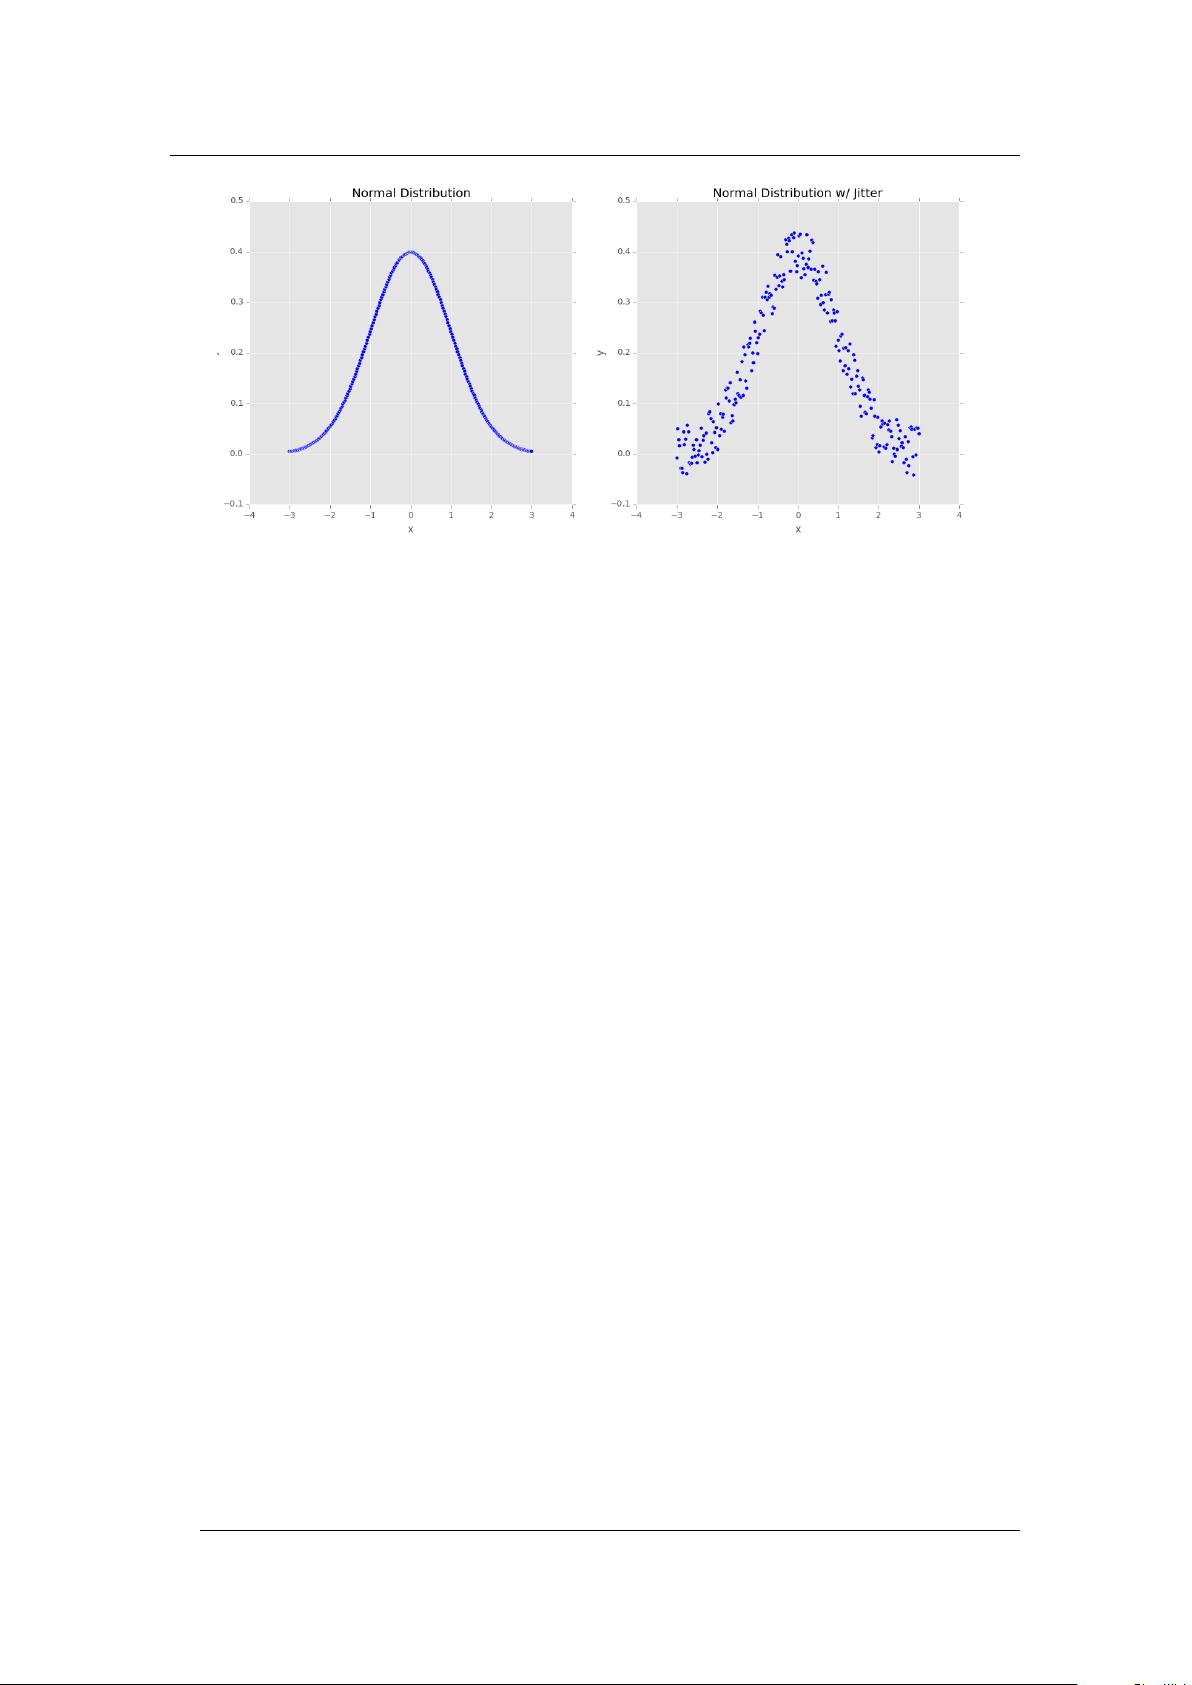
Figure 2.1:
Left:
A sample of 250 data points that follow a normal distribution exactly.
Right:
Adding a small amount of random “jitter” to the distribution. This type of data augmentation can
increase the generalizability of our networks.
Let’s consider the Figure 2.1 (left) of a normal distribution with zero mean and unit variance.
Training a machine learning model on this data may result in us modeling the distribution exactly –
however, in real-world applications, data rarely follows such a neat distribution.
Instead, to increase the generalizability of our classifier, we may first randomly jitter points
along the distribution by adding some values
ε
drawn from a random distribution (right). Our plot
still follows an approximately normal distribution, but it’s not a perfect distribution as on the left. A
model trained on this data is more likely to generalize to example data points not included in the
training set.
In the context of computer vision, data augmentation lends itself naturally. For example, we
can obtain additional training data from the original images by apply simple geometric transforms
such as random:
1. Translations
2. Rotations
3. Changes in scale
4. Shearing
5. Horizontal (and in some cases, vertical) flips
Applying a (small) amount of these transformations to an input image will change its appearance
slightly, but it does not change the class label – thereby making data augmentation a very natural,
easy method to apply to deep learning for computer vision tasks. More advanced techniques for
data augmentation applied to computer vision include random perturbation of colors in a given
color space [6] and nonlinear geometric distortions [7].
2.2 Visualizing Data Augmentation
The best way to understand data augmentation applied to computer tasks is to simply visualize a
given input being augmented and distorted. To accomplish this visualization, let’s build a simple
Python script that uses the built-in power of Keras to perform data augmentation. Create a new file,
name it augmentation_demo.py. and insert the following code:


剩余209页未读,继续阅读
152 浏览量
110 浏览量
2018-05-28 上传
2022-08-03 上传
190 浏览量
183 浏览量
199 浏览量
107 浏览量
146 浏览量

Alpha95
- 粉丝: 1
 我的内容管理
展开
我的内容管理
展开


最新资源
- 深入解析Linux内核注释:定制与功能扩展指南
- XFire服务开发实战指南
- UML基础教程:统一建模语言的关键概念解析
- CMM1.1:软件开发能力提升与成熟度模型解析
- Java设计模式:提升复用与灵活性的编程艺术
- Java语言中的数据结构和算法实现
- C#编程挑战:从基础到高级的实战题目
- Java Servlet 2.4 规范详解
- 网上书店管理系统分析与实现
- Div+CSS布局全攻略:从入门到高级实战
- 编程初学者指南:C/C++/Java/VB书籍推荐
- 提升效率的关键:进销存管理系统需求深度解析
- Java编程思想:对象与多态
- Oracle数据库详解:从入门到精通
- SQLPLUS全面指南:命令行操作与实战技巧
- USACO全攻略:从入门到精通
