台达DVP-EC3系列编程控制器安装与安全指南
需积分: 33 51 浏览量
更新于2024-07-23
收藏 831KB PDF 举报
DVP-EC-说明书是针对台湾达电(Delta)公司生产的DVP-EC3系列可编程逻辑控制器的用户指南。该系列控制器提供了10到60个输入/输出点,适用于各种工业自动化应用。手册的主要内容包括电气规格、基本功能、安装和配线注意事项,确保用户能够正确安装、操作和维护设备。
首先,重要的是理解DVP-EC3的电气和功能特性。这些控制器具有开放型机壳设计,意味着它们需要被安装在防尘、防潮且能防护电击和振动的外壳中,以确保设备安全和性能。用户需确保只有经过适当授权的人员才能接触到设备,并且安装过程需使用专用工具或钥匙,防止未经授权的操作或意外损坏。
对于程序设计和指令,DVP-EC3与DVP-ES系列兼容,这意味着熟悉后者编程方法的用户可以直接应用到前者。详细的编程指导可在《DVP-PLC应用技术手册》中的“编程”章节找到。此外,手册还建议参考随产品提供的外围设备使用说明书,以了解特定周边设备的安装和使用方法。
需要注意的是,在安装前务必检查电源连接,避免将交流输入电源接入输入/输出信号端,以免造成严重损害。上电时不要接触任何端子,并确保接地端子正确接地,这样可以增强设备抗干扰能力,保证数据传输的稳定性和可靠性。
DVP-EC-说明书是工程师和操作员必备的参考资料,它涵盖了设备的基础配置、安全操作规范以及必要的技术支持,帮助用户有效管理和维护这一系列的PLC系统。
- 3 -
Input Points
Off → On < 25us < 50us < 10ms
Response time
On → Off < 10us < 20us < 15ms
Filter time X0 ~ X17 Approx. 10ms (0 ~ 20ms adjustable in D1020, D1021)
Output Points
Output point type Relay-R Transistor-T
Voltage specification < 240VAC, 30VDC
5 ~ 30VDC
#2
Max. frequency 1Hz Normal inputs
10kHz
#4
Off → On < 30us < 20us
Response time
On → Off
Approx. 10 ms
< 350us < 50us
Resistive 2A/1 point (5A/COM) 0.5A /1 point (4A / ZP)
Inductive
#3
15W (30VDC)
Maximum load
Lamp 20WDC/100WAC 2.5W (30VDC)
#1: Please refer to “I/O Terminal Layout” for the max. X/Y No. on each model.
#2: UP, ZP must work with external auxiliary power supply 24VDC (-15% ~ +20%), rated
consumption approx. 1mA/point.
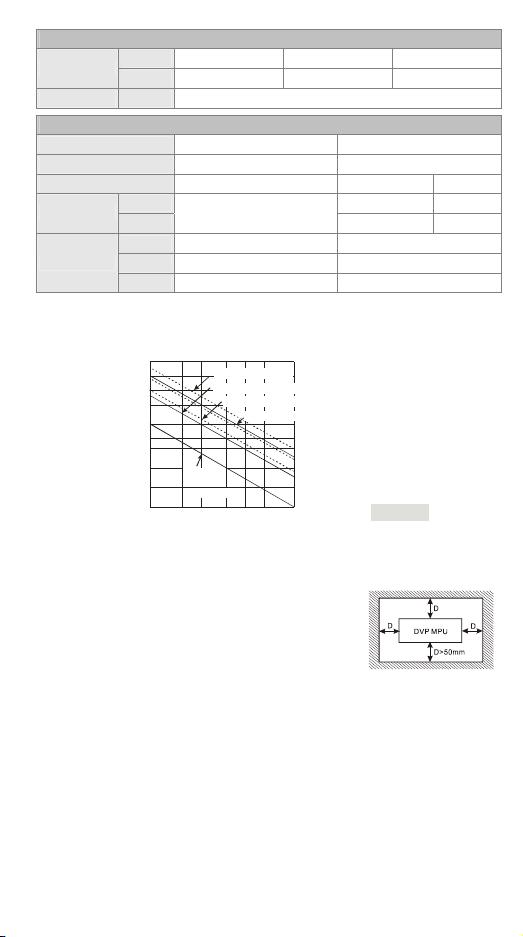
#3: Life curves
Contact
Current(A)
0.5
0.1
0.2
50
0.3 0.7 1 2
200
300
500
100
1000
2000
3000
O
p
e
r
a
t
i
o
n
(
X
1
0
)
3
120VAC Resistive
30VDC Inductive(t=7ms)
240VAC Inductive(cos 0.4)
ψ
=
120VAC Inductive(cos =0.4)
ψ
30VDC
Inductive
( t=40ms )
[ Figure 3 ]
#4: Only for output points Y0~Y3 of DVP48EC00T3 and the others are normal points.
Installation
Please install the PLC in an enclosure with sufficient space
around it to allow heat dissipation, as shown in the figure.
y Direct Mounting: Please use M4 screw according to the
dimension of the product.
y DIN Rail Mounting: When mounting the PLC to 35mm
DIN rail, be sure to use the retaining clip to stop any side-to-side movement of the
PLC and reduce the chance of wires being loose. The retaining clip is at the bottom
of the PLC. To secure the PLC to DIN rail, pull down the clip, place it onto the rail
and gently push it up. To remove the PLC, pull the retaining clip down with a flat
screwdriver and gently remove the PLC from DIN rail.
Wiring
1. Use the 12-24 AWG single-core bare wire or the multi-core wire for the I/O wiring.
The PLC terminal screws should be tightened to 3.80 kg-cm (3.30 in-lbs) and please
use 60/75°C copper conductor only.
2. DO NOT wire empty terminal. DO NOT place the input signal wire and output power
wire in the same wiring circuit.
3. DO NOT drop tiny metallic conductor into the PLC while screwing and wiring.
剩余17页未读,继续阅读
2769 浏览量
166 浏览量
835 浏览量
1215 浏览量
166 浏览量
1215 浏览量
835 浏览量

sq760818
- 粉丝: 1
- 资源: 3
 我的内容管理
展开
我的内容管理
展开


最新资源
- 某综合楼室外幕墙施工方案
- 市场调查与预测.zip
- Orbit Data for All Known Asteroids in MPC Database MPC数据库中所有已知小行星的轨道-数据集
- phone-book:React电话簿
- 马哥2016运维笔记
- ctw-engineering-templates:适用于Web以及其他应用的自行开发和精选的代码模板和摘录
- c++课程设计宾馆客房管理系统.zip
- 360度全景展示插件pano.js
- docker-quick-stack:使用单个脚本,在各种环境中部署docker-compose堆栈
- abstracte
- reportview.zip
- jdk1.7 64位.zip
- wireframe:此函数绘制曲面的二次采样线框。-matlab开发
- XX河大桥施工组织设计
- 代码学院
- Amazon lookup for Flipkart-crx插件
