没有合适的资源?快使用搜索试试~ 我知道了~
首页TMS320F28377 DSP硬件原理图.pdf
TMS320F28377 DSP硬件原理图.pdf
5星 · 超过95%的资源 需积分: 36 134 下载量 104 浏览量
更新于2023-03-03
评论 4
收藏 751KB PDF 举报
TI公司TMS320F28377 DSP硬件原理图,包含最小系统搭建,复位电路、CAN总线、PWM输出、DAC,以及元器件的BOM表,可作为硬件设计参考资料。
资源详情
资源评论
资源推荐
1
SPRUI25D–June 2015–Revised March 2019
Submit Documentation Feedback
Copyright © 2015–2019, Texas Instruments Incorporated
LAUNCHXL-F28377S overview
User's Guide
SPRUI25D–June 2015–Revised March 2019
LAUNCHXL-F28377S overview
The C2000™ Delfino™ LaunchPad™, LAUNCHXL-F28377S, is a complete low-cost development board
for the Texas Instruments Delfino F2837xS devices. The LAUNCHXL-F28377S kit features all the
hardware and software necessary to develop applications based on the F2837xS microprocessor. The
LaunchPad is based on the superset F28377S device, and easily allows users to migrate to lower cost
F2837xS devices once the design needs are known. It offers an on-board JTAG emulation tool allowing
direct interface to a PC for easy programming, debugging, and evaluation. In addition to JTAG emulation,
the USB interface provides a UART serial connection from the F2837xS device to the host PC.
Contents
1 Introduction ................................................................................................................... 2
2 Kit Contents................................................................................................................... 3
3 Installation .................................................................................................................... 3
4 Getting Started with the LAUNCHXL-F28377S.......................................................................... 3
5 Hardware Configuration..................................................................................................... 5
6 LAUNCHXL-F28377S Hardware........................................................................................... 6
7 References .................................................................................................................. 19
8 Frequently Asked Questions (FAQ)...................................................................................... 20
List of Figures
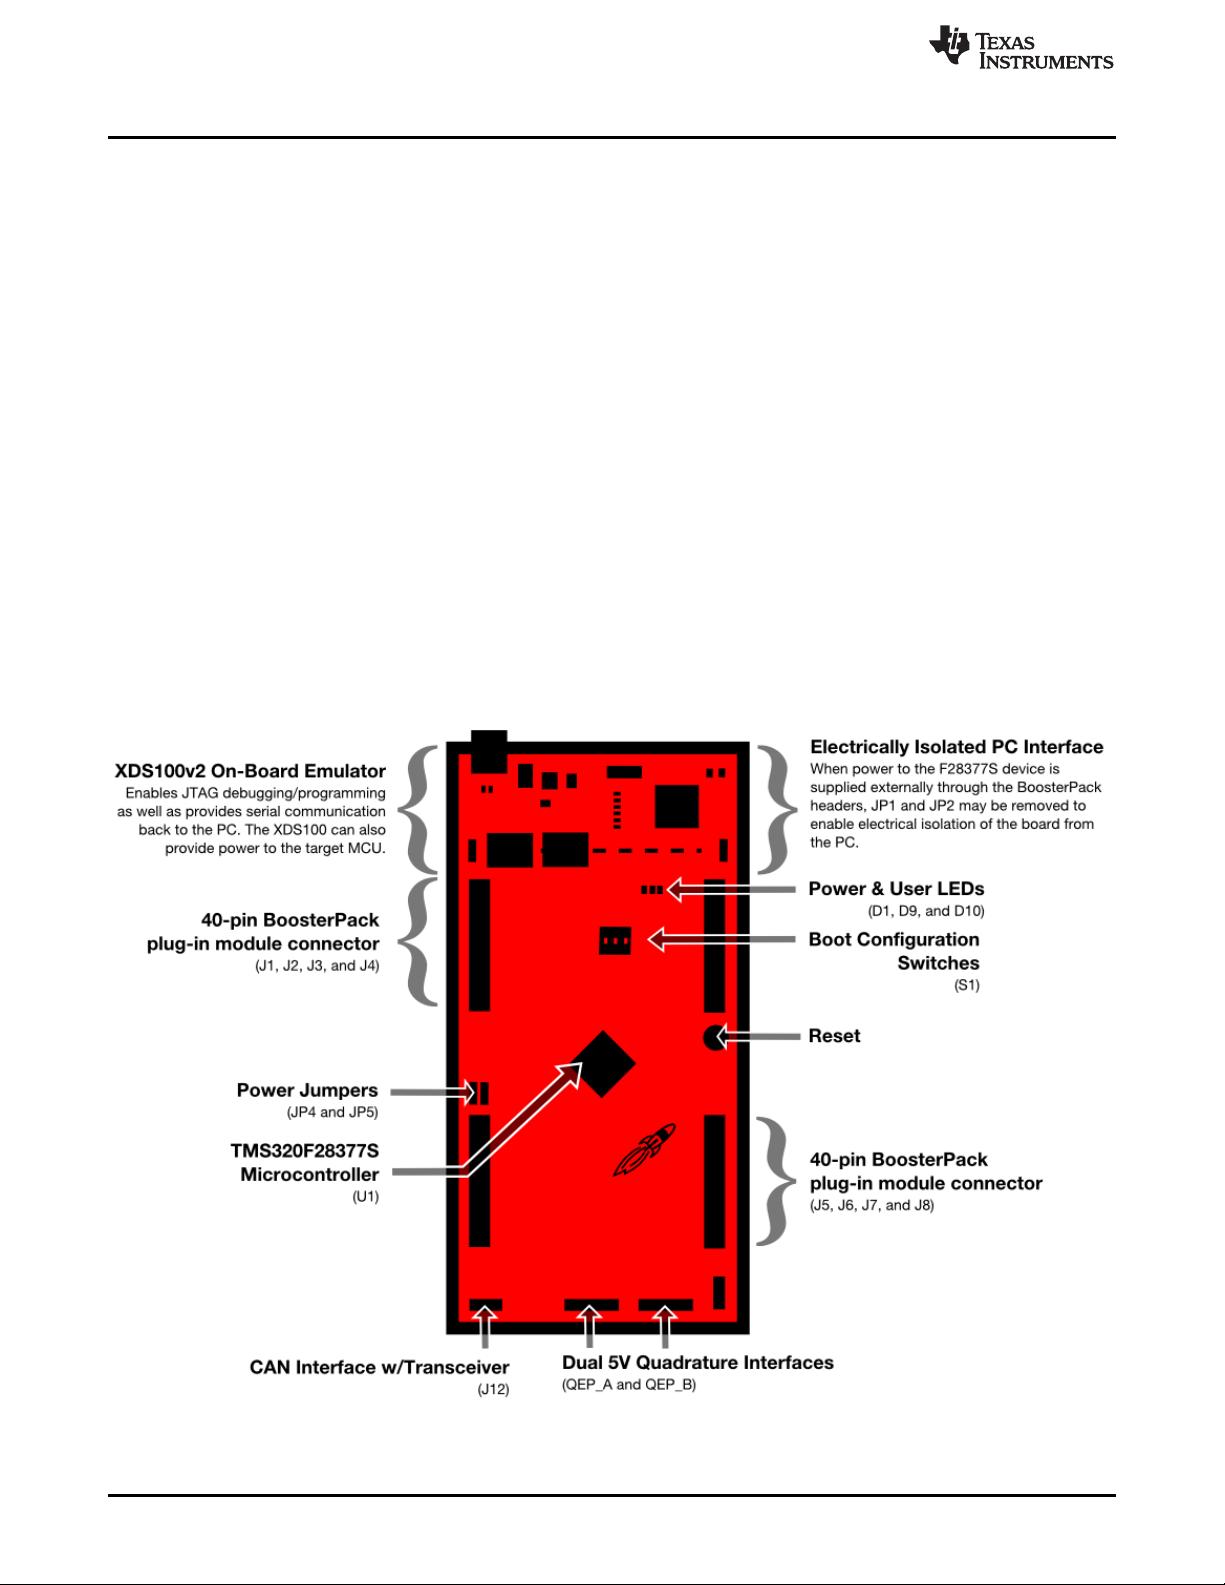
1 LAUNCHXL-F28377S Board Overview................................................................................... 2
2 LAUNCHXL-F28377S_B Block Diagram Schematic.................................................................... 8
3 LAUNCHXL-F28377S XDS100v2 Schematic............................................................................ 9
4 LAUNCHXL-F28377S Power Schematic................................................................................ 10
5 LAUNCHXL-F28377S_A Schematic..................................................................................... 11
6 LAUNCHXL-F28377S_B Schematic..................................................................................... 12
7 LAUNCHXL-F28377S BoosterPack Schematic ........................................................................ 13
8 Top Silk...................................................................................................................... 14
9 Top Copper ................................................................................................................. 14
10 Inner Copper 1.............................................................................................................. 14
11 Inner Copper 2.............................................................................................................. 14
12 Bottom Silk .................................................................................................................. 14
13 Bottom Copper.............................................................................................................. 14
List of Tables
1 F28377S LaunchPad Pin Out and Pin Mux Options - J1, J3 .......................................................... 6
2 F28377S LaunchPad Pin Out and Pin Mux Options - J4, J2 .......................................................... 6
3 F28377S LaunchPad Pin Out and Pin Mux Options - J5, J7 .......................................................... 7
4 F28377S LaunchPad Pin Out and Pin Mux Options - J8, J6 .......................................................... 7
5 LAUNCHXL-F28377S Bill of Materials .................................................................................. 15
Introduction
www.ti.com
2
SPRUI25D–June 2015–Revised March 2019
Submit Documentation Feedback
Copyright © 2015–2019, Texas Instruments Incorporated
LAUNCHXL-F28377S overview
Trademarks
C2000, Delfino, LaunchPad, Code Composer Studio are trademarks of Texas Instruments.
Windows is a registered trademark of Microsoft Corporation in the United States and/or other countries.
All other trademarks are the property of their respective owners.
1 Introduction
Users can download an unrestricted copy of the latest version of Code Composer Studio™ IDE version 6
to write, download, and debug applications on the LAUNCHXL-F28377S board. The debugger is
unobtrusive, allowing the user to run an application at full speed with hardware breakpoints and single
stepping available while consuming no extra hardware resources.
As shown in Figure 1, the LAUNCHXL-F28377S C2000 LaunchPad features include:
• USB debugging and programming interface via a high-speed galvanically isolated XDS100v2 debug
probe featuring a USB/UART connection
• Superset F28377S device that allows applications to easily migrate to lower cost devices
• Two user LEDs
• Device reset pushbutton
• Easily accessible device pins for debugging purposes or as sockets for adding customized extension
boards
• Dual 5V quadrature encoder interfaces
• CAN Interface with integrated transceiver
• Boot selection switches
Figure 1. LAUNCHXL-F28377S Board Overview
www.ti.com
Kit Contents
3
SPRUI25D–June 2015–Revised March 2019
Submit Documentation Feedback
Copyright © 2015–2019, Texas Instruments Incorporated
LAUNCHXL-F28377S overview
2 Kit Contents
The LAUNCHXL-F28377S LaunchPad experimenter kit includes the following items:
• C2000 Delfino LaunchPad Board (LAUNCHXL-F28377S)
• Mini USB-B Cable, 0.5m
• Quick Start Guide
2.1 Revisions
The first production revision of the LAUNCHXL-F28377S in 2016 was Revision 1.0.
All Revisions:
• Resistor R7 in the oscillator circuit is incorrectly placed or should not be installed. This resistor may
impact startup time or robustness of the clocking circuit over the full operating range of the MCU or
different physical layouts of this circuit. The probability is low that this resistor will have any impact on
the functionality of this EVM as is not intended to be operated outside of Standard Temperature and
Pressure in a lab or prototype environment. Do not use this circuit as reference. Follow the
requirements for the Oscillator schematic as documented in the MCU Datasheet.
3 Installation
The F28377S LaunchPad is supported in Code Composer Studio.
3.1 Code Composer Studio
3.1.1 Download the Required Software
Code Composer Studio IDE is available for free without any restriction when used with the XDS100 debug
probe on the C2000 LaunchPad. The software can be downloaded from the C2000 LaunchPad page at
ti.com/launchpad. At this site, you can also download a copy of controlSUITE that includes drivers,
examples, and other support software needed to get started.
3.1.2 Install the Software
Once downloaded, install Code Composer Studio and the controlSUITE package.
3.1.3 Install the Hardware
After Code Composer Studio is installed, plug the supplied USB cable into the C2000 LaunchPad board
and into an available USB port on your computer.
Windows
®
will automatically detect the hardware and ask you to install software drivers. Let Windows run
a search for the drivers and automatically install them. After Windows successfully installs the drivers for
the integrated XDS100v2 debug probe, your LaunchPad is now ready for use.
4 Getting Started with the LAUNCHXL-F28377S
4.1 Getting Started
The first time the LAUNCHXL-F28377S is used, a demo application automatically starts when the board is
powered from a USB host. If your board does not start the demo application, try placing S1 in the following
positions and resetting the board: UP - UP - DOWN. To start the demo, connect the LAUNCHXL-F28377S
with the included mini-USB cable to a free USB port. The demo application starts with the LEDs flashing
to show the device is active.
Getting Started with the LAUNCHXL-F28377S
www.ti.com
4
SPRUI25D–June 2015–Revised March 2019
Submit Documentation Feedback
Copyright © 2015–2019, Texas Instruments Incorporated
LAUNCHXL-F28377S overview
4.2 Demo Application, ADC Sampling
The LAUNCHXL-F28377S includes a pre-programmed TMS320F28377S device. When the LaunchPad is
connected via USB, the demo starts with an LED flash sequence. After a few seconds the device switches
into an ADC sample mode.
Each second the ADC is sampled and the sample data is relayed to you. If the sample is above mid-scale
(2048), the red LED will light. However, if the sample is below mid-scale the blue LED will light.
In addition to the LED display, sample information is also displayed on your PC through the USB/UART
connection. To view the UART information on your PC, first figure out the COM port associated with the
LaunchPad. To do this in Windows, right click on My Computer and click on Properties. In the dialog box
that appears, click on the Hardware tab and open Device Manager. Look for an entry under Ports (COM &
LPT) titled "USB Serial Port (COMX)", where X is a number. Remember this number for when you open a
serial terminal. The demo applications UART data was written and debugged using PuTTY, and for the
best user experience we recommend you use PuTTY to view the UART data. PuTTY can be downloaded
from the following URL:
http://www.chiark.greenend.org.uk/~sgtatham/putty/download.html
Open your serial terminal program and open the COM port you found previously in device manager with
the following settings: 115200 Baud, 8 data bits, no parity, 1 stop bit. After opening the serial port in your
serial terminal, reset the Launchpad with the reset push button and observe the serial terminal for a
surprise.
4.3 Program and Debug the ADC Sample Demo Application
The project and associated source code for the C2000 Delfino LaunchPad demo is included in the
controlSUITE software package and should automatically be found by the TI Resource Explorer in Code
Composer Studio v6. In the resource explorer, open the controlSUITE folder and then the Development
Tools entry and look for the C2000 LaunchPad line item. Expand this item and LAUNCHXL-F28377S,
then select the LaunchPad Demo Application. Follow the steps in the main pane of the resource explorer
to import, build, debug, and run this application.
4.4 Using other Examples
Including the LaunchPad demo example described above, controlSUITE provides many examples
demonstrating a majority of the features of the F2837x MCU. Most examples are configured by default to
use the other hardware which has a different on-board clocking circuit. As such, some examples may not
work as intended without minor modification. To make this easier on the designer, compiler switch has
been added to automatically pick the proper clock configuration based on adding "_LAUNCHXL_F28377S"
as a predefined symbol in the project properties. Refer to for more information on how and where to define
this symbol.
www.ti.com
Hardware Configuration
5
SPRUI25D–June 2015–Revised March 2019
Submit Documentation Feedback
Copyright © 2015–2019, Texas Instruments Incorporated
LAUNCHXL-F28377S overview
5 Hardware Configuration
The F28377S LaunchPad provides users with several options on how to configure the board.
5.1 ADC Resolution
While the F28377S device has a 16 bit ADC, this development kit has been designed to use the ADC in
its 12-bit mode. The user can use the ADC in its 16-bit mode by driving the proper differential signals into
the ADC. Performance will not be on par with the data sheet [1] due to the reference circuitry being
designed to match the ADC's 12-bit mode.
5.2 Power Domain
The F28377S LaunchPad has several different power domains to enable JTAG isolation. Jumpers JP1,
JP2, JP4, and JP5 configure where power is passed.
Jumper Power Domain
JP1 Enable 3.3 V from USB (disables isolation)
JP2 Enable GND from USB (disables isolation)
JP4 Connects target MCU 3.3 V to second set of BoosterPack
headers
JP5 Connects target MCU 5 V to second set of BoosterPack headers
5.3 Boot Mode Selection
The LaunchPad's F28377S device includes a boot ROM that performs some basic start-up checks and
allows for the device to boot in many different ways. Most users will either want to perform an emulation
boot or a boot to flash (if they are running the application standalone). S1 has been provided to allow
users to easily configure the pins that the bootROM checks to make this decision. The switches on S1
correspond to:
Switch Function
1 GPIO84
2 GPIO72
3 TRSTn
Keep in mind that the debugger does not connect if the device is not in the emulation boot mode (TRST
switch in the up position). More information about boot mode selection can be found in the Boot ROM
section of the TMS320F2837xS Delfino Microcontrollers Technical Reference Manual (SPRUHX5).
5.4 Connecting a BoosterPack
The F28377S LaunchPad is the perfect experimenter board to start hardware development with the
F2837xS devices. All of the connectors are aligned in a 0.1-in (2.54-mm) grid to allow easy and
inexpensive development of add on boards called BoosterPacks. These satellite boards can access all of
the GPIO and analog signals. The the pin out of the connectors can be found in Section 5.
5.5 Device Migration Path
Applications developed on the LAUNCHXL-F28377S can easily be migrated to any of these lower cost
devices in the F2837xS family:
Part Number Description
TMS320F28377S 32 Bit Real Time Microcontroller, 200 Mhz, 1024KB Flash, 164KB RAM, 16 Bit ADC
TMS320F28376S 32 Bit Real Time Microcontroller, 200 Mhz, 512KB Flash, 132KB RAM, 16 Bit ADC
TMS320F28375S 32 Bit Real Time Microcontroller, 200 Mhz, 1024KB Flash, 164KB RAM, 12 Bit ADC
TMS320F28374S 32 Bit Real Time Microcontroller, 200 Mhz, 512KB Flash, 132KB RAM, 12 Bit ADC
剩余21页未读,继续阅读
euroue
- 粉丝: 1
- 资源: 7
上传资源 快速赚钱
- 我的内容管理 收起
- 我的资源 快来上传第一个资源
- 我的收益 登录查看自己的收益
- 我的积分 登录查看自己的积分
- 我的C币 登录后查看C币余额
- 我的收藏
- 我的下载
- 下载帮助
会员权益专享
最新资源
- RTL8188FU-Linux-v5.7.4.2-36687.20200602.tar(20765).gz
- c++校园超市商品信息管理系统课程设计说明书(含源代码) (2).pdf
- 建筑供配电系统相关课件.pptx
- 企业管理规章制度及管理模式.doc
- vb打开摄像头.doc
- 云计算-可信计算中认证协议改进方案.pdf
- [详细完整版]单片机编程4.ppt
- c语言常用算法.pdf
- c++经典程序代码大全.pdf
- 单片机数字时钟资料.doc
- 11项目管理前沿1.0.pptx
- 基于ssm的“魅力”繁峙宣传网站的设计与实现论文.doc
- 智慧交通综合解决方案.pptx
- 建筑防潮设计-PowerPointPresentati.pptx
- SPC统计过程控制程序.pptx
- SPC统计方法基础知识.pptx
资源上传下载、课程学习等过程中有任何疑问或建议,欢迎提出宝贵意见哦~我们会及时处理!
点击此处反馈
安全验证
文档复制为VIP权益,开通VIP直接复制
信息提交成功
评论5