没有合适的资源?快使用搜索试试~ 我知道了~
首页使用MDK开发S32k方法 流程.pdf
资源详情
资源评论
资源推荐

Copyright © 2017 ARM Ltd. All rights reserved
NXP S32K Cortex-M4 Lab using ARM
®
Keil™ MDK 5 toolkit www.keil.com
1
The latest version of this document is here: www.keil.com/appnotes/docs/apnt_299.asp
NXP S32K: Cortex-M4 Tutorial
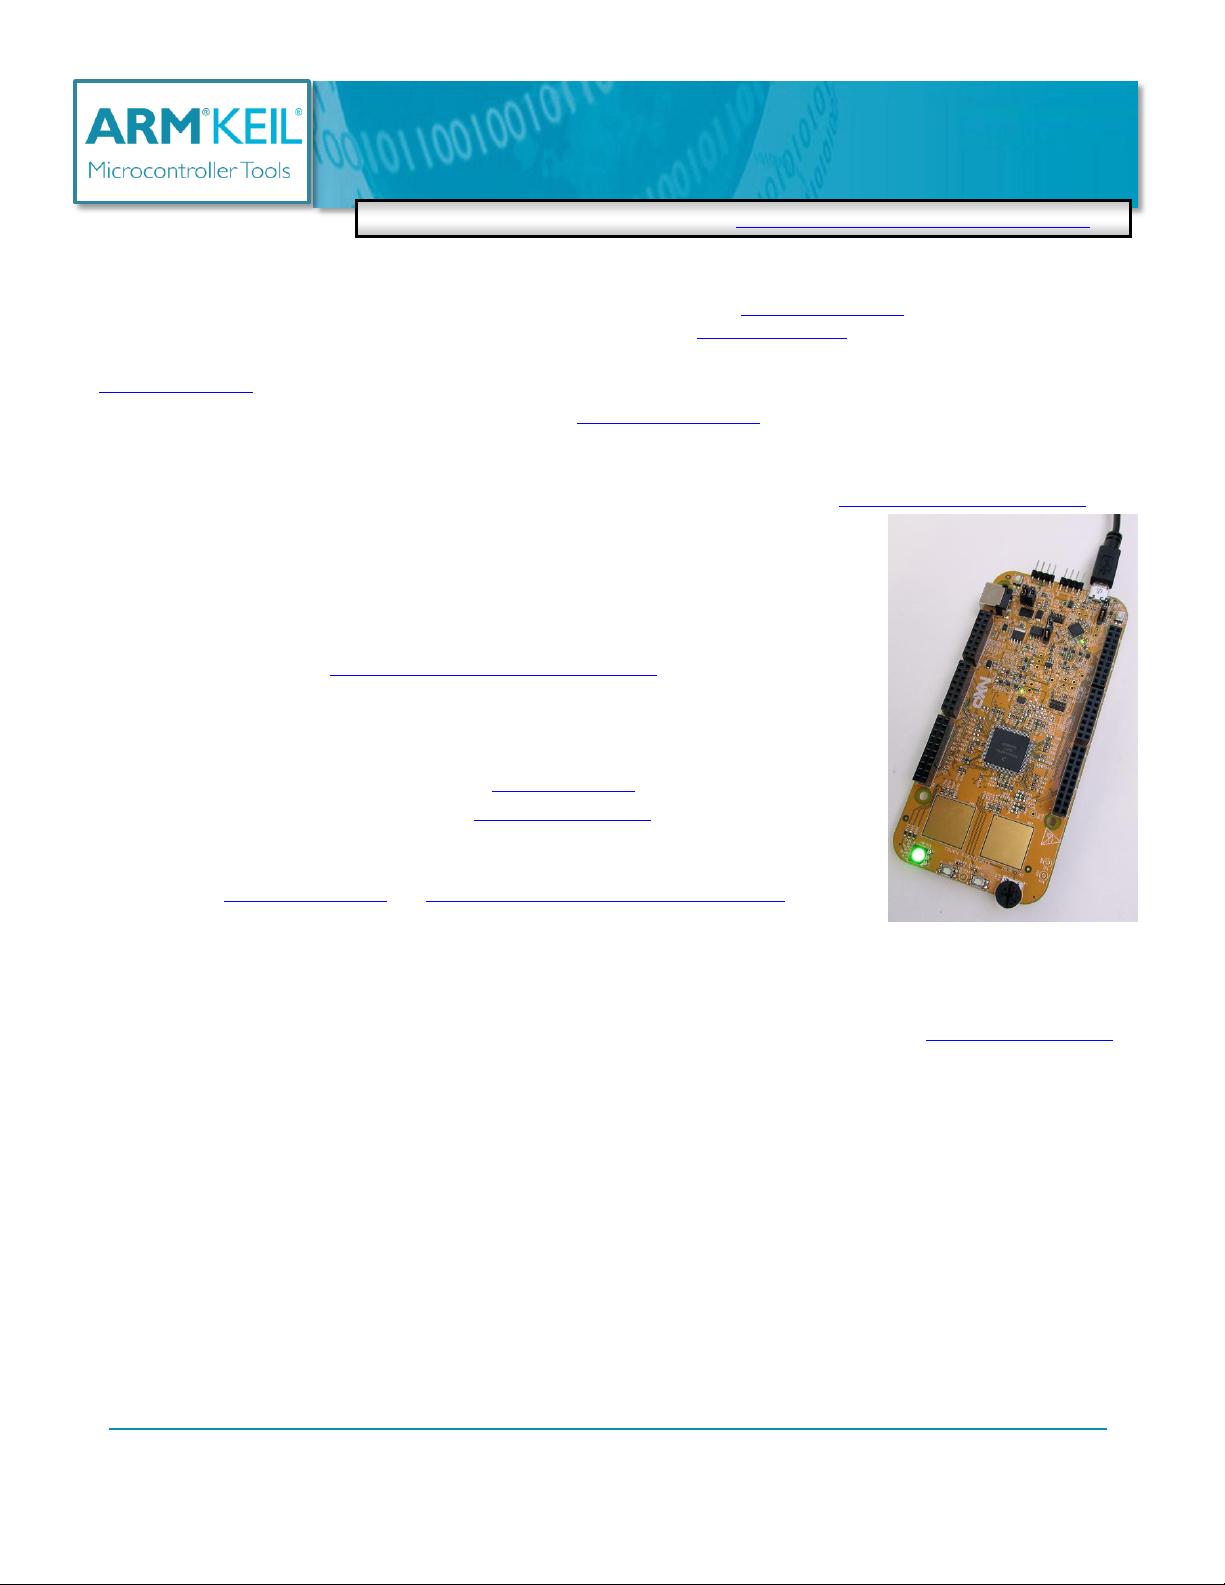
Using the S32K144EVB evaluation board
ARM Keil MDK 5 Toolkit Spring 2017 V 0.4b bob.boys@arm.com
Introduction:
The purpose of this lab is to introduce you to the NXP S32K Cortex
®
-M4 processor using the ARM
®
Keil
®
MDK toolkit
featuring the IDE μVision
®
. We will demonstrate all debugging features available on this processer. At the end of this tutorial,
you will be able to confidently work with these processors and Keil MDK. See www.keil.com/NXP.
We recommend you obtain the new Getting Started MDK 5: from here: www.keil.com/gsg.
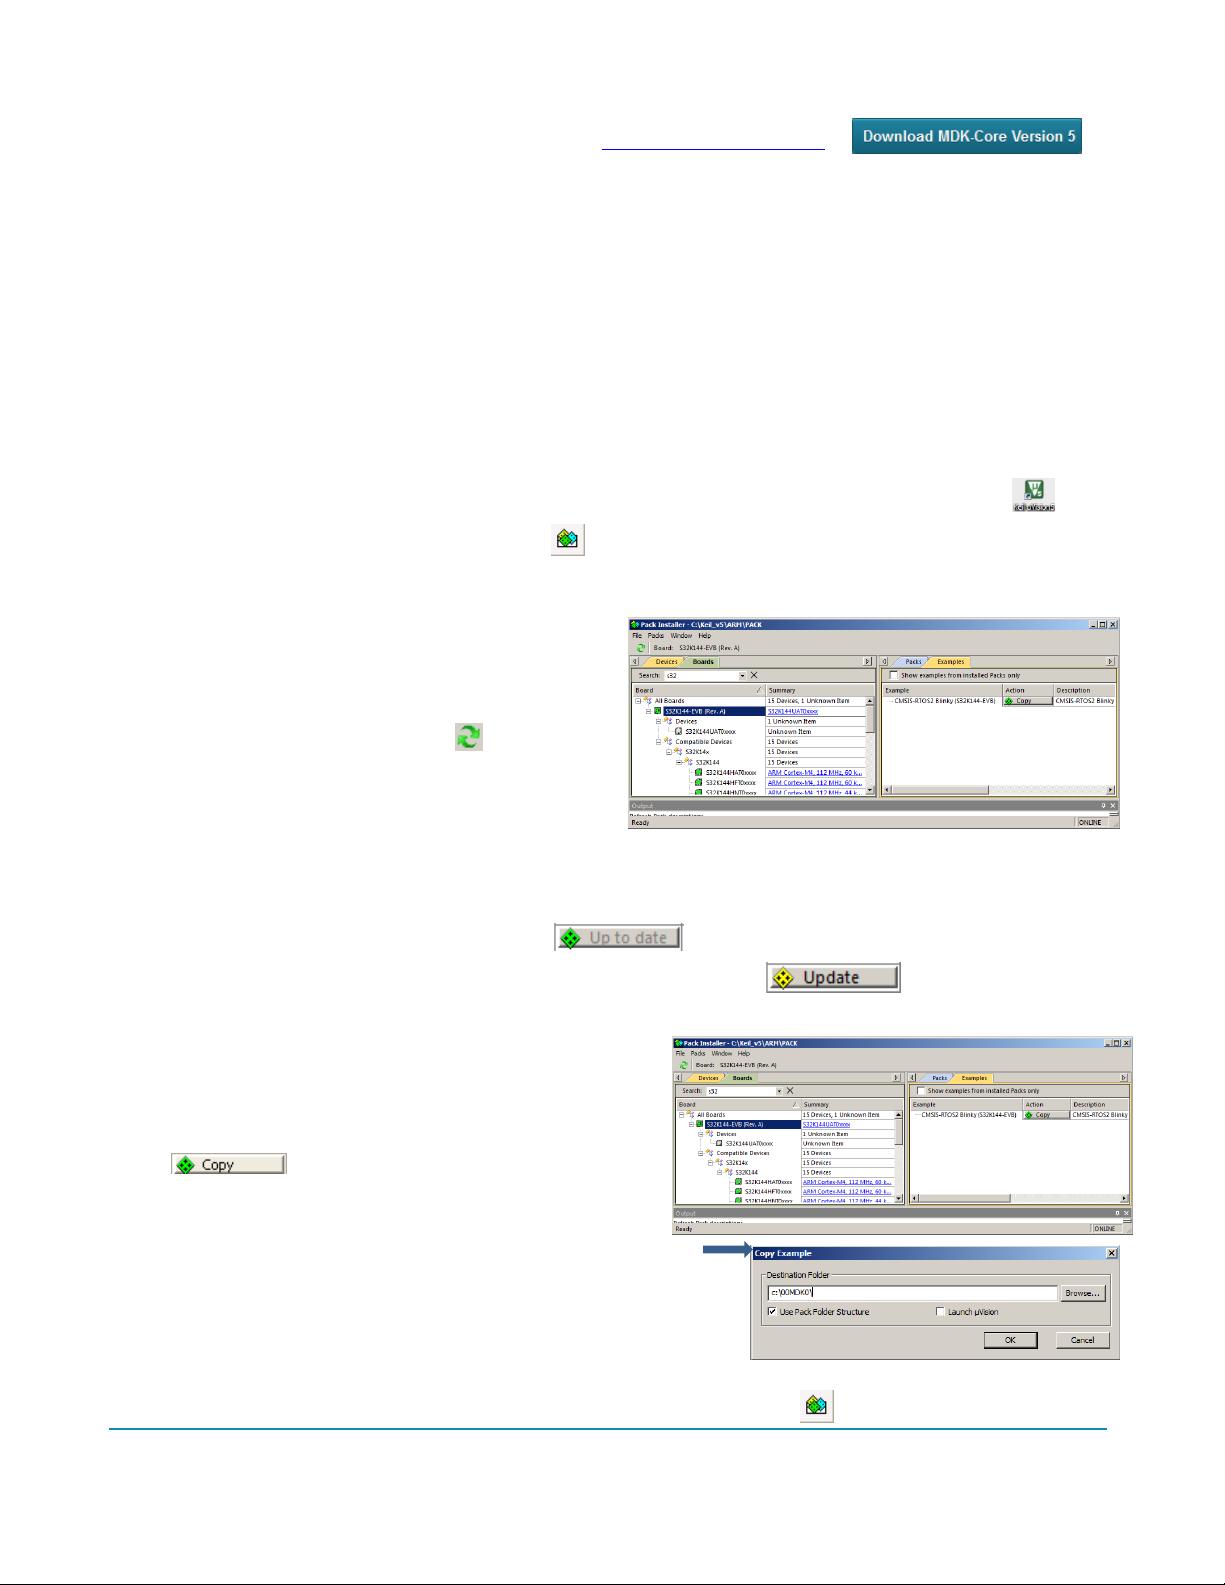
Keil MDK supports and has examples for most NXP ARM processors. Check the Keil Device Database
®
on
www.keil.com/dd2. This list is also provided by the μVision Pack Installer utility.
NXP i.MX processors are supported by ARM DS-MDK
™
. www.keil.com/ds-mdk.
Keil MDK-Lite™ is a free evaluation version that limits code size to 32 Kbytes. Nearly all Keil examples will compile within
this 32K limit. The addition of a valid license number will turn it into an unrestricted commercial version.
RTX RTOS: All variants of MDK contain the full version of RTX with Source Code. See www.keil.com/mdk5/cmsis/rtx/.
Why Use Keil MDK ?
MDK provides these features particularly suited for NXP Cortex-M users:
1. µVision IDE with Integrated Debugger, Flash programmer and the ARM
®
Compiler
toolchain. MDK is turn-key "out-of-the-box".
2. ARM Compiler 5 and ARM Compiler 6 (LLVM) are included.
GCC is supported. https://launchpad.net/gcc-arm-embedded
3. Dynamic Syntax checking on C/C++ source lines.
4. Keil Middleware: Network, USB, Flash File and Graphics for some NXP processors.
5. NEW! Event Recorder for Keil Middleware, RTX and User programs. Page 17.
6. MISRA C/C++ support using PC-Lint. www.gimpel.com
7. Compiler Safety Certification Kit: www.keil.com/safety/
8. TÜV certified. SIL3 (IEC 61508) and ASILD (ISO 26262).
9. CMSIS-RTOS RTX is included. RTX has a BSD or Apache 2.0 license with source
code. www.keil.com/RTX and https://github.com/ARM-software/CMSIS_5
10. CoreSight™ Serial Wire Viewer (SWV). ETM instruction trace capability on
appropriately equipped NXP processors. Provides Code Coverage and Performance Analysis.
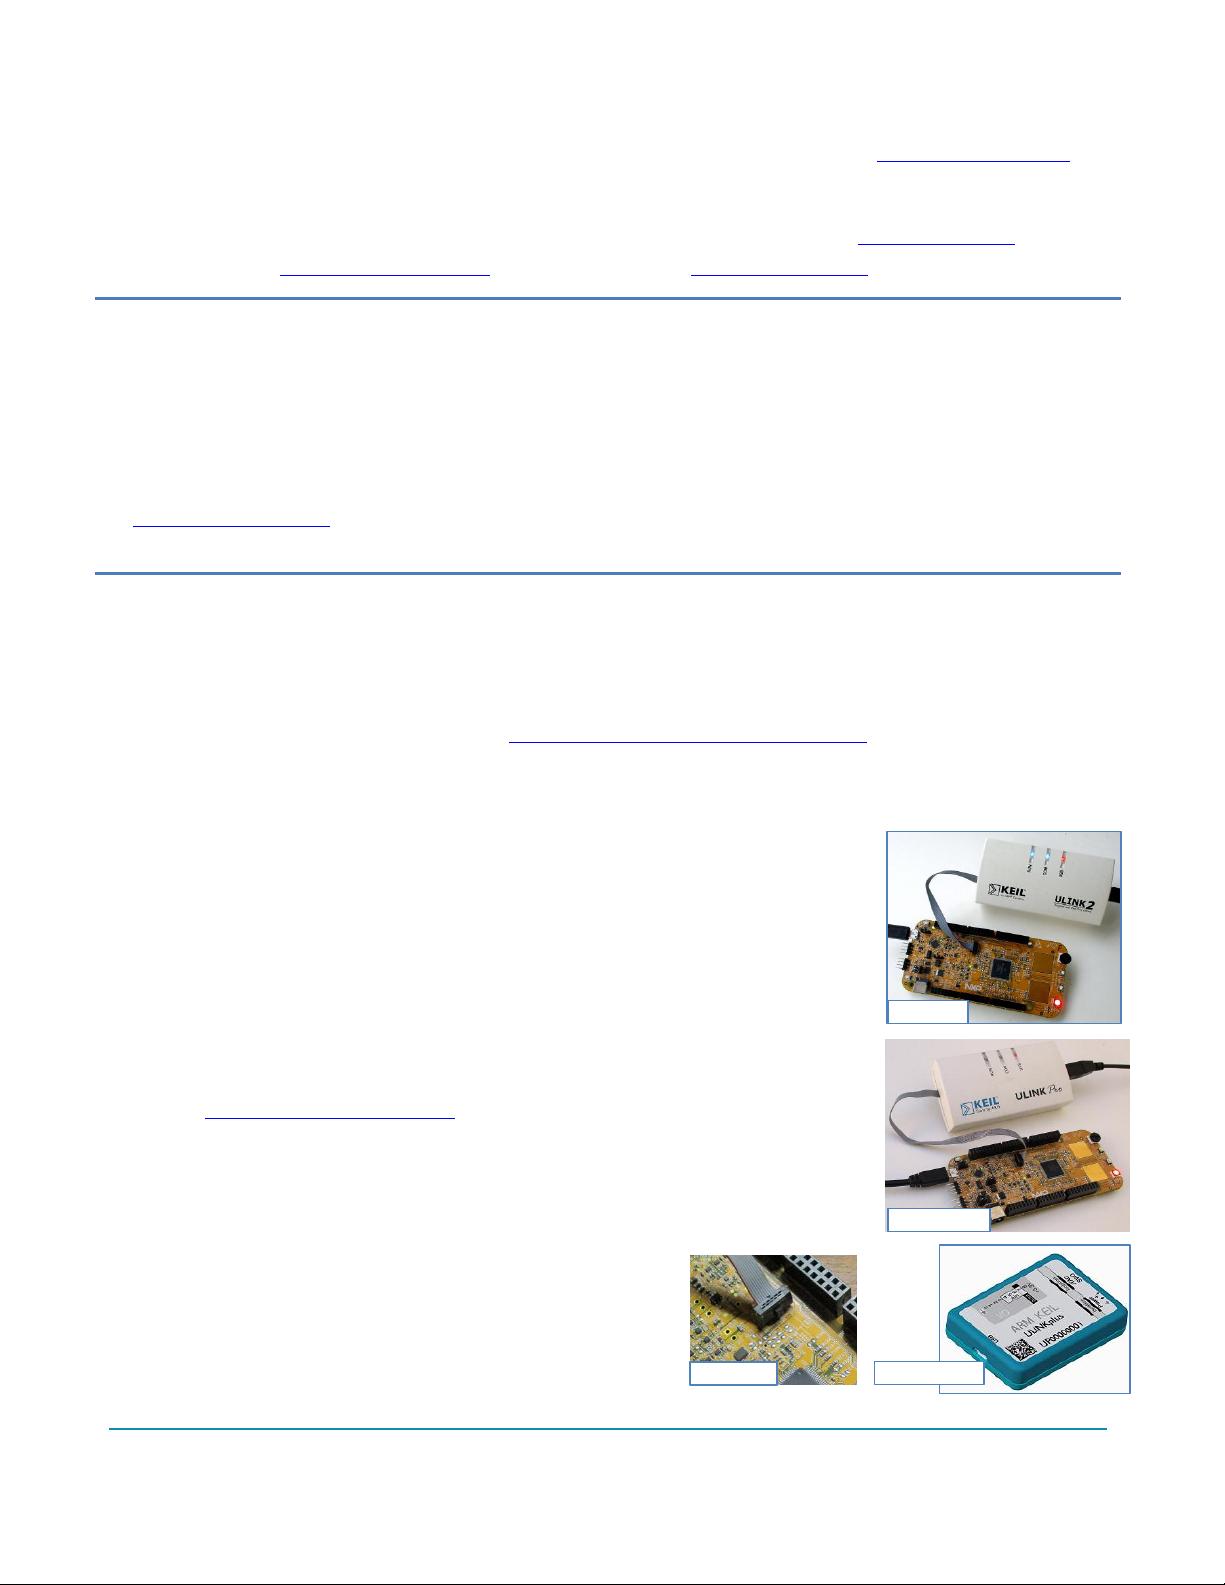
11. Debug Adapters: OpenSDA (CMSIS-DAP or P&E mode), Keil ULINK
™
2, ULINK-ME, ULINKpro and J-Link.
12. MDK includes board support for NXP processors and boards. For i.MX support see DS-MDK.
13. Affordable perpetual and term licensing with support. Contact Keil sales for pricing options. Inside-Sales@arm.com
14. Keil Technical Support is included for one year and is renewable. This helps you get your project completed faster.
15. Micrium µC/Probe compatible. www.micrium.com/ucprobe
This document includes details on these features plus more:
1. Serial Wire Viewer (SWV) data trace. Includes Exceptions (interrupts), Data writes, graphical Logic Analyzer.
2. Real-time Read and Write to memory locations for the Watch, Memory and Peripheral windows. These are non-
intrusive to your program. No CPU cycles are stolen. No instrumentation code is added to your source files.
3. Six Hardware Breakpoints (can be set/unset on-the-fly) and two Watchpoints (also known as Access Breaks).
4. RTX and RTX Tasks window: a kernel awareness program for RTX that updates while your program is running.
5. Event Recorder. You can use this in your own programs too.
6. printf using SWV ITM. No UART required.
7. A DSP example program using ARM CMSIS-DSP libraries. <coming>
8. How to create your own µVision projects <coming> and an extensive list of available document resources.
9. ETM instruction trace with Code Coverage and Performance Analysis will be in a later version of this tutorial.

Copyright © 2017 ARM Ltd. All rights reserved
NXP S32K Cortex-M4 Lab using ARM
®
Keil™ MDK 5 toolkit www.keil.com
2
General Information:
1. NXP Evaluation Boards & Keil Evaluation Software: 3
2. MDK 5 Keil Software Information: 3
3. Debug Adapters Supported: 3
4. CoreSight Definitions: 4
Keil Software and Software Packs:
5. Keil MDK Software Download and Installation: 5
6. µVision Software Pack and RTX5_Blinky example Download and Install Process: 5
7. Other features of Software Packs: 6
Using Debug Adapters:
8. Configuring the P&E OpenSDA Debug Adapter: 7
9. Configuring the CMSIS-DAP OpenSDA Adapter: 8
10. Testing the OpenSDA CMSIS-DAP Connection: 8
11. Configuring External Debug Adapters: Keil ULINK2/ME, ULINKpro, J-Link: 9
Blinky Example and Debugging Features:
12. Blinky example using the S32K144 EVB: 10
13. Hardware Breakpoints and Single Stepping: 11
14. Call Stack & Locals window: 12
15. Watch and Memory windows and how to use them: 13
16. Peripheral System Viewer (SV): 14
17. Watchpoints: Conditional Breakpoints: 15
18. RTX System and Threads Viewer: 16
19. NEW! Event Recorder: 17
Serial Wire Viewer (SWV):
20. Serial Wire Viewer (SWV) Configuration with ULINK2, ULINK-ME and J-Link: 18
21. SWV ULINKpro Configuration: 19
22. Displaying Exceptions (including Interrupts) with SWV Event Viewer: 20
23. Using µVision Logic Analyzer (LA) Graphical variable display: 21
24. printf using ITM: 22
Other Useful Information:
25. Document Resources: 23
26. Keil Products and contact information: 24
At the time of writing this document March 17, 2017, the S32K Software Pack was not on the Keil website.
If you follow the instructions to get the S32K Pack as described on page 5 Install Software Pack and this is successful, this means
the new Pack in on the web and please use it. Do not use the Beta version
To obtain the Beta version of the Pack, contact bob.boys@arm.com MDK 5.23 was used to create this lab.
1. Double click on the file and µVision will open and automatically install it.
There are two update files to be added: they are available here: www.keil.com/appnotes/docs/apnt_299.asp
2. Replace UL2CM3.DLL in C:\Keil_v5\ARM\BIN (to unlock the Flash on S32K)
3. Replace RTX5.scvd in C:\Keil_v5\ARM\PACK\ARM\CMSIS\5.0.1\CMSIS\RTOS2\RTX
4. These will be added to MDK 5.24.
Always check for the latest version of this lab: www.keil.com/appnotes/docs/apnt_299.asp
5.

Copyright © 2017 ARM Ltd. All rights reserved
NXP S32K Cortex-M4 Lab using ARM
®
Keil™ MDK 5 toolkit www.keil.com
3
ULINKpro
J14 SWD
1) NXP Evaluation Boards & Keil Evaluation Software:
Keil MDK provides board support for many NXP Cortex-M processors. For the i.MX series see www.keil.com/ds5-mdk
On the second last page of this document is an extensive list of resources that will help you successfully create your projects.
This list includes application notes, books and labs and tutorials for other NXP boards.
We recommend you obtain the latest Getting Started Guide for MDK5: It is available free on www.keil.com/gsg/.
ARM forums: https://https://developer.arm.com Keil Forums: www.keil.com/forum/
2) MDK 5 Keil Software Information: This document uses MDK 5.23 or later.
MDK 5 uses CMSIS Software. This is an ARM standard that provides software including middleware, CMSIS headers and
configuration files, RTX and middleware. These Packs are downloaded from the web with the "Pack Installer", the version(s)
selected with "Select Software Packs" and your project configured with the "Run Time Environment" (RTE) utilities. These
are components of µVision.
A Software Pack is an ordinary .zip file with the extension changed to .pack. It contains various header, Flash programming
and example files and more. Contents of a Pack is described by a .pdsc file in XML format.
See www.keil.com/dd2/pack for the current list of available Software Packs. More packs are being added.
Example Project Files: This document uses the RTX5_Blinky example project contained in the S32K Software Pack.
3) Debug Adapters Supported:
These are listed below with a brief description. Configuration instructions start on page 7.
1. OpenSDA: OpenSDA is an on-board debug adapter. NXP OpenSDA has a P&E and a CMSIS-DAP mode
depending on the firmware loaded into the OpenSDA processor U8. You do not need an external debugger such as a
ULINK2 to do this lab. If you want to use Serial Wire Viewer (SWV), you need any ULINK or a J-Link. You can
add CMSIS-DAP to a custom board. See https://github.com/ARM-software/CMSIS_5 This version supports SWV.
2. CMSIS-DAP: An extra processor on your board becomes a debug adapter compliant to CMSIS-DAP. The S32K
and many other NXP boards incorporate CMSIS-DAP.
3. ULINK2 and ULINK-ME: ULINK-ME is only offered as part of certain evaluation
board packages. ULINK2 can be purchased separately. These are electrically the
same and both support Serial Wire Viewer (SWV), Run-time memory reads and writes
for the Watch and Memory windows and hardware breakpoint set/unset on-the-fly.
4. ULINKpro: ULINKpro supports all SWV features and adds ETM Instruction Trace.
ETM records all executed instructions. ETM provides Code Coverage, Execution
Profiling and Performance Analysis features. ULINKpro also provides the fastest
Flash programming times. Not all S32K devices have ETM. Consult your datasheet.
5. NEW ! ULINKplus: High SWV performance plus Power Measurement.
See www.keil.com/ulink/ulinkplus/ for complete details.
6. Segger J-Link: J-Link Version 6 (black) or later supports Serial Wire Viewer.
SWV data reads and writes are not currently supported with a J-Link.
Debug Connections: An external debug adapter must be connected
to the J14 SWD connector and shown in these pictures. This is a
10 pin CoreSight standard 10 pin connector. A special cable is
provided with a ULINK2, ULINK-ME and ULINKpro.
Contact Segger for a special adapter board for the J-Link series.
www.segger.com
ULINK2
ULINKplus

Copyright © 2017 ARM Ltd. All rights reserved
NXP S32K Cortex-M4 Lab using ARM
®
Keil™ MDK 5 toolkit www.keil.com
4
4) CoreSight Definitions: It is useful to have a basic understanding of these terms:
Cortex-M0 and Cortex-M0+ may have only features 2) and 4) plus 11), 12) and 13) implemented. Cortex-M3, Cortex-M4
and Cortex-M7 can have all features listed implemented. MTB is normally found on Cortex-M0+. It is possible some
processors have all features except ETM Instruction trace and the trace port. Consult your specific datasheet.
1. JTAG: Provides access to the CoreSight debugging module located on the Cortex processor. It uses 4 to 5 pins.
2. SWD: Serial Wire Debug is a two pin alternative to JTAG and has about the same capabilities except Boundary Scan
is not possible. SWD is referenced as SW in the µVision Cortex-M Target Driver Setup.
The SWJ box must be selected in ULINK2/ME or ULINKpro. Serial Wire Viewer (SWV) must use SWD because
the JTAG signal TDO shares the same pin as SWO. The SWV data normally comes out the SWO pin or Trace Port.
3. JTAG and SWD are functionally equivalent. The signals and protocols are not directly compatible.
4. DAP: Debug Access Port. This is a component of the ARM CoreSight debugging module that is accessed via the
JTAG or SWD port. One of the features of the DAP are the memory read and write accesses which provide on-the-
fly memory accesses without the need for processor core intervention. µVision uses the DAP to update Memory,
Watch, Peripheral and RTOS kernel awareness windows while the processor is running. You can also modify
variable values on the fly. No CPU cycles are used, the program can be running and no code stubs are needed.
You do not need to configure or activate DAP. µVision configures DAP when you select a function that uses it.
Do not confuse this with CMSIS_DAP which is an ARM on-board debug adapter standard.
5. SWV: Serial Wire Viewer: A trace capability providing display of reads, writes, exceptions, PC Samples and printf.
6. SWO: Serial Wire Output: SWV frames usually come out this one pin output. It shares the JTAG signal TDO.
7. Trace Port: A 4 bit port that ULINKpro uses to collect ETM frames and optionally SWV (rather than SWO pin).
8. ITM: Instrumentation Trace Macrocell: As used by µVision, ITM is thirty-two 32 bit memory addresses (Port 0
through 31) that when written to, will be output on either the SWO or Trace Port. This is useful for printf type
operations. µVision uses Port 0 for printf and Port 31 for the RTOS Event Viewer. The data can be saved to a file.
9. ETM: Embedded Trace Macrocell: Displays all the executed instructions. The ULINKpro provides ETM. ETM
requires a special 20 pin CoreSight connector. ETM also provides Code Coverage and Performance Analysis. ETM
is output on the Trace Port or accessible in the ETB (ETB has no Code Coverage or Performance Analysis).
10. ETB: Embedded Trace Buffer: A small amount of internal RAM used as an ETM trace buffer. This trace does not
need a specialized debug adapter such as a ULINKpro. ETB runs as fast as the processor and is especially useful for
very fast Cortex-A processors. Not all processors have ETB. See your specific datasheet.
11. MTB: Micro Trace Buffer. A portion of the device internal user RAM is used for an instruction trace buffer. Only
on Cortex-M0+ processors. Cortex-M3/M4 and Cortex-M7 processors provide ETM trace instead.
12. Hardware Breakpoints: The Cortex-M0+ has 2 breakpoints. The Cortex-M3, M4 and M7 usually have 6. These
can be set/unset on-the-fly without stopping the processor. They are no skid: they do not execute the instruction they
are set on when a match occurs. The CPU is halted before the instruction is executed.
13. Watchpoints: Both the Cortex-M0, M0+, Cortex-M3, Cortex-M4 and Cortex-M7 can have 2 Watchpoints. These
are conditional breakpoints. They stop the program when a specified value is read and/or written to a specified
address or variable. There also referred to as Access Breaks in Keil documentation.
Read-Only Source Files:
Some source files in the Project window will have a yellow key on them: This means they are read-only. This is
to help unintentional changes to these files. This can cause difficult to solve problems. These files normally need no
modification. µVision icon meanings are found here: www.keil.com/support/man/docs/uv4/uv4_ca_filegrp_att.htm
If you need to modify one, you can use Windows Explorer to modify its permission.
1. In the Projects window, double click on the file to open it in the Sources window.
2. Right click on its source tab and select Open Containing folder.
3. Explorer will open with the file selected.
4. Right click on the file and select Properties.
5. Unselect Read-only and click OK. You are now able to change the file in the µVision editor.
6. It is a good idea to make the file read-only when you are finished modifications.

Copyright © 2017 ARM Ltd. All rights reserved
NXP S32K Cortex-M4 Lab using ARM
®
Keil™ MDK 5 toolkit www.keil.com
5
5) Keil MDK Software Download and Installation:
1. Download MDK 5.23 or later from the Keil website. www.keil.com/mdk5/install
2. Install MDK into the default folder. You can install into any folder, but this lab uses the default C:\Keil_v5
3. We recommend you use the default folders for this tutorial. We will use C:\00MDK\ for the examples.
4. If you install MDK into a different folder, you will have to adjust for the folder location differences.
5. You do not need a debug adapter: just the S32K board, a USB cable and MDK installed on your PC.
6. For the exercises using SWV, you need a Keil ULINK2, ULINK-ME, ULINKplus, ULINKpro or a J-Link.
7. You do not need a Keil MDK license for this tutorial. All examples will compile within the 32 K limit.
NOTE: In the preliminary version of this tutorial, see the important notes on the bottom of page 2.
6) µVision Software Pack Download and Install Process:
A Software Pack contain components such as header, Flash programming, documents and other files used in a project.
1) Start µVision and open Pack Installer:
1. Connect your computer to the internet. This is needed to download the Software Packs. Start µVision:
2. Open the Pack Installer by clicking on its icon: A Pack Installer Welcome screen will open. Read and close it.
3. This window opens up: Select the Devices tab:
4. Note “ONLINE” is displayed at the bottom right.
If “OFFLINE” is displayed, connect to the Internet
before continuing.
5. If there are no entries shown because you were not
connected to the Internet when Pack Installer opened,
select Packs/Check for Updates or to refresh once
you have connected to the Internet.
2) Install The S32K Software Pack:
1. In the Devices tab, select NXP and then S32K Series
as shown above: The devices supported are displayed.
2. Select Keil::S32_SDK_DFP.1.0.0.pack and click Install. This Pack will download and install in the MDK files. This
download can take several minutes.
3. Its status is indicated by the “Up to date” icon:
4. Update means there is an updated Software Pack available for download.
TIP: The left hand pane filters the selections displayed on the right pane. You can start with either Devices or Boards.
3) Install the RTX5_Blinky Example:
1. Select the Boards tab. Select S32K.
2. Select the Examples tab:
3. Opposite CMSIS-RTOS2 Blinky (S32K144): select Copy:
4. The Copy Example window opens up: Select Use Pack
Folder Structure. Unselect Launch µVision.
5. Type in C:\00MDK\. Click OK to copy the RTX5_Blinky project.
6. The RTX5_Blinky example will now copy to
C:\00MDK\addon_mdk\Boards\NXP\S32K144-EVB\
TIP: The default folder for copied examples the first time you install MDK is
C:\Users\<user>\Documents. For simplicity, we will use the default folder of
C:\00MDK\ in this tutorial. You can use any folder you prefer.
7. Close the Pack Installer. You can open it any time by clicking on its icon.
剩余23页未读,继续阅读


安全验证
文档复制为VIP权益,开通VIP直接复制

评论1