⽂
档
说
明
这
个
⽂
档
是
来
⾃
⿍
甲
科
技
的
姚
远
⼯
作
中
整
理
的
,
在
Virtualbox
上
安
装
Oracle 19.3
再
升
级
到
19.8(Oracle
Restart
和
数
据
库
)
完
整
步
骤
,
包
括
:
配
置
系
统
环
境
,
安
装
grid
,
oracle
,
建
库
,
补
丁下
载
升
级
等
全
过
程
。
配
置
系
统
环
境
安
装
软
件
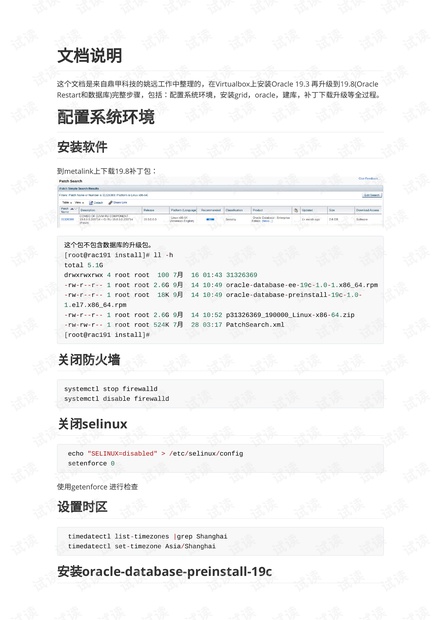
到
metalink
上下
载
19.8
补
丁
包
:
关
闭防
⽕
墙
关
闭
selinux
使
⽤
getenforce
进
⾏
检
查
设
置
时
区
安
装
oracle-database-preinstall-19c
这
个
包
不
包
含
数
据
库
的
升
级
包
。
[root@rac191 install]# ll -h
total 5.1G
drwxrwxrwx 4 root root 100 7
⽉
16 01:43 31326369
-rw-r--r-- 1 root root 2.6G 9
⽉
14 10:49 oracle-database-ee-19c-1.0-1.x86_64.rpm
-rw-r--r-- 1 root root 18K 9
⽉
14 10:49 oracle-database-preinstall-19c-1.0-
1.el7.x86_64.rpm
-rw-r--r-- 1 root root 2.6G 9
⽉
14 10:52 p31326369_190000_Linux-x86-64.zip
-rw-rw-r-- 1 root root 524K 7
⽉
28 03:17 PatchSearch.xml
[root@rac191 install]#
systemctl stop firewalld
systemctl disable firewalld
echo "SELINUX=disabled" > /etc/selinux/config
setenforce 0
timedatectl list-timezones |grep Shanghai
timedatectl set-timezone Asia/Shanghai


剩余25页未读,继续阅读

姚远OracleACE
- 粉丝: 6807
- 资源: 7
 我的内容管理
收起
我的内容管理
收起
- 我的资源
快来上传第一个资源
 我的收益 登录查看自己的收益
 我的积分
登录查看自己的积分
我的积分
登录查看自己的积分
 我的C币
登录后查看C币余额
我的C币
登录后查看C币余额
 我的收藏
我的收藏  我的下载
我的下载  下载帮助
下载帮助

会员权益专享


最新资源
- zigbee-cluster-library-specification
- JSBSim Reference Manual
- c++校园超市商品信息管理系统课程设计说明书(含源代码) (2).pdf
- 建筑供配电系统相关课件.pptx
- 企业管理规章制度及管理模式.doc
- vb打开摄像头.doc
- 云计算-可信计算中认证协议改进方案.pdf
- [详细完整版]单片机编程4.ppt
- c语言常用算法.pdf
- c++经典程序代码大全.pdf
- 单片机数字时钟资料.doc
- 11项目管理前沿1.0.pptx
- 基于ssm的“魅力”繁峙宣传网站的设计与实现论文.doc
- 智慧交通综合解决方案.pptx
- 建筑防潮设计-PowerPointPresentati.pptx
- SPC统计过程控制程序.pptx
资源上传下载、课程学习等过程中有任何疑问或建议,欢迎提出宝贵意见哦~我们会及时处理!
点击此处反馈


评论1