没有合适的资源?快使用搜索试试~ 我知道了~
首页Labview_AKD_EtherCAT_通讯设置
Labview_AKD_EtherCAT_通讯设置

AKD-EtherCAT与labview通讯,和与欧姆龙PLC的通讯设置。
资源详情
资源评论
资源推荐

Getting Started with AKD
EtherCAT Drives and the
LabVIEW NI SoftMotion
Module
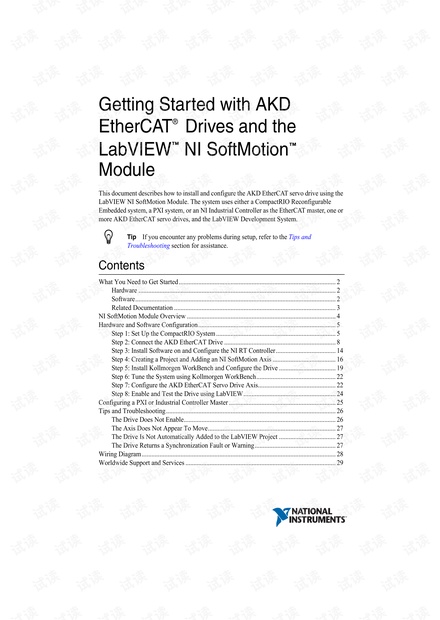
This document describes how to install and configure the AKD EtherCAT servo drive using the
LabVIEW NI SoftMotion Module. The system uses either a CompactRIO Reconfigurable
Embedded system, a PXI system, or an NI Industrial Controller as the EtherCAT master, one or
more AKD EtherCAT servo drives, and the LabVIEW Development System.
Tip If you encounter any problems during setup, refer to the Tips and
Troubleshooting section for assistance.
Contents
What You Need to Get Started ................................................................................................. 2
Hardware .......................................................................................................................... 2
Software............................................................................................................................ 2
Related Documentation .................................................................................................... 3
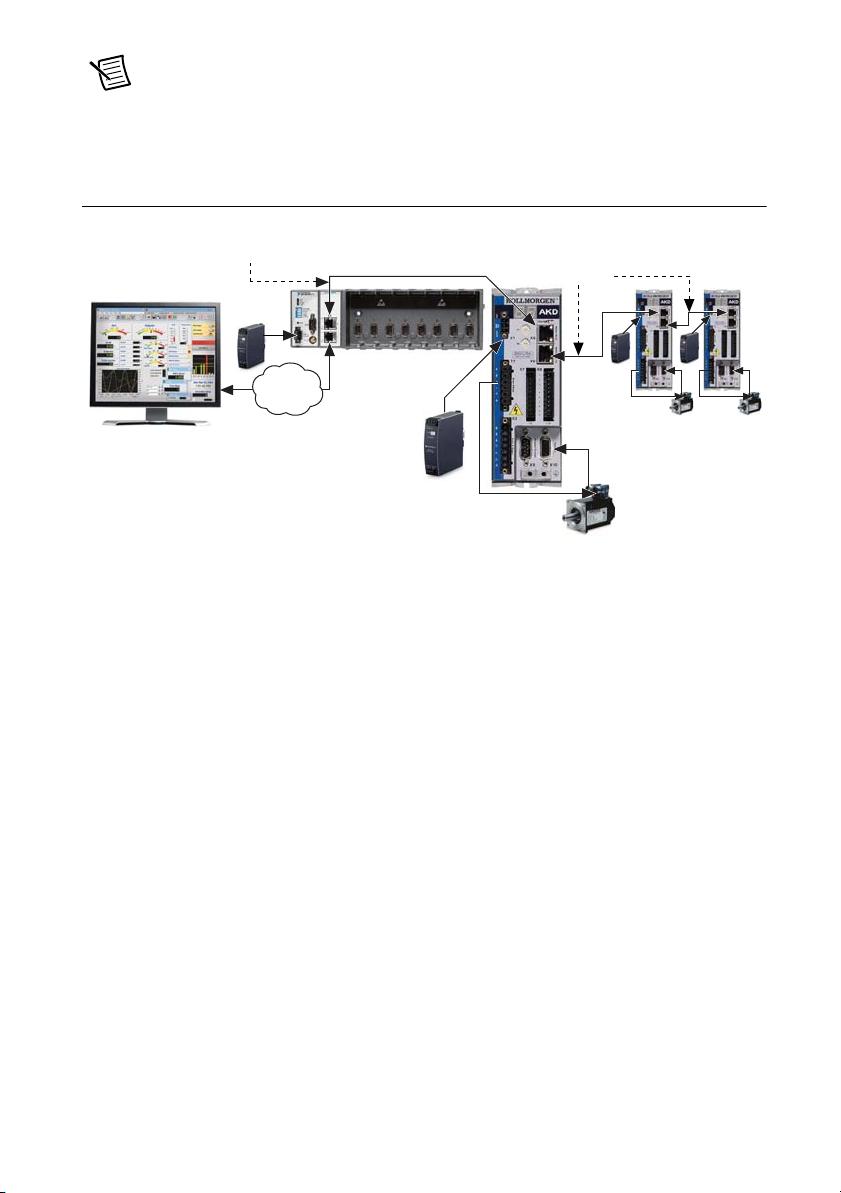
NI SoftMotion Module Overview ............................................................................................ 4
Hardware and Software Configuration..................................................................................... 5
Step 1: Set Up the CompactRIO System .......................................................................... 5
Step 2: Connect the AKD EtherCAT Drive ..................................................................... 8
Step 3: Install Software on and Configure the NI RT Controller..................................... 14
Step 4: Creating a Project and Adding an NI SoftMotion Axis ....................................... 16
Step 5: Install Kollmorgen WorkBench and Configure the Drive ................................... 19
Step 6: Tune the System using Kollmorgen WorkBench................................................. 22
Step 7: Configure the AKD EtherCAT Servo Drive Axis................................................ 22
Step 8: Enable and Test the Drive using LabVIEW......................................................... 24
Configuring a PXI or Industrial Controller Master .................................................................. 25
Tips and Troubleshooting......................................................................................................... 26
The Drive Does Not Enable.............................................................................................. 26
The Axis Does Not Appear To Move............................................................................... 27
The Drive Is Not Automatically Added to the LabVIEW Project ................................... 27
The Drive Returns a Synchronization Fault or Warning.................................................. 27
Wiring Diagram ........................................................................................................................ 28
Worldwide Support and Services ............................................................................................. 29
®
™
™

2 | ni.com | Getting Started with AKD EtherCAT Drives and NI SoftMotion
What You Need to Get Started
Caution Before installing the drive, review Chapter 2, Safety, in the AKD
Installation Manual that shipped with the drive. Failure to follow safety instructions
may result in injury or damage to equipment.
You need the following items to get started.
Hardware
NI Real-Time Controller:
• NI Real-Time CompactRIO controller with two Ethernet ports
• NI Real-Time PXI embedded controller with two ethernet ports. If your controller
does not meet this requirement, install one of the following Ethernet PXI modules for
EtherCAT use:
– NI PXI-8231
– NI PXI-8232
• NI Industrial Controller
+24 VDC power supply for the CompactRIO controller or Industrial Controller
(not applicable for PXI controllers)
+24 VDC power supply for the AKD EtherCAT servo drive
Note Check your hardware documentation for power supply requirements.
Ethernet connection and cable for the RT controller
Ethernet cable and EtherCAT connection for the AKD EtherCAT servo drive
AKD EtherCAT servo drive and associated AKM series servo motor and encoder
Note Refer to ni.com for information about AKD EtherCAT servo drive and
AKM series servo motor compatibility.
Software
LabVIEW 2010 or later
LabVIEW 2010 Real-Time Module or later
LabVIEW 2010 NI SoftMotion Module or later
NI-RIO 3.5.0 or later
NI-Industrial Communications for EtherCAT 2.0 or later

Getting Started with AKD EtherCAT Drives and NI SoftMotion | © National Instruments | 3
Note Refer to the NI SoftMotion ReadMe to ensure the installed version of
NI-Industrial Communications for EtherCAT is compatible with your installation of
the NI SoftMotion module.
Figure 1 shows a simplified connection diagram.
Figure 1. AKD EtherCAT Servo Drive Connection Diagram
Related Documentation
The following documents contain additional information that you may find helpful. All
referenced documents ship with the product and are available at
ni.com/manuals.
• AKD Installation Manual—Use this document to learn additional information about the
electrical and mechanical aspects of the AKD EtherCAT servo drive, including important
safety information.
• Documentation for the CompactRIO or PXI controller (shipped with the hardware and
available at
ni.com/manuals).
• LabVIEW NI SoftMotion Module Help—Use this help file to learn about using the
NI SoftMotion Module in LabVIEW including information about programming with and
using the NI SoftMotion Module with LabVIEW. To access this help file from LabVIEW,
select Help»LabVIEW Help, then expand the LabVIEW NI SoftMotion Module book on
the Contents tab.
• NI Industrial Communications for EtherCAT software documentation.
• LabVIEW Help—Use the LabVIEW Help to access information about LabVIEW
programming concepts, step-by-step instructions for using LabVIEW, and reference
information about LabVIEW VIs, functions, palettes, menus, tools, properties, methods,
events, dialog boxes, and so on. The LabVIEW Help also lists the LabVIEW documentation
resources available from National Instruments. Access the LabVIEW Help by selecting
Help»LabVIEW Help.
• Getting Started with the LabVIEW Real-Time Module—Use this document to learn how to
develop a real-time project and VIs, from setting up RT targets to building, debugging, and
AKD EtherCAT
Servo Drive
NI RT Controller
(NI cRIO-9074 shown)
+24 V Power Supply
(NI PS-15 Shown)
Additional AKD
Servo Drives
(Optional)
EtherCAT Master
EtherCAT
EtherCAT
+24 V Power
Supply
EthernetEthernet

4 | ni.com | Getting Started with AKD EtherCAT Drives and NI SoftMotion
deploying real-time applications. Access the Getting Started with the LabVIEW Real-Time
Module PDF by selecting Start»All Programs»National Instruments»LabVIEW»
LabVIEW Manuals»RT_Getting_Started.pdf.
NI SoftMotion Module Overview
The LabVIEW NI SoftMotion Module allows you to create deterministic motion control
applications using the LabVIEW Development System.
The following figure shows the NI SoftMotion Module architecture when you are using
NI SoftMotion with the AKD EtherCAT servo drive.
Figure 2. NI SoftMotion and AKD EtherCAT Servo Drive Architecture
Use the LabVIEW Project to configure all your axis settings and test your configuration. When
your hardware configuration is complete, you use NI SoftMotion to create move profiles. Refer
to the NI SoftMotion Module Help, available by selecting Help»LabVIEW Help, for
information about using the NI SoftMotion Module to create motion applications. Use the
NI Example Finder to browse and search installed NI SoftMotion Module examples. Select
Help»Find Examples to launch the NI Example Finder.
Motion Manager
Trajectory
Generator
Supervisory
Control
Host HMI and
Axis Settings:
LabVIEW Project
Windows RT Target
User VI
NI SoftMotion
APIs
NI SoftMotion
User VI
NI SoftMotion
APIs
EtherCAT
Drive
Communication
Module
EtherCAT
Drive
EtherCAT Drive

Getting Started with AKD EtherCAT Drives and NI SoftMotion | © National Instruments | 5
Hardware and Software Configuration
This section covers the hardware and software setup for the EtherCAT master and
AKD EtherCAT servo drive, and contains instructions about using the NI SoftMotion Module
to configure and test your system.
Note This document uses a CompactRIO controller as the EtherCAT master. Refer
to Configuring a PXI or Industrial Controller Master for setup instructions for those
devices.
The following procedure assumes the device is configured with the factory default settings it
shipped with. If the device has been previously configured, use Kollmorgen WorkBench
software to restore it to the default settings before proceeding. Refer to the Parameter Load/Save
topic in the Using Parameters and the Terminal Screen section of the Kollmorgen WorkBench
help for more information.
Step 1: Set Up the CompactRIO System
Complete the following steps to set up the CompactRIO hardware.
1. Install the real-time CompactRIO controller on the chassis if you are not using an integrated
controller and chassis.
Note Write down the controller serial number before installing the controller onto
the chassis. You will be unable to read the serial number after you have mounted the
controller.
a. Make sure that no power is connected to the controller or the chassis.
b. Align the controller with the chassis as shown in Figure 3.
剩余29页未读,继续阅读


安全验证
文档复制为VIP权益,开通VIP直接复制

评论3