SpringBoot+MyBatis入门教程:从工程创建到基本配置
需积分: 3 198 浏览量
更新于2024-08-04
1
收藏 69KB DOCX 举报
"java-kencie"
本文将详细探讨如何使用SpringBoot与MyBatis进行集成,以实现一个简单的Web应用程序。我们将从创建SpringBoot工程开始,逐步介绍如何添加必要的依赖,配置数据库连接,以及实现基本的数据操作。
首先,创建一个SpringBoot项目。这通常可以通过Spring Initializr在线工具或使用IDE的内置功能来完成。我们需要添加Web支持以及MyBatis和MySQL驱动的依赖。在`pom.xml`文件中,你需要包含以下依赖:
```xml
<dependency>
<groupId>org.springframework.boot</groupId>
<artifactId>spring-boot-starter-web</artifactId>
</dependency>
<dependency>
<groupId>org.mybatis.spring.boot</groupId>
<artifactId>mybatis-spring-boot-starter</artifactId>
<version>2.0.0</version>
</dependency>
<dependency>
<groupId>com.alibaba</groupId>
<artifactId>druid-spring-boot-starter</artifactId>
<version>1.1.10</version>
</dependency>
<dependency>
<groupId>mysql</groupId>
<artifactId>mysql-connector-java</artifactId>
<version>5.1.28</version>
<scope>runtime</scope>
</dependency>
```
其中,`mybatis-spring-boot-starter`和`druid-spring-boot-starter`都是由第三方提供的启动器,用于简化MyBatis和Druid数据源的集成。
接下来,我们需要配置数据库连接信息。在`application.properties`文件中,添加如下内容:
```properties
spring.datasource.url=jdbc:mysql:///test01?useUnicode=true&characterEncoding=utf-8
spring.datasource.username=root
spring.datasource.password=root
```
这里配置了数据库URL、用户名和密码。确保URL中的数据库名称、用户名和密码与实际环境匹配。
然后,我们需要创建MyBatis的配置文件`mybatis-config.xml`,定义映射文件的位置,例如:
```xml
<configuration>
<mappers>
<mapper resource="com/example/mapper/UserMapper.xml"/>
</mappers>
</configuration>
```
接着,创建实体类、Mapper接口和对应的Mapper XML文件。例如,创建一个`User`实体类,`UserMapper`接口,以及`UserMapper.xml`文件,用于定义SQL查询和更新语句。
在`UserMapper.java`接口中,你可以定义如下的方法:
```java
import org.apache.ibatis.annotations.Select;
public interface UserMapper {
@Select("SELECT * FROM user WHERE id = #{id}")
User getUserById(Integer id);
}
```
同时,在`UserMapper.xml`文件中,定义相应的XML映射:
```xml
<mapper namespace="com.example.mapper.UserMapper">
<select id="getUserById" resultType="com.example.model.User">
SELECT * FROM user WHERE id = #{id}
</select>
</mapper>
```
最后,通过SpringBoot的自动配置能力,MyBatis会自动扫描并注册Mapper接口。在需要使用的地方,可以注入`UserMapper`,并调用其方法进行数据库操作。
例如,在一个Controller类中:
```java
import org.springframework.beans.factory.annotation.Autowired;
import org.springframework.web.bind.annotation.GetMapping;
import org.springframework.web.bind.annotation.PathVariable;
import org.springframework.web.bind.annotation.RestController;
@RestController
public class UserController {
private final UserMapper userMapper;
@Autowired
public UserController(UserMapper userMapper) {
this.userMapper = userMapper;
}
@GetMapping("/users/{id}")
public User getUser(@PathVariable Integer id) {
return userMapper.getUserById(id);
}
}
```
以上就是一个基本的SpringBoot+MyBatis应用的构建过程。通过这种方式,我们可以轻松地实现对数据库的操作,而无需编写大量的JDBC代码。MyBatis允许我们以更面向对象的方式编写SQL,结合SpringBoot的自动化配置,使得开发过程更加简洁高效。
Spring Boot + MyBatis 入门
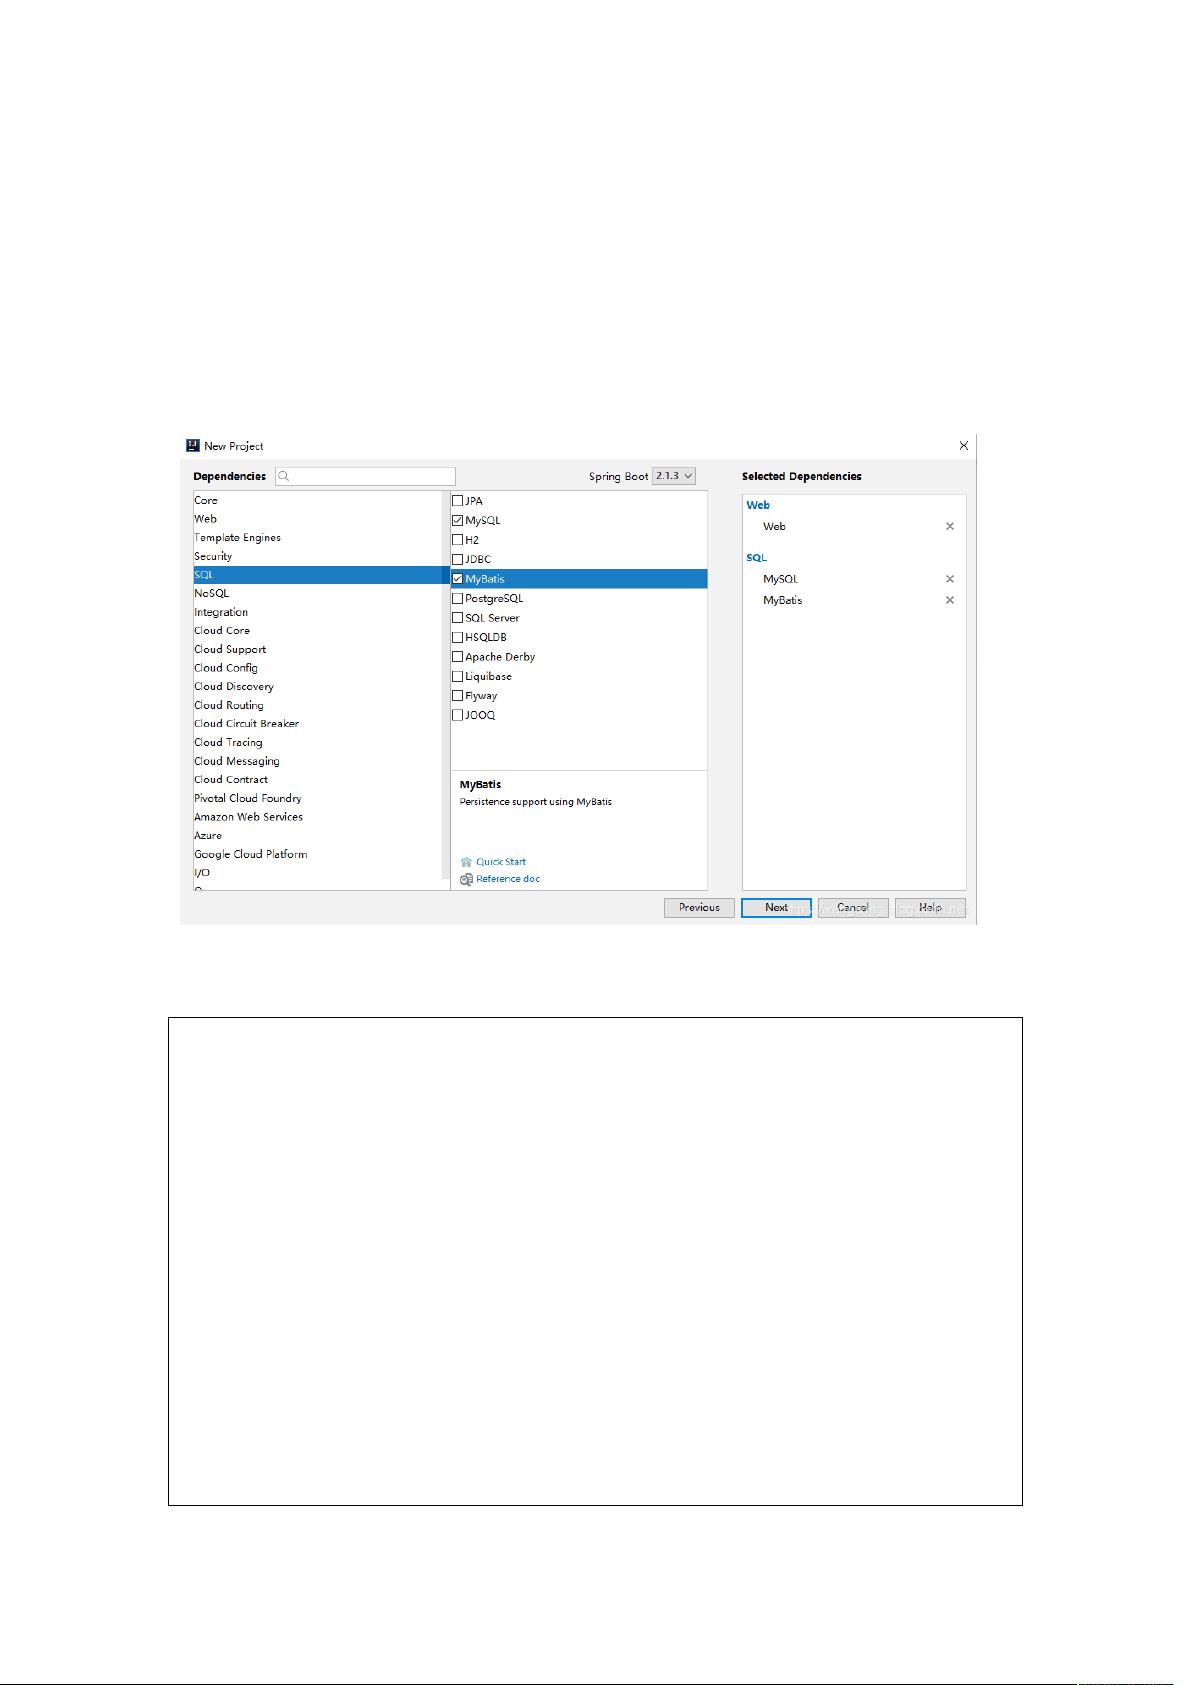
1、工程创建
首先创建一个基本的 Spring Boot 工程,添加 Web 依赖,MyBatis 依赖以及 MySQL 驱动依
赖,如下:
创建成功后,添加 Druid 依赖,并且锁定 MySQL 驱动版本,完整的依赖如下:
<dependency>
<groupId>org.springframework.boot</groupId>
<artifactId>spring-boot-starter-web</artifactId>
</dependency>
<dependency>
<groupId>org.mybatis.spring.boot</groupId>
<artifactId>mybatis-spring-boot-starter</artifactId>
<version>2.0.0</version>
</dependency>
<dependency>
<groupId>com.alibaba</groupId>
<artifactId>druid-spring-boot-starter</artifactId>
<version>1.1.10</version>
</dependency>
<dependency>
<groupId>mysql</groupId>
<artifactId>mysql-connector-java</artifactId>
<version>5.1.28</version>
<scope>runtime</scope>
</dependency>
下载后可阅读完整内容,剩余5页未读,立即下载
297 浏览量
734 浏览量
614 浏览量

リウェイジェ
- 粉丝: 1
- 资源: 2
 我的内容管理
展开
我的内容管理
展开


