Android自定义组合控件实践:从ImageButton到ViewGroup
142 浏览量
更新于2024-09-01
收藏 183KB PDF 举报
本文主要探讨了在Android应用中如何自定义组合控件,通过实例讲解了如何创建一个自定义的ImageButton以及将ImageView与TextView结合使用的案例。内容涉及到自定义View的分类,包括继承View、组合View、使用Paint和Canvas绘制以及自定义ViewGroup。文章还提到了Android的顶层视图结构,特别是DecorView及其包含的状态栏、标题栏和活动界面。
在Android开发中,自定义控件能够提高代码复用性和用户体验。自定义组合控件通常涉及将多个基础View组合在一起以形成新的功能组件。在这个实例中,我们创建了一个自定义的ImageButton,它是通过将Button和ImageView集成在一个FrameLayout中实现的。FrameLayout允许我们在同一位置堆叠多个子视图,而最后一个添加的视图会位于顶部。
首先,我们需要一个XML布局文件来定义这个自定义组合控件。在这个例子中,`myimagebutton_layout.xml`包含了Button和ImageView:
```xml
<FrameLayout
xmlns:android="http://schemas.android.com/apk/res/android"
android:layout_width="match_parent"
android:layout_height="match_parent">
<Button
android:layout_width="match_parent"
android:layout_height="wrap_content"
<!-- 其他Button属性 -->
/>
<ImageView
android:layout_width="wrap_content"
android:layout_height="wrap_content"
android:src="@drawable/image_resource"
<!-- 其他ImageView属性 -->
/>
</FrameLayout>
```
接下来,我们创建一个新的Java类来扩展FrameLayout,并在该类中加载并处理这个XML布局。这使得我们可以在代码中像使用普通控件一样使用自定义的ImageButton:
```java
public class CustomImageButton extends FrameLayout {
public CustomImageButton(Context context) {
super(context);
init(context);
}
public CustomImageButton(Context context, AttributeSet attrs) {
super(context, attrs);
init(context);
}
public CustomImageButton(Context context, AttributeSet attrs, int defStyleAttr) {
super(context, attrs, defStyleAttr);
init(context);
}
private void init(Context context) {
LayoutInflater.from(context).inflate(R.layout.myimagebutton_layout, this, true);
// 可以在这里添加额外的初始化逻辑,如设置点击事件等
}
}
```
现在,我们可以在Activity的布局文件中使用`CustomImageButton`,并像设置其他属性一样设置它的自定义属性:
```xml
<com.example.yourpackage.CustomButtonImageButton
android:id="@+id/custom_image_button"
android:layout_width="wrap_content"
android:layout_height="wrap_content"
<!-- 自定义属性 -->
/>
```
关于自定义属性,Android提供了`attrs.xml`文件来定义自定义View的属性。在该文件中,我们可以定义新的XML属性,并在Java代码中通过`getAttributeValue()`方法获取它们的值。例如:
```xml
<!-- res/values/attrs.xml -->
<resources>
<declare-styleable name="CustomImageButton">
<attr name="customBackground" format="reference|color"/>
<attr name="customImage" format="reference"/>
</declare-styleable>
</resources>
```
然后在`CustomImageButton`类中,我们可以通过`TypedArray`来获取这些属性:
```java
private void init(Context context, AttributeSet attrs) {
// 获取自定义属性
TypedArray a = context.obtainStyledAttributes(attrs, R.styleable.CustomButtonImageButton);
int customBackground = a.getResourceId(R.styleable.CustomButtonImageButton_customBackground, -1);
int customImage = a.getResourceId(R.styleable.CustomButtonImageButton_customImage, -1);
// 应用属性
if (customBackground != -1) {
setBackgroundColor(customBackground);
}
if (customImage != -1) {
ImageView imageView = findViewById(R.id.image_view); // 假设在myimagebutton_layout.xml中有id为image_view的ImageView
imageView.setImageResource(customImage);
}
a.recycle();
}
```
此外,对于更复杂的自定义控件,可能需要重写一些方法,比如`onDraw()`来直接使用Canvas和Paint进行绘图。在自定义ViewGroup时,需要重写`onMeasure()`和`onLayout()`来控制子视图的位置和大小。
自定义Android控件是一项强大的技术,能够帮助开发者实现独特的设计和功能。通过组合已有的View,自定义属性,甚至直接绘图,我们可以构建出满足特定需求的用户界面组件。了解并熟练掌握自定义View的技巧,是提升Android开发能力的重要一步。
实例讲解实例讲解Android应用中自定义组合控件的方法应用中自定义组合控件的方法
主要介绍了实例讲解Android应用中自定义组合控件的方法,通过例子讲解了view组合控件及自定义属性的用法,需要的朋友可以参考下
自定义自定义view大概可以分成:大概可以分成:
继承view
组合view
自己画的view(用paint和canvas)
自定义viewgroup(widget)
最近又跟同学聊起来了,于是就准备自己实现一个imagebutton来练练手。(最简单的了)以及后面一个把imageview与textview结合使用的案例。
ImageButton
要实现ImageButton最容易想到的不就是把button和imageview合在一起么。嗯,人容易就想到这是一个组合自定义view。可是如何把一个image放到button上呢,自然就
是用一个FrameLayout把button和imageview包裹起来,然后将这个layout当作一个weidgt。把一个layout当成一个控件我开始不太理解。后来了解到一些东西。
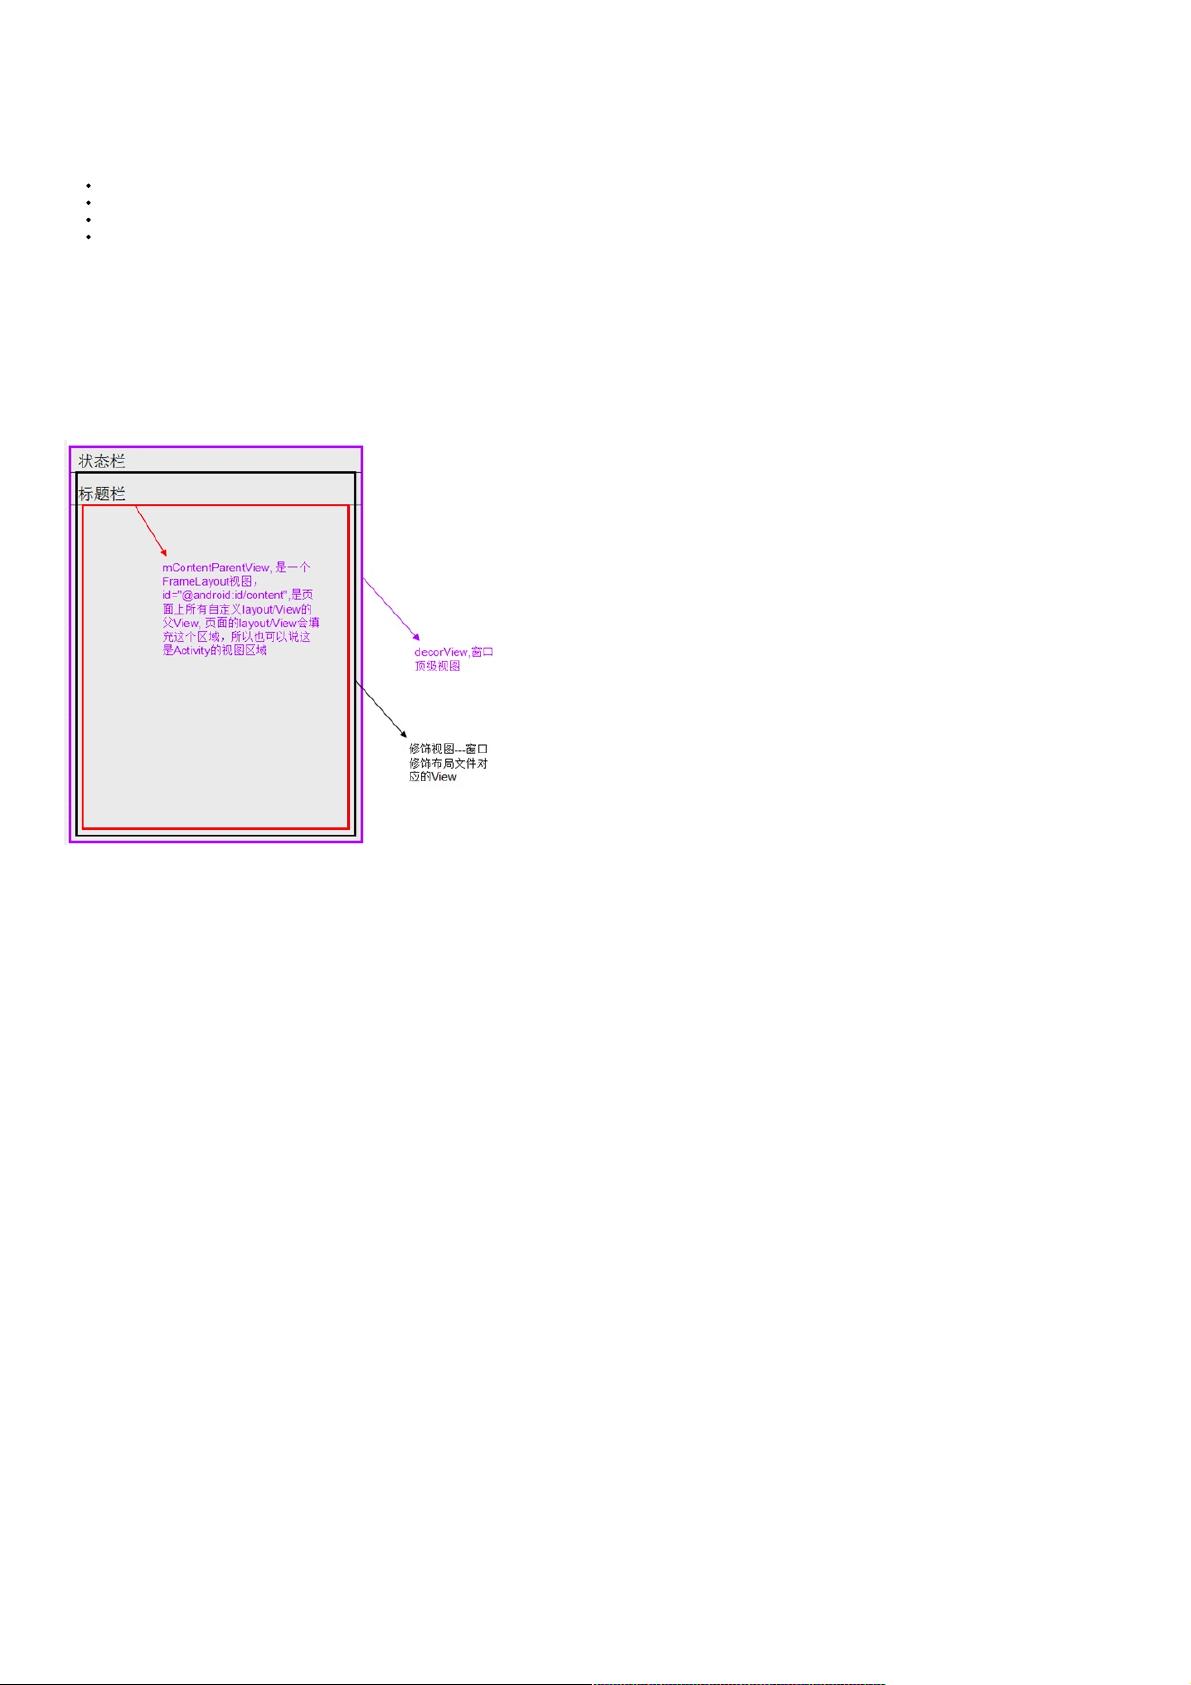
补充知识点(安卓的顶层视图)补充知识点(安卓的顶层视图)
在android里面,你的app界面的活动的视图并非是最顶级的视图。大家应该都知道viewtree。在安卓里面,最顶级的视图是一个叫DecorView的东西。它包括你的状态
栏,标题栏,以及你的活动界面。而且这个活动界面,安卓会自动帮你提前弄进去一个FrameLayout。可以这么理解吧,在安卓这个上帝的面前,你的activity就是放在
他的framelayout的一个个view。上一张图~
DecorView->LinearLayout(状态栏和activity)->FrameLayout(activity)->你自己的acitivty视图。
实例讲解实例讲解
好啦,回归正题。我上代码了。
myimagebutton_layout.xml
<FrameLayout
xmlns:android="http://schemas.android.com/apk/res/android"
android:layout_width="match_parent"
android:layout_height="match_parent">
<Button
android:layout_width="match_parent"
android:layout_height="match_parent"
android:id="@+id/button_imagebutton" />
<ImageView
android:layout_width="match_parent"
android:layout_height="match_parent"
android:id="@+id/imageview_button" />
</FrameLayout>
用一个framelayout把两个控件装起来,然后组合。组合了之后我们就去自定义我们这个控件的属性。button不用变对吧,用原生的就好了,就是需要有一个图片的src这
个属性就好了。
在values目录下的attrs.xml文件_
<?xml version="1.0" encoding="utf-8"?>
<resources>在
<declare-styleable name="MyImageButton">
<attr name="Imagesrc" format="reference"/>
</declare-styleable>
</resources>
一般来说,declare-styleable标签的名字都是你的自定义控件的名字。attr就是你的自定义控件属性。format是这个属性的值的数据类型。这里的reference表示引用。
dimension表示的是dp或者sp的大小。还有一些可以自己去看看。定义好属性,我们就开始写控件了。
MyImageButton.java
public class MyImageButton2 extends FrameLayout{
ImageView mImageView;
Button mButton;
int resId;
public MyImageButton2(Context context) {
super(context);
}
public MyImageButton2(Context context, AttributeSet attrs) {
super(context, attrs);
//导入布局
LayoutInflater.from(context).inflate(R.layout.myimagebutton_layout, this);
mImageView=(ImageView)findViewById(R.id.imageview_button);
下载后可阅读完整内容,剩余5页未读,立即下载
2021-01-04 上传
2021-01-05 上传
2020-09-02 上传
2019-03-22 上传
2021-01-04 上传
2015-12-14 上传
2016-04-01 上传

weixin_38748718
- 粉丝: 6
- 资源: 912
 我的内容管理
展开
我的内容管理
展开


最新资源
- JHU荣誉单变量微积分课程教案介绍
- Naruto爱好者必备CLI测试应用
- Android应用显示Ignaz-Taschner-Gymnasium取消课程概览
- ASP学生信息档案管理系统毕业设计及完整源码
- Java商城源码解析:酒店管理系统快速开发指南
- 构建可解析文本框:.NET 3.5中实现文本解析与验证
- Java语言打造任天堂红白机模拟器—nes4j解析
- 基于Hadoop和Hive的网络流量分析工具介绍
- Unity实现帝国象棋:从游戏到复刻
- WordPress文档嵌入插件:无需浏览器插件即可上传和显示文档
- Android开源项目精选:优秀项目篇
- 黑色设计商务酷站模板 - 网站构建新选择
- Rollup插件去除JS文件横幅:横扫许可证头
- AngularDart中Hammock服务的使用与REST API集成
- 开源AVR编程器:高效、低成本的微控制器编程解决方案
- Anya Keller 图片组合的开发部署记录
