没有合适的资源?快使用搜索试试~ 我知道了~
首页grandMA2 控制台用户指南:兼容模式与功能更新
grandMA2 控制台用户指南:兼容模式与功能更新
需积分: 9 10 下载量 80 浏览量
更新于2024-07-21
1
收藏 4.47MB PDF 举报
"grandMA2 帮助手册是一份详细的文档,针对的是MA2 系列控制系统的操作员,特别是那些具有一定的英文能力的学习者。该手册涵盖了grandMA2 系列,它是MA Lighting 的第二代控制台,标志着一个新阶段的开始,尽管在初始版本中可能并不完善,但其硬件可以在兼容模式下运行,保持了Series 1的所有功能。 手册强调了在使用grandMA2 的兼容模式时,应参考最新版的grandMA series 1 手册,因为部分功能尚未完全实现或文档记录不全。这可能是由于新功能还在开发中,或者当前软件团队认为现有实现不够理想,未来可能会有所调整。因此,用户需要注意,手册中可能包含过时的信息,这是由于快速发展的软件导致的。 版权和免责声明部分声明了该手册符合指令2004/108/EG,制造商的名字也在此处列出,确保了用户在使用过程中遵循相关法规。作为455页的文档,它提供了全面的指导,从基础操作到高级功能,帮助用户充分利用grandMA2 的功能和潜力,适应其不断演进的技术特性。" 这份手册对于想要深入了解和掌握grandMA2 控制系统的人来说,是一份不可或缺的参考资料,它不仅提供了技术指导,还提示了用户在使用过程中的注意事项,以便于有效避免不必要的困扰和误解。随着软件的持续更新,定期查阅最新的帮助文档至关重要,以保持与系统的同步和高效操作。
资源详情
资源推荐
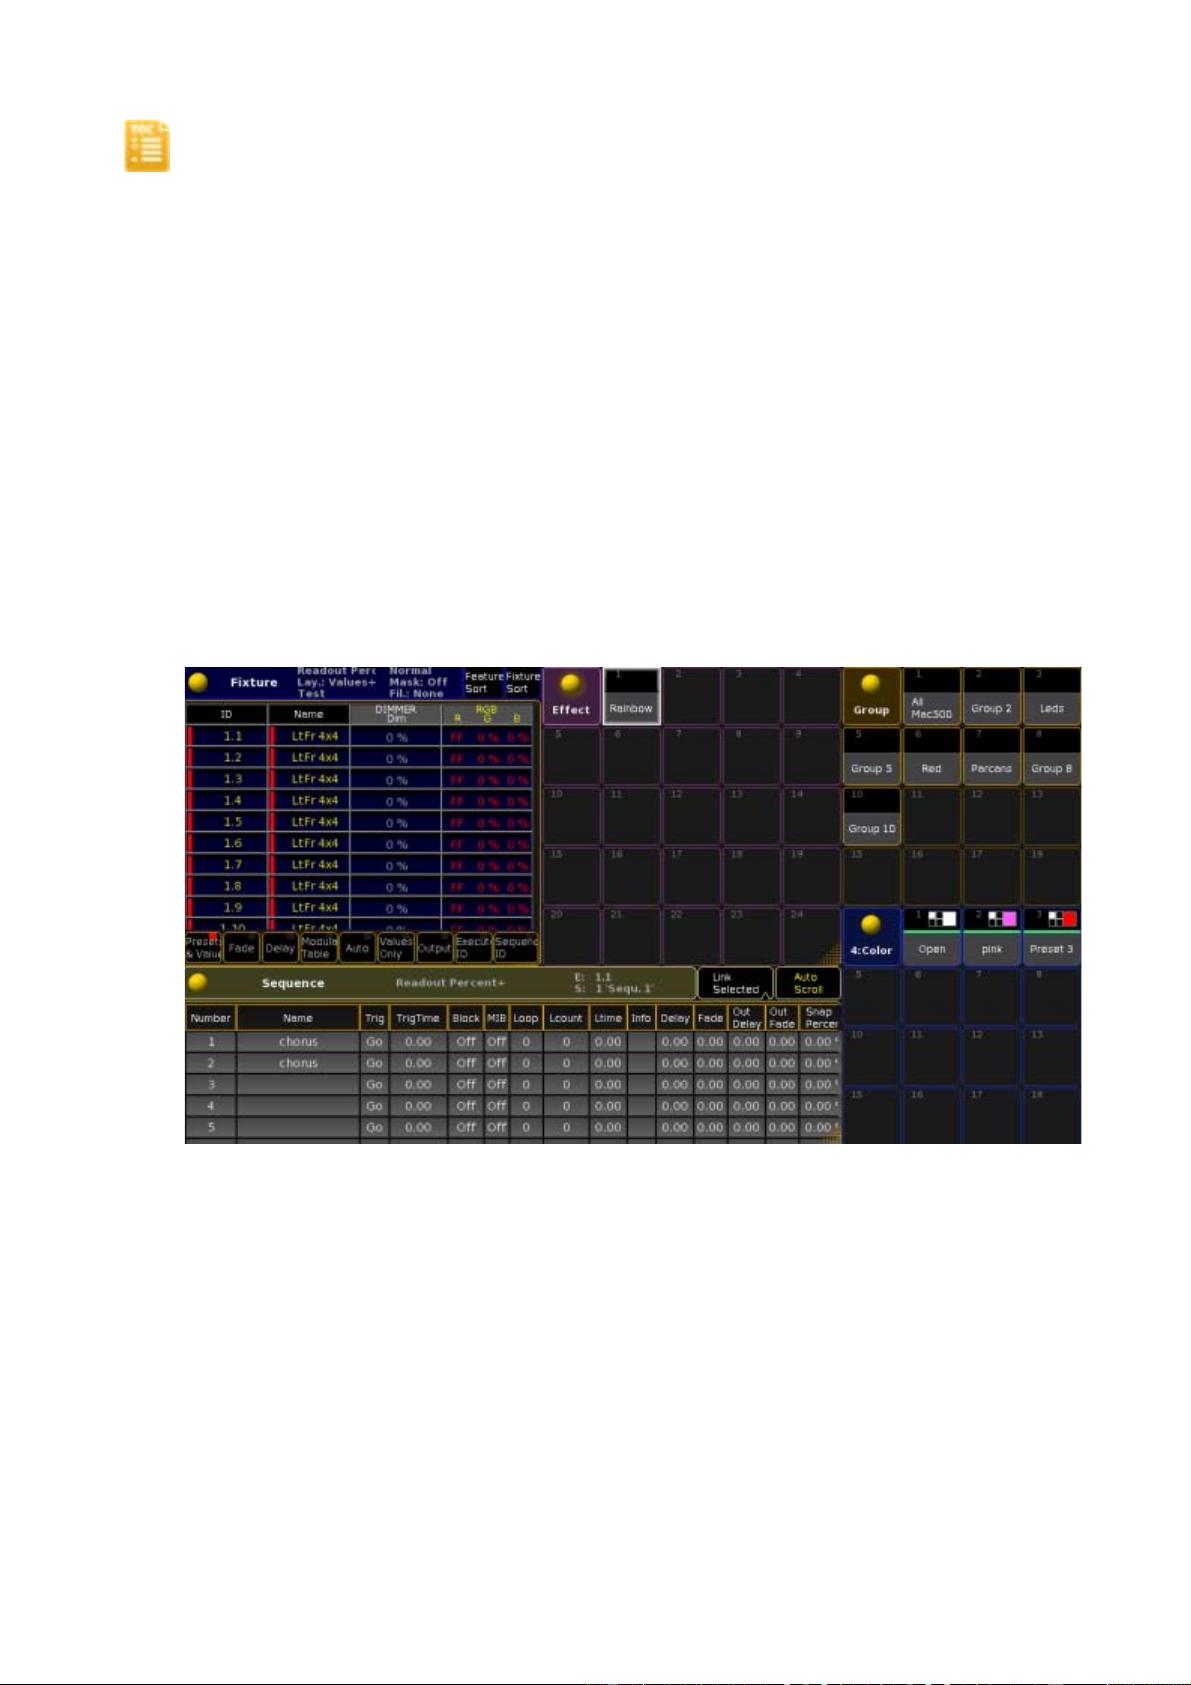
Concept: Views and Windows
What you see is what you want....
To get started, you may Autocreate a simple set of Views with window
arrangements, however to work efficiently with the console you should
create your own views, optimized for your type of show, amount of
fixtures, and your personal preferences regarding data-presentation
Window arrangements
Windows are created by pressing an empty space on your screen, and
choosing type of window, from the Create Window dialog.
Windows may be moved by dragging the headline, and resized by
dragging the lower right corner. After filling your screen with multiple
windows, it could look something like this:
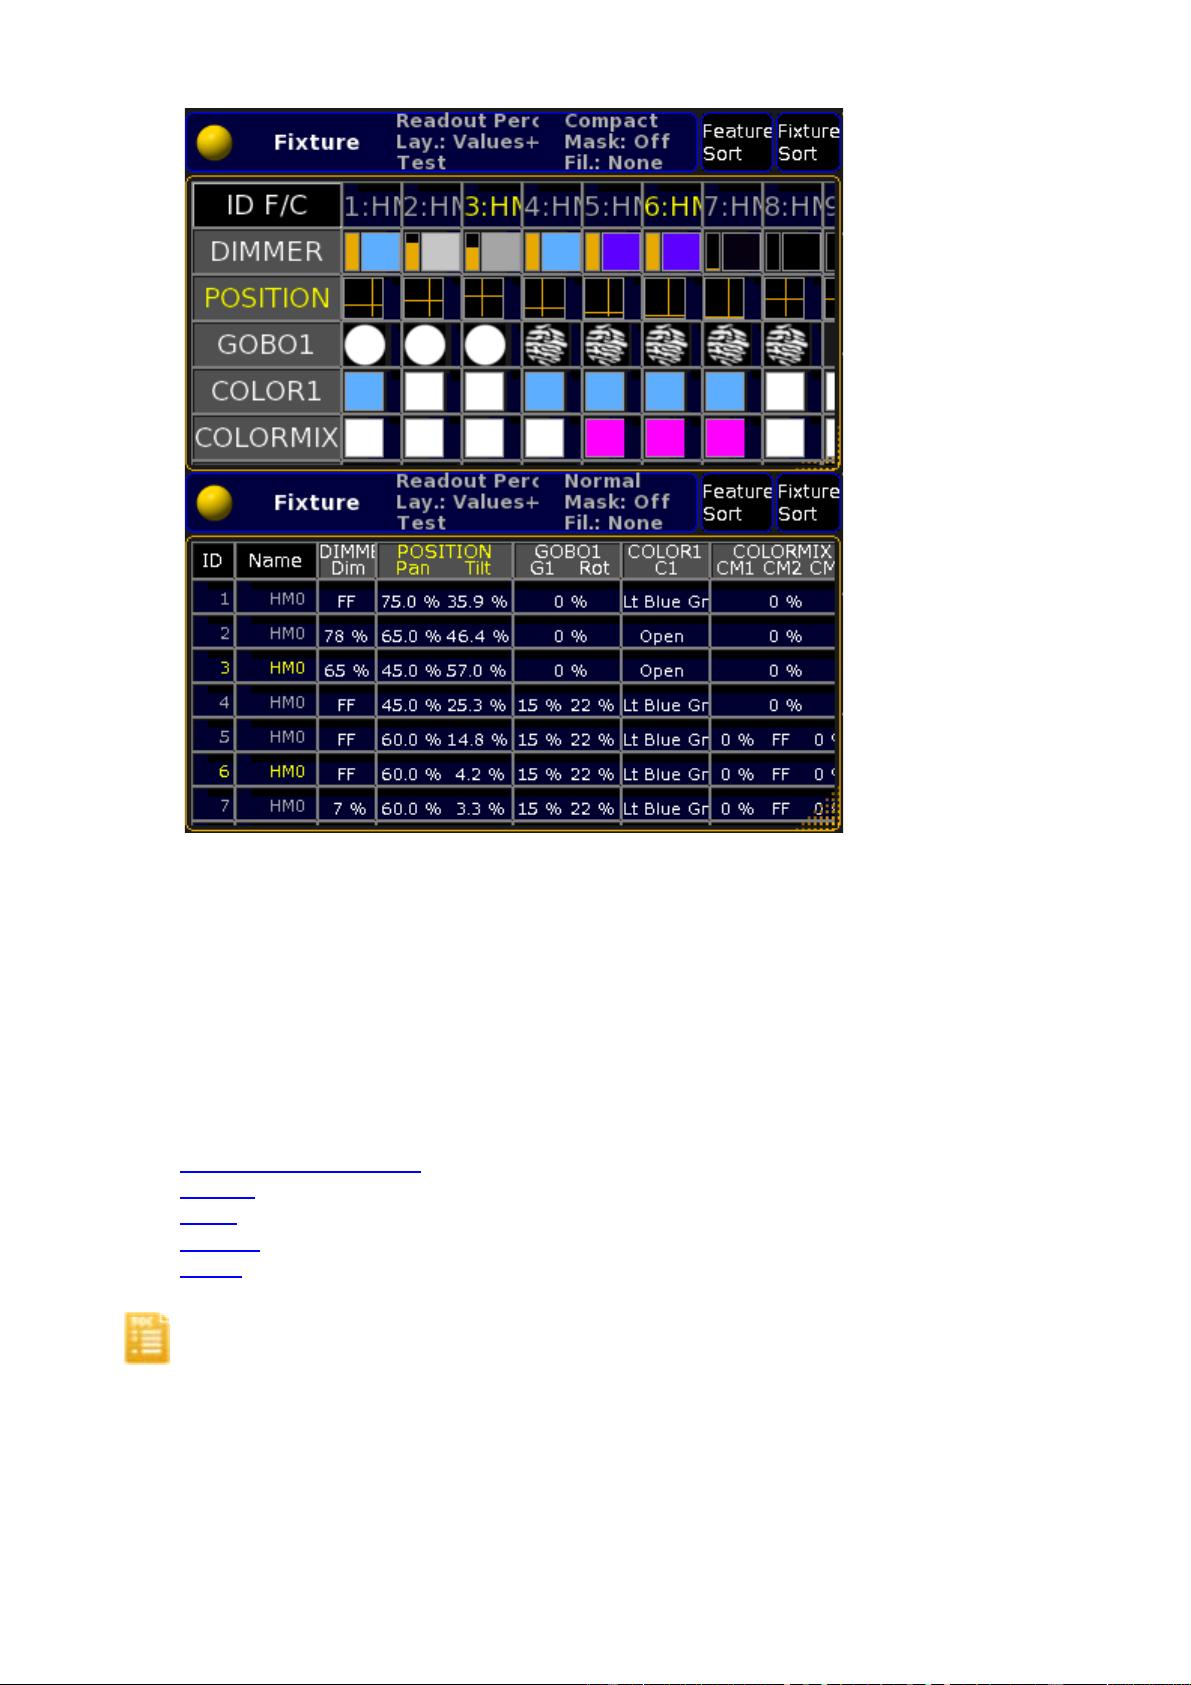
Window options
Every window has a yellow ball in the upper left corner, which may be
used to access the Window Option dialog. Within the options dialog, you
may select how the data is presented, fontsize, readout, special filters,
toolbars etc.
Here is two examples of the same Window, Fixture Sheet , but with
different options:
文件名:grandMA2 Help
Pa
g
e 16 of 455
Views
Window arrangements and options, are stored in as Views. By pressing
Store, and an empty Viewbutton on the right part of the screen, the
console will create a new View, and assign the View to the button, for
easy recall of the current arrangement.
Related Links
Create Window Dialog•
Sheets
•
Pools
•
Presets
•
Other
•
Concept: Channels & Fixtures
Devices to control; Channels & Fixtures
The grandMA2 is a versatile control system, there are no predefined
limitation of what type of fixtures it does control, e.g. "this desk controls
文件名:grandMA2 Help
Pa
g
e 17 of 455
200 dimmers and 48 moving lights". With grandMA2 all fixtures to be
controlled are defined in Setup
Show , by the user.
Every fixture needs an identifier (ID) . grandMA2 has two different
types/ranges of such, Channel ID & Fixture ID.
Channel
A fixture with a Channel ID will display its dimmer-attribute in the
Channel Sheet window. Channel IDs are typically used with devices that
only have one controllable parameter - Dimmer.
Fixture
A fixture with a Fixture ID will display all its attributes in the Fixture
Sheet window. Fixture IDs are typically used with fixtures that have
multiple controllable parameters - pan/tilt, color, gobo etc.
ID
A fixture must have either a Channel ID or a Fixture ID, - or both. Some
operators prefer to give every fixture both the same Channel and Fixture
ID, to be able to select number 5, not caring about if it is a Channel or a
Fixture, while others prefer to separate and distinguish between the two
types of fixtures. e.g Channel 5 (dimmer 5) is another fixture than Fixture
5 (Mac600 #5). A fixture can also have different Channel and Fixture IDs.
This may be useful in situations where the designer would like to call
文件名:grandMA2 Help
Pa
g
e 18 of 455
fixtures by its location: Channel 35 (5th position on third truss), while the
operator prefer to think of the fixture as first mac600, Fixture 601.
Subfixtures
In the later years, there has been an increase in products which actually
are multiple fixtures in one housing, e.g. LED-battens, where you have
multiple cells, and each cell has individual control of RGB. Such fixtures
may be patched as one fixture, but nevertheless be accessed individually
as Subfixtures. If a Thomas Pixel-line is patched and given the ID Fixture
5, merely selecting fixture 5 would adjust all 18 cells of this fixture. To
adjust only cell #13, you select Fixture 5.13
Related Links
Fixture Schedule•
Channel Sheet
•
Fixture Sheet
•
Concept: Selection
To be able to adjust and manipulate fixtures, they need to be
selected
Selecting via commandline
Selecting may be done with the commandline by i.e. pressing Fixture 5
Please . Multiple fixtures may be selected in one go by using the helping
keywords +, - and Thru, e.g. Channel 2 Thru 10 - 4
To see your current selection onscreen, you need a Channel Sheet and/or
Fixture Sheet window. Selected fixtures will have their name and number
(ID) displayed with yellow text.
文件名:grandMA2 Help
Pa
g
e 19 of 455
If your sheets are not large enough to display all fixtures,
enable Fixture Sort in the top right corner, to move the
selected fixtures to the top of the list
Selecting via GUI
With a Channel Sheet or Fixture Sheet window visible, you may select
fixtures merely by touching their name or ID-number. Selecting a range is
done with a "lasso": press on first fixture, move finger/mouse to last
fixture, then release. To deselect via the GUI, press the
-
(minus) key
first, then the name/ID in the sheet.
Cancel current selection
To de-select all selected fixtures press the
Clear
key once.
Concept: Attributes
Every fixture/channel has a minimum of one, but possibly multiple
parameters to be controlled. These parameters are classified as
Attributes, and may be adjusted and manipulated via the Encoder
Toolbar , once the fixtures are selected.
A generic dimmer typically has only one attribute - "Dimmer" while an
advanced Moving Light may have 30+ different attributes. To effectivly
work with a high number of attributes, Attributes are grouped in
Features, which again are grouped in Preset-types.
Example:
A fixtures's parameter for rotating the gobos on the second gobowheel,
would be the Attribute "Gobo2 Rot", of the Feature "Gobo2" of the Preset-
type "Gobo"
A fixtures's parameter for adjusting its intensity, would be the Attribute
"Dimmer", of the Feature "Dimmer" of the Preset-type "Dimmer"
Accessing attributes
文件名:grandMA2 Help
Pa
g
e 20 of 455
剩余454页未读,继续阅读
Trump_zhai
- 粉丝: 59
- 资源: 7
上传资源 快速赚钱
- 我的内容管理 展开
- 我的资源 快来上传第一个资源
- 我的收益 登录查看自己的收益
- 我的积分 登录查看自己的积分
- 我的C币 登录后查看C币余额
- 我的收藏
- 我的下载
- 下载帮助
最新资源
- Hadoop生态系统与MapReduce详解
- MDS系列三相整流桥模块技术规格与特性
- MFC编程:指针与句柄获取全面解析
- LM06:多模4G高速数据模块,支持GSM至TD-LTE
- 使用Gradle与Nexus构建私有仓库
- JAVA编程规范指南:命名规则与文件样式
- EMC VNX5500 存储系统日常维护指南
- 大数据驱动的互联网用户体验深度管理策略
- 改进型Booth算法:32位浮点阵列乘法器的高速设计与算法比较
- H3CNE网络认证重点知识整理
- Linux环境下MongoDB的详细安装教程
- 压缩文法的等价变换与多余规则删除
- BRMS入门指南:JBOSS安装与基础操作详解
- Win7环境下Android开发环境配置全攻略
- SHT10 C语言程序与LCD1602显示实例及精度校准
- 反垃圾邮件技术:现状与前景
资源上传下载、课程学习等过程中有任何疑问或建议,欢迎提出宝贵意见哦~我们会及时处理!
点击此处反馈
安全验证
文档复制为VIP权益,开通VIP直接复制
信息提交成功