html 中 div, class, button详解
时间: 2024-06-04 16:11:44 浏览: 20
1. div
div是HTML中最常用的标签之一,用于定义文档中的一个区域或块级容器,可以用来分割网页的不同部分,比如内容区、头部区、底部区等等。div标签的作用是划分出一块独立的区域,在这个区域中可以放置其他的HTML元素。
2. class
class是HTML中用来定义样式的一种属性,它可以用于HTML中的任何元素。通过class属性,我们可以为同一类元素设置相同的样式,使得网页样式更加统一。比如,我们可以将多个div元素设置为同一个class,然后在CSS中设置这个class的样式,这样就可以让这些div元素具有相同的样式了。
3. button
button是HTML中用来创建按钮的标签,它可以用来触发一些交互操作,比如提交表单、跳转页面、打开弹窗等等。button标签可以设置多个属性,包括type、name、value、onclick等等,通过这些属性可以实现不同的功能。button标签可以包含其他HTML元素,比如文字、图标、图片等等,可以通过CSS来设置这些元素的样式。
相关问题
详解element ui中的upload组件
Element UI 的 Upload 组件是一个文件上传组件,允许用户上传多个文件,并支持拖拽上传和文件预览。下面我将详细介绍这个组件的使用方法。
## 安装
首先,需要在项目中安装 Element UI。
```bash
npm install element-ui --save
```
然后,在 main.js 中引入 Element UI。
```javascript
import Vue from 'vue'
import ElementUI from 'element-ui'
import 'element-ui/lib/theme-chalk/index.css'
Vue.use(ElementUI)
```
## 基本用法
在需要使用 Upload 的组件中,可以这样写:
```html
<el-upload
class="upload-demo"
action="/upload"
:data="{ user_id: 123 }"
:on-success="handleSuccess"
:on-error="handleError"
:before-upload="beforeUpload"
:file-list="fileList"
:auto-upload="false">
<el-button slot="trigger" size="small" type="primary">选取文件</el-button>
<el-button size="small" type="success" @click="submitUpload">上传到服务器</el-button>
<div slot="tip" class="el-upload__tip">只能上传jpg/png文件,且不超过500kb</div>
</el-upload>
```
上面代码中,`action` 属性是上传的后端接口地址,`data` 属性是上传时需要携带的额外参数,`on-success` 和 `on-error` 属性分别是上传成功和失败时的回调函数,`before-upload` 属性是上传前的校验函数,`file-list` 属性是已经上传的文件列表,`auto-upload` 属性表示是否自动上传。
在 Upload 组件中,需要通过 `slot` 分别定义两个按钮,分别是选取文件和上传到服务器的按钮。同时,可以通过 `slot` 定义提示信息。
```html
<el-button slot="trigger" size="small" type="primary">选取文件</el-button>
<el-button size="small" type="success" @click="submitUpload">上传到服务器</el-button>
<div slot="tip" class="el-upload__tip">只能上传jpg/png文件,且不超过500kb</div>
```
最后,需要在 Vue 实例中定义对应的函数。
```javascript
export default {
data() {
return {
fileList: []
}
},
methods: {
handleSuccess(response, file, fileList) {
console.log(response, file, fileList);
},
handleError(error, file, fileList) {
console.log(error, file, fileList);
},
beforeUpload(file) {
const isJPG = file.type === 'image/jpeg' || file.type === 'image/png';
const isLt2M = file.size / 1024 / 1024 < 2;
if (!isJPG) {
this.$message.error('上传头像图片只能是 JPG 格式!');
}
if (!isLt2M) {
this.$message.error('上传头像图片大小不能超过 2MB!');
}
return isJPG && isLt2M;
},
submitUpload() {
this.$refs.upload.submit();
}
}
}
```
上面代码中,`handleSuccess` 和 `handleError` 分别是上传成功和失败时的回调函数,在这里可以对上传的结果进行处理。`beforeUpload` 是上传前的校验函数,可以在这里对上传的文件进行校验。`submitUpload` 用于手动触发上传。
## 高级用法
### 限制上传文件类型和大小
可以通过 `accept` 和 `before-upload` 属性来限制上传文件的类型和大小。
```html
<el-upload
class="upload-demo"
action="/upload"
:data="{ user_id: 123 }"
:on-success="handleSuccess"
:on-error="handleError"
:before-upload="beforeUpload"
:file-list="fileList"
:auto-upload="false"
accept="image/*"
:limit="3"
:on-exceed="handleExceed">
<el-button slot="trigger" size="small" type="primary">选取文件</el-button>
<el-button size="small" type="success" @click="submitUpload">上传到服务器</el-button>
<div slot="tip" class="el-upload__tip">只能上传jpg/png文件,且不超过500kb</div>
</el-upload>
```
上面代码中,`accept` 属性限制了只能上传图片类型的文件,`before-upload` 函数限制了文件大小不超过 500KB,同时还设置了最多上传 3 个文件的限制,并在超出限制时触发 `on-exceed` 方法。
```javascript
handleExceed(files, fileList) {
this.$message.warning(`当前限制选择 ${this.limit} 个文件,本次选择了 ${files.length} 个文件,共选择了 ${files.length + fileList.length} 个文件`);
}
```
### 上传到阿里云 OSS
可以通过 `before-upload` 和 `custom-request` 属性来实现上传到阿里云 OSS。
```html
<el-upload
class="upload-demo"
:action="ossConfig.host"
:data="ossConfig.params"
:on-success="handleSuccess"
:on-error="handleError"
:before-upload="beforeUpload"
:file-list="fileList"
:auto-upload="false"
:custom-request="ossConfig.customRequest">
<el-button slot="trigger" size="small" type="primary">选取文件</el-button>
<el-button size="small" type="success" @click="submitUpload">上传到服务器</el-button>
<div slot="tip" class="el-upload__tip">只能上传jpg/png文件,且不超过500kb</div>
</el-upload>
```
上面代码中,`action` 属性设置为阿里云 OSS 的上传地址,`data` 属性设置为上传时需要携带的额外参数。在 `before-upload` 函数中,需要返回一个 Promise 对象,该 Promise 对象中需要实现上传到阿里云 OSS 的逻辑。
```javascript
beforeUpload(file) {
const isJPG = file.type === 'image/jpeg' || file.type === 'image/png';
const isLt2M = file.size / 1024 / 1024 < 2;
if (!isJPG) {
this.$message.error('上传头像图片只能是 JPG 格式!');
}
if (!isLt2M) {
this.$message.error('上传头像图片大小不能超过 2MB!');
}
return isJPG && isLt2M && new Promise((resolve, reject) => {
const ossConfig = this.getOssConfig();
this.ossConfig = ossConfig;
const client = new OSS({
accessKeyId: ossConfig.accessid,
accessKeySecret: ossConfig.accesskey,
stsToken: ossConfig.securitytoken,
bucket: ossConfig.bucket,
region: ossConfig.region,
cname: true
});
client.multipartUpload(ossConfig.dir + '/' + file.name, file).then((result) => {
console.log(result);
resolve();
}).catch((error) => {
console.log(error);
reject();
});
});
},
getOssConfig() {
// 获取阿里云 OSS 的配置
}
```
在 `custom-request` 函数中,可以实现上传成功和失败的回调函数。
```javascript
ossConfig: {
host: '',
params: {},
customRequest: (config) => {
const { action, data, file, headers, onError, onSuccess, onProgress } = config;
const xhr = new XMLHttpRequest();
xhr.open('POST', action, true);
Object.keys(headers).forEach((key) => {
xhr.setRequestHeader(key, headers[key]);
});
xhr.onload = function onload() {
if (xhr.readyState === 4 && xhr.status === 200 && xhr.responseText !== '') {
try {
const response = JSON.parse(xhr.responseText);
onSuccess(response, xhr);
} catch (error) {
onError(error, xhr);
}
} else {
onError(new Error('上传失败'), xhr);
}
};
xhr.onerror = function onerror(error) {
onError(error, xhr);
};
xhr.upload.onprogress = function onprogress(event) {
if (event.total > 0) {
event.percent = (event.loaded / event.total) * 100;
}
onProgress(event, xhr);
};
const formData = new FormData();
Object.keys(data).forEach((key) => {
formData.append(key, data[key]);
});
formData.append('file', file);
xhr.send(formData);
}
},
```
react 中unstated-next的 createContainer详解
`unstated-next` 是 `unstated` 的升级版,是一个基于 React Hooks 的状态管理库。其中 `createContainer` 是其 API 之一,用于创建一个状态容器。
`createContainer` 的基本语法如下:
```
import { createContainer } from 'unstated-next';
const useContainer = createContainer(ContainerClass);
```
其中,`ContainerClass` 是一个类,用于定义状态容器的数据和方法。`useContainer` 是一个 React Hook,可以在组件中使用该 Hook 获取状态容器的实例。状态容器实例中包含了类中定义的数据和方法。
下面是一个简单的示例:
```
import { createContainer } from 'unstated-next';
import { useState } from 'react';
class CounterContainer {
state = {
count: 0
}
increment = () => {
this.setState({ count: this.state.count + 1 });
}
decrement = () => {
this.setState({ count: this.state.count - 1 });
}
}
const useCounter = createContainer(CounterContainer);
function Counter() {
const { state, increment, decrement } = useCounter.useContainer();
return (
<div>
<button onClick={decrement}>-</button>
<span>{state.count}</span>
<button onClick={increment}>+</button>
</div>
);
}
```
以上代码中,`CounterContainer` 类定义了一个包含 `count` 属性和 `increment`、`decrement` 方法的状态容器。`useCounter` Hook 获取到该状态容器的实例,通过 `state` 属性和 `increment`、`decrement` 方法实现了一个简单的计数器组件。
需要注意的是,`unstated-next` 的 `createContainer` 与 `Docker` API 中的 `createContainer` 是两个完全不同的东西,它们没有任何关系,也不要混淆。
相关推荐
最新推荐
详解SpringBoot中Controller接收对象列表实现
Spring Boot 中 Controller 接收对象列表实现详解 在 Spring Boot 框架中, Controller 是处理 HTTP 请求的入口点。通常情况下,我们需要在 Controller 中接收来自客户端的请求参数,而这些参数往往是对象列表形式...
Python中Selenium库使用教程详解
btn = bor.find_element_by_xpath('//[@id="search"]/div/div[2]/button') btn.click() # 滚动页面并获取页面源代码 sleep(2) bor.execute_script('window.scrollTo(0, document.body.scrollHeight)') sleep(2) ...
vue中引用swiper轮播插件的教程详解
<div class="swiper-button-prev"></div> <div class="swiper-button-next"></div> <!-- 滚动条 --> <div class="swiper-scrollbar"></div> </div> ``` 在`<script>`部分,我们需要在组件的`mounted`生命周期...
对vue中的事件穿透与禁止穿透实例详解
<div class="cover"></div> .cover { position: fixed; width: 100%; height: 110%; z-index: 999; pointer-events: none; /* 点击穿透 */ } ``` 在这个例子中,`cover`类的元素作为蒙层,设置了`pointer-...
详解React中传入组件的props改变时更新组件的几种实现方法
<button onClick={() => this.props.onConfirm(user)}>确定</button> </div> ); } } ``` 此时,`UserInput`组件完全依赖于`props`,当`props`中的`user`变化时,由于React的默认行为,组件会自动重新渲染。对于...
GO婚礼设计创业计划:技术驱动的婚庆服务
"婚礼GO网站创业计划书"
在创建婚礼GO网站的创业计划书中,创业者首先阐述了企业的核心业务——GO婚礼设计,专注于提供计算机软件销售和技术开发、技术服务,以及与婚礼相关的各种服务,如APP制作、网页设计、弱电工程安装等。企业类型被定义为服务类,涵盖了一系列与信息技术和婚礼策划相关的业务。
创业者的个人经历显示了他对行业的理解和投入。他曾在北京某科技公司工作,积累了吃苦耐劳的精神和实践经验。此外,他在大学期间担任班长,锻炼了团队管理和领导能力。他还参加了SYB创业培训班,系统地学习了创业意识、计划制定等关键技能。
市场评估部分,目标顾客定位为本地的结婚人群,特别是中等和中上收入者。根据数据显示,广州市内有14家婚庆公司,该企业预计能占据7%的市场份额。广州每年约有1万对新人结婚,公司目标接待200对新人,显示出明确的市场切入点和增长潜力。
市场营销计划是创业成功的关键。尽管文档中没有详细列出具体的营销策略,但可以推断,企业可能通过线上线下结合的方式,利用社交媒体、网络广告和本地推广活动来吸引目标客户。此外,提供高质量的技术解决方案和服务,以区别于竞争对手,可能是其市场差异化策略的一部分。
在组织结构方面,未详细说明,但可以预期包括了技术开发团队、销售与市场部门、客户服务和支持团队,以及可能的行政和财务部门。
在财务规划上,文档提到了固定资产和折旧、流动资金需求、销售收入预测、销售和成本计划以及现金流量计划。这表明创业者已经考虑了启动和运营的初期成本,以及未来12个月的收入预测,旨在确保企业的现金流稳定,并有可能享受政府对大学生初创企业的税收优惠政策。
总结来说,婚礼GO网站的创业计划书详尽地涵盖了企业概述、创业者背景、市场分析、营销策略、组织结构和财务规划等方面,为初创企业的成功奠定了坚实的基础。这份计划书显示了创业者对市场的深刻理解,以及对技术和婚礼行业的专业认识,有望在竞争激烈的婚庆市场中找到一席之地。
管理建模和仿真的文件
管理Boualem Benatallah引用此版本:布阿利姆·贝纳塔拉。管理建模和仿真。约瑟夫-傅立叶大学-格勒诺布尔第一大学,1996年。法语。NNT:电话:00345357HAL ID:电话:00345357https://theses.hal.science/tel-003453572008年12月9日提交HAL是一个多学科的开放存取档案馆,用于存放和传播科学研究论文,无论它们是否被公开。论文可以来自法国或国外的教学和研究机构,也可以来自公共或私人研究中心。L’archive ouverte pluridisciplinaire
【基础】PostgreSQL的安装和配置步骤
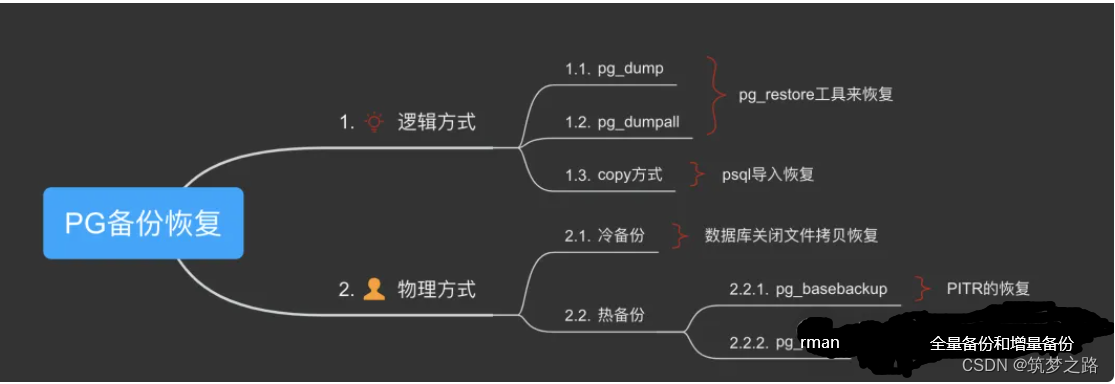
# 2.1 安装前的准备工作
### 2.1.1 系统要求
PostgreSQL 对系统硬件和软件环境有一定要求,具体如下:
- 操作系统:支持 Linux、Windows、macOS 等主流操作系统。
- CPU:推荐使用多核 CPU,以提高数据库处理性能。
- 内存:根据数据库规模和并发量确定,一般建议 8GB 以上。
- 硬盘:数据库文件和临时文件需要占用一定空间,建议预留足够的空间。
字节跳动面试题java
字节跳动作为一家知名的互联网公司,在面试Java开发者时可能会关注以下几个方面的问题:
1. **基础技能**:Java语言的核心语法、异常处理、内存管理、集合框架、IO操作等是否熟练掌握。
2. **面向对象编程**:多态、封装、继承的理解和应用,可能会涉及设计模式的提问。
3. **并发编程**:Java并发API(synchronized、volatile、Future、ExecutorService等)的使用,以及对并发模型(线程池、并发容器等)的理解。
4. **框架知识**:Spring Boot、MyBatis、Redis等常用框架的原理和使用经验。
5. **数据库相
微信行业发展现状及未来发展趋势分析
微信行业发展现状及未来行业发展趋势分析
微信作为移动互联网的基础设施,已经成为流量枢纽,月活跃账户达到10.4亿,同增10.9%,是全国用户量最多的手机App。微信的活跃账户从2012年起步月活用户仅为5900万人左右,伴随中国移动互联网进程的不断推进,微信的活跃账户一直维持稳步增长,在2014-2017年年末分别达到5亿月活、6.97亿月活、8.89亿月活和9.89亿月活。
微信月活发展历程显示,微信的用户数量增长已经开始呈现乏力趋势。微信在2018年3月日活达到6.89亿人,同比增长5.5%,环比上个月增长1.7%。微信的日活同比增速下滑至20%以下,并在2017年年底下滑至7.7%左右。微信DAU/MAU的比例也一直较为稳定,从2016年以来一直维持75%-80%左右的比例,用户的粘性极强,继续提升的空间并不大。
微信作为流量枢纽,已经成为移动互联网的基础设施,月活跃账户达到10.4亿,同增10.9%,是全国用户量最多的手机App。微信的活跃账户从2012年起步月活用户仅为5900万人左右,伴随中国移动互联网进程的不断推进,微信的活跃账户一直维持稳步增长,在2014-2017年年末分别达到5亿月活、6.97亿月活、8.89亿月活和9.89亿月活。
微信的用户数量增长已经开始呈现乏力趋势,这是因为微信自身也在重新寻求新的增长点。微信日活发展历程显示,微信的用户数量增长已经开始呈现乏力趋势。微信在2018年3月日活达到6.89亿人,同比增长5.5%,环比上个月增长1.7%。微信的日活同比增速下滑至20%以下,并在2017年年底下滑至7.7%左右。
微信DAU/MAU的比例也一直较为稳定,从2016年以来一直维持75%-80%左右的比例,用户的粘性极强,继续提升的空间并不大。因此,在整体用户数量开始触达天花板的时候,微信自身也在重新寻求新的增长点。
中国的整体移动互联网人均单日使用时长已经较高水平。18Q1中国移动互联网的月度总时长达到了77千亿分钟,环比17Q4增长了14%,单人日均使用时长达到了273分钟,环比17Q4增长了15%。而根据抽样统计,社交始终占据用户时长的最大一部分。2018年3月份,社交软件占据移动互联网35%左右的时长,相比2015年减少了约10pct,但仍然是移动互联网当中最大的时长占据者。
争夺社交软件份额的主要系娱乐类App,目前占比达到约32%左右。移动端的流量时长分布远比PC端更加集中,通常认为“搜索下載”和“网站导航”为PC时代的流量枢纽,但根据统计,搜索的用户量约为4.5亿,为各类应用最高,但其时长占比约为5%左右,落后于网络视频的13%左右位于第二名。PC时代的网络社交时长占比约为4%-5%,基本与搜索相当,但其流量分发能力远弱于搜索。
微信作为移动互联网的基础设施,已经成为流量枢纽,月活跃账户达到10.4亿,同增10.9%,是全国用户量最多的手机App。微信的活跃账户从2012年起步月活用户仅为5900万人左右,伴随中国移动互联网进程的不断推进,微信的活跃账户一直维持稳步增长,在2014-2017年年末分别达到5亿月活、6.97亿月活、8.89亿月活和9.89亿月活。
微信的用户数量增长已经开始呈现乏力趋势,这是因为微信自身也在重新寻求新的增长点。微信日活发展历程显示,微信的用户数量增长已经开始呈现乏力趋势。微信在2018年3月日活达到6.89亿人,同比增长5.5%,环比上个月增长1.7%。微信的日活同比增速下滑至20%以下,并在2017年年底下滑至7.7%左右。
微信DAU/MAU的比例也一直较为稳定,从2016年以来一直维持75%-80%左右的比例,用户的粘性极强,继续提升的空间并不大。因此,在整体用户数量开始触达天花板的时候,微信自身也在重新寻求新的增长点。