揭秘PyCharm集成OpenCV:从小白到实战高手
发布时间: 2024-08-06 03:05:21 阅读量: 46 订阅数: 25 

PyCharm安装教程:下载、安装和基本设置步骤
# 1. PyCharm集成OpenCV概述
**1.1 OpenCV简介**
OpenCV(Open Source Computer Vision Library)是一个开源的计算机视觉库,广泛用于图像处理、视频分析和机器学习等领域。它提供了一系列图像处理和计算机视觉算法,包括图像读取、转换、增强、分割、目标检测、视频处理和目标跟踪等。
**1.2 PyCharm集成OpenCV**
PyCharm是一种流行的Python IDE(集成开发环境),它可以轻松集成OpenCV库。通过集成OpenCV,PyCharm用户可以利用OpenCV的强大功能,在PyCharm环境中开发和调试计算机视觉应用程序。PyCharm提供了一个友好的界面,可以简化OpenCV模块的导入、使用和调试,从而提高开发效率。
# 2. PyCharm集成OpenCV的理论基础
### 2.1 OpenCV简介和安装
**OpenCV简介**
OpenCV(Open Source Computer Vision Library)是一个开源的计算机视觉库,提供了一系列图像处理和计算机视觉算法。它广泛用于各种应用中,如图像处理、视频分析、机器学习和机器人技术。
**OpenCV安装**
在PyCharm中集成OpenCV之前,需要先安装OpenCV。具体步骤如下:
1. **下载OpenCV安装包:**从OpenCV官方网站(https://opencv.org/)下载适用于您操作系统的OpenCV安装包。
2. **安装OpenCV:**按照安装包中的说明安装OpenCV。
3. **验证安装:**打开终端或命令提示符,输入以下命令:
```
python
import cv2
print(cv2.__version__)
```
如果安装成功,您将看到OpenCV的版本号。
### 2.2 PyCharm集成OpenCV的原理
PyCharm集成OpenCV的原理是通过使用Cython,一种将Python代码编译成C代码的工具。Cython可以提高Python代码的执行速度,从而使OpenCV算法在PyCharm中更高效地运行。
PyCharm集成OpenCV的过程如下:
1. **安装Cython:**使用pip命令安装Cython:
```
pip install Cython
```
2. **创建PyCharm项目:**在PyCharm中创建一个新的Python项目。
3. **添加OpenCV库:**右键单击项目目录,选择“添加”>“现有”>“库”。选择OpenCV安装目录中的“cv2.pyd”文件。
4. **编译Cython代码:**在项目目录中创建名为“setup.py”的文件,并添加以下代码:
```
from distutils.core import setup
from Cython.Build import cythonize
setup(
ext_modules=cythonize("your_cython_file.pyx")
)
```
5. **运行编译命令:**在终端或命令提示符中,导航到项目目录并运行以下命令:
```
python setup.py build_ext --inplace
```
6. **导入OpenCV:**在您的Python脚本中,使用以下语句导入OpenCV:
```
import cv2
```
现在,您已成功将OpenCV集成到PyCharm中,并可以使用其强大的图像处理和计算机视觉算法。
# 3.1 PyCharm环境配置
#### PyCharm版本选择
PyCharm集成OpenCV需要使用PyCharm Professional版本或更高版本。专业版提供了对科学计算和数据分析的支持,包括OpenCV集成。
#### OpenCV版本安装
OpenCV的版本选择取决于PyCharm的版本。对于PyCharm 2021.2及更高版本,推荐使用OpenCV 4.5或更高版本。对于PyCharm 2021.1及更低版本,推荐使用OpenCV 4.2或更低版本。
**安装步骤:**
1. 下载OpenCV安装包:https://opencv.org/releases/
2. 运行安装程序,选择PyCharm集成选项
3. 按照安装向导完成安装
#### PyCharm集成配置
**步骤:**
1. 打开PyCharm,点击"File" -> "Settings"
2. 在"Project" -> "Project Interpreter"下,点击"+"按钮添加新的解释器
3. 在"New Interpreter"对话框中,选择"Virtualenv"或"Conda"环境
4. 在"Base interpreter"字段中,选择已安装的Python解释器
5. 在"Packages"选项卡中,搜索"OpenCV"并安装所需的版本
6. 点击"OK"保存设置
### 3.2 OpenCV模块导入和使用
#### 模块导入
导入OpenCV模块的语法如下:
```python
import cv2
```
#### 图像读取
读取图像的语法如下:
```python
image = cv2.imread("image.jpg")
```
其中,"image.jpg"是图像文件的路径。
#### 图像显示
显示图像的语法如下:
```python
cv2.imshow("Image", image)
cv2.waitKey(0)
cv2.destroyAllWindows()
```
其中,"Image"是图像窗口的标题,waitKey(0)等待用户按下任意键关闭窗口,destroyAllWindows()关闭所有OpenCV窗口。
#### 图像转换
图像转换的语法如下:
```python
gray_image = cv2.cvtColor(image, cv2.COLOR_BGR2GRAY)
```
其中,cvtColor()函数将图像从BGR颜色空间转换为灰度空间。
#### 图像增强
图像增强的语法如下:
```python
blur_image = cv2.GaussianBlur(image, (5, 5), 0)
```
其中,GaussianBlur()函数对图像进行高斯模糊,(5, 5)是模糊核的大小,0是标准差。
#### 图像分割
图像分割的语法如下:
```python
_, contours, _ = cv2.findContours(gray_image, cv2.RETR_EXTERNAL, cv2.CHAIN_APPROX_SIMPLE)
```
其中,findContours()函数检测图像中的轮廓,RETR_EXTERNAL表示只检测外部轮廓,CHAIN_APPROX_SIMPLE表示使用简单轮廓近似。
#### 目标检测
目标检测的语法如下:
```python
detector = cv2.CascadeClassifier("haarcascade_frontalface_default.xml")
faces = detector.detectMultiScale(gray_image, 1.3, 5)
```
其中,CascadeClassifier()函数加载Haar级联分类器,detectMultiScale()函数检测图像中的人脸,1.3是缩放因子,5是检测窗口大小的最小变化。
# 4. PyCharm集成OpenCV的图像处理应用
### 4.1 图像读取和显示
图像读取是图像处理的第一步,OpenCV提供了`cv2.imread()`函数读取图像。该函数接收图像路径作为参数,并返回一个NumPy数组,其中包含图像的像素值。
```python
import cv2
# 读取图像
image = cv2.imread('image.jpg')
# 显示图像
cv2.imshow('Image', image)
cv2.waitKey(0)
cv2.destroyAllWindows()
```
**代码逻辑分析:**
* `cv2.imread()`函数读取图像并将其存储在`image`变量中。
* `cv2.imshow()`函数显示图像,窗口标题为`Image`。
* `cv2.waitKey(0)`函数等待用户按下任意键关闭窗口。
* `cv2.destroyAllWindows()`函数关闭所有OpenCV窗口。
### 4.2 图像转换和增强
图像转换和增强是图像处理中常见的操作,用于改善图像质量或提取特定特征。
**图像转换**
图像转换涉及将图像从一种格式转换为另一种格式。OpenCV提供了多种图像转换函数,例如:
```python
# 将图像转换为灰度图像
gray_image = cv2.cvtColor(image, cv2.COLOR_BGR2GRAY)
# 将图像转换为HSV颜色空间
hsv_image = cv2.cvtColor(image, cv2.COLOR_BGR2HSV)
```
**图像增强**
图像增强涉及改善图像的对比度、亮度或其他属性。OpenCV提供了多种图像增强函数,例如:
```python
# 调整图像对比度
contrast_image = cv2.convertScaleAbs(image, alpha=1.5, beta=0)
# 调整图像亮度
bright_image = cv2.add(image, np.array([50, 50, 50]))
```
### 4.3 图像分割和目标检测
图像分割是将图像分割成不同区域的过程,每个区域代表一个对象或感兴趣区域。目标检测是识别和定位图像中特定对象的子任务。
**图像分割**
OpenCV提供了多种图像分割算法,例如:
* **阈值分割:**根据像素强度将图像分割成二值图像。
* **聚类分割:**将图像中的像素聚类成不同的组。
* **形态学分割:**使用形态学操作分割图像。
**目标检测**
OpenCV提供了预训练的目标检测模型,例如:
* **Haar级联分类器:**用于检测人脸、眼睛和其他常见对象。
* **深度学习模型:**用于检测更复杂的物体,如汽车、行人等。
```python
# 使用Haar级联分类器检测人脸
face_cascade = cv2.CascadeClassifier('haarcascade_frontalface_default.xml')
faces = face_cascade.detectMultiScale(image, 1.1, 4)
# 绘制人脸边界框
for (x, y, w, h) in faces:
cv2.rectangle(image, (x, y), (x+w, y+h), (255, 0, 0), 2)
```
# 5. PyCharm集成OpenCV的视频处理应用
视频处理在计算机视觉领域有着广泛的应用,包括视频监控、视频分析、视频编辑等。PyCharm集成OpenCV提供了强大的视频处理功能,本章节将详细介绍如何使用PyCharm集成OpenCV进行视频处理。
### 5.1 视频读取和显示
#### 5.1.1 视频读取
OpenCV提供了`cv2.VideoCapture()`函数来读取视频文件或摄像头流。该函数接收一个参数,可以是视频文件路径或摄像头索引(对于摄像头)。
```python
import cv2
# 读取视频文件
cap = cv2.VideoCapture('video.mp4')
# 读取摄像头流
cap = cv2.VideoCapture(0)
```
#### 5.1.2 视频显示
读取视频后,可以使用`cv2.imshow()`函数显示视频帧。该函数接收两个参数:窗口名称和帧图像。
```python
while True:
# 读取视频帧
ret, frame = cap.read()
# 检查是否读取到帧
if not ret:
break
# 显示视频帧
cv2.imshow('Video', frame)
# 按下Esc键退出
if cv2.waitKey(1) & 0xFF == 27:
break
# 释放视频捕获对象
cap.release()
# 销毁所有窗口
cv2.destroyAllWindows()
```
### 5.2 视频帧处理和分析
#### 5.2.1 视频帧转换
OpenCV提供了多种函数来转换视频帧,包括格式转换、颜色空间转换和大小调整。
```python
# 格式转换
frame = cv2.cvtColor(frame, cv2.COLOR_BGR2GRAY)
# 颜色空间转换
frame = cv2.cvtColor(frame, cv2.COLOR_RGB2HSV)
# 大小调整
frame = cv2.resize(frame, (640, 480))
```
#### 5.2.2 视频帧分析
视频帧分析涉及提取帧中的信息,例如运动检测、对象跟踪和场景识别。OpenCV提供了许多用于帧分析的算法和函数。
```python
# 运动检测
gray = cv2.cvtColor(frame, cv2.COLOR_BGR2GRAY)
diff = cv2.absdiff(gray, prev_gray)
_, thresh = cv2.threshold(diff, 25, 255, cv2.THRESH_BINARY)
contours, _ = cv2.findContours(thresh, cv2.RETR_EXTERNAL, cv2.CHAIN_APPROX_SIMPLE)
# 对象跟踪
tracker = cv2.TrackerKCF_create()
tracker.init(frame, bbox)
# 场景识别
orb = cv2.ORB_create()
keypoints, descriptors = orb.detectAndCompute(frame, None)
```
### 5.3 视频目标跟踪和识别
#### 5.3.1 视频目标跟踪
视频目标跟踪是指在连续的视频帧中跟踪感兴趣的目标。OpenCV提供了多种目标跟踪算法,例如KCF、MOSSE和TLD。
```python
# KCF目标跟踪
tracker = cv2.TrackerKCF_create()
tracker.init(frame, bbox)
while True:
# 读取视频帧
ret, frame = cap.read()
# 检查是否读取到帧
if not ret:
break
# 更新跟踪器
success, bbox = tracker.update(frame)
# 绘制跟踪框
if success:
p1 = (int(bbox[0]), int(bbox[1]))
p2 = (int(bbox[0] + bbox[2]), int(bbox[1] + bbox[3]))
cv2.rectangle(frame, p1, p2, (0, 255, 0), 2)
# 显示视频帧
cv2.imshow('Video', frame)
# 按下Esc键退出
if cv2.waitKey(1) & 0xFF == 27:
break
# 释放视频捕获对象
cap.release()
# 销毁所有窗口
cv2.destroyAllWindows()
```
#### 5.3.2 视频目标识别
视频目标识别是指识别视频帧中感兴趣的目标。OpenCV提供了多种目标识别算法,例如人脸识别、物体检测和场景识别。
```python
# 人脸识别
face_cascade = cv2.CascadeClassifier(cv2.data.haarcascades + 'haarcascade_frontalface_default.xml')
faces = face_cascade.detectMultiScale(frame, 1.1, 4)
# 物体检测
object_detector = cv2.HOGDescriptor()
object_detector.setSVMDetector(cv2.HOGDescriptor_getDefaultPeopleDetector())
objects, _ = object_detector.detectMultiScale(frame, 0, 0, 0.9, (100, 100))
# 场景识别
orb = cv2.ORB_create()
keypoints, descriptors = orb.detectAndCompute(frame, None)
```
# 6.1 人脸识别系统
**实战项目:人脸识别系统**
**目标:**
* 构建一个基于 OpenCV 和 PyCharm 的人脸识别系统。
* 能够识别不同的人脸并提供身份信息。
**步骤:**
1. **数据收集:**收集一组人脸图像,包括正面、侧面和不同表情的照片。
2. **人脸检测:**使用 OpenCV 的 `cv2.CascadeClassifier` 类检测图像中的人脸。
3. **人脸识别:**使用 OpenCV 的 `cv2.face_LBPHFaceRecognizer` 类训练人脸识别模型。
4. **人脸特征提取:**从检测到的人脸上提取特征,如眼睛、鼻子和嘴巴的位置。
5. **人脸匹配:**将新图像中提取的特征与训练模型中的特征进行匹配,识别出人脸。
6. **身份信息显示:**根据匹配结果,显示识别出的人脸的身份信息。
**代码示例:**
```python
import cv2
# 初始化人脸检测器
face_cascade = cv2.CascadeClassifier('haarcascade_frontalface_default.xml')
# 初始化人脸识别器
recognizer = cv2.face_LBPHFaceRecognizer_create()
# 训练人脸识别模型
recognizer.train(faces, labels)
# 人脸识别
while True:
# 读取视频帧
ret, frame = cap.read()
# 灰度转换
gray = cv2.cvtColor(frame, cv2.COLOR_BGR2GRAY)
# 人脸检测
faces = face_cascade.detectMultiScale(gray, 1.3, 5)
# 人脸识别
for (x, y, w, h) in faces:
id, confidence = recognizer.predict(gray[y:y+h, x:x+w])
# 显示身份信息
cv2.putText(frame, str(id), (x, y-10), cv2.FONT_HERSHEY_SIMPLEX, 0.9, (0, 255, 0), 2)
# 显示视频帧
cv2.imshow('frame', frame)
if cv2.waitKey(1) & 0xFF == ord('q'):
break
# 释放视频捕获器
cap.release()
# 销毁所有窗口
cv2.destroyAllWindows()
```
**优化建议:**
* 使用多线程或多进程来提高人脸检测和识别的速度。
* 探索使用更先进的人脸识别算法,如深度学习模型。
* 集成额外的功能,如人脸追踪和情绪分析。

 百万级
高质量VIP文章无限畅学
百万级
高质量VIP文章无限畅学
 千万级
优质资源任意下载
千万级
优质资源任意下载
 C知道
免费提问 ( 生成式Al产品 )
C知道
免费提问 ( 生成式Al产品 )
0
0
相关推荐

专栏简介
本专栏旨在为读者提供全面的 PyCharm 配置 OpenCV 指南,帮助他们解锁图像处理和计算机视觉技能。专栏内容涵盖从基础安装到高级应用的各个方面,包括图像处理实战、性能优化、深度学习集成、常见问题解决、图像分割、图像增强、特征提取、图像分类、图像生成等。通过循序渐进的教程和实战项目,读者可以掌握 PyCharm 中 OpenCV 的使用技巧,并将其应用于图像处理和计算机视觉项目中。
专栏目录
最低0.47元/天 解锁专栏
买1年送3月
百万级
高质量VIP文章无限畅学
千万级
优质资源任意下载
C知道
免费提问 ( 生成式Al产品 )
最新推荐
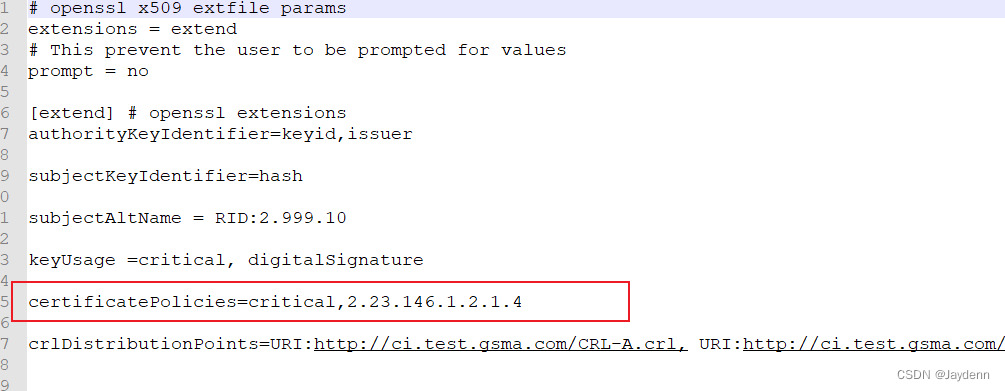
【SGP.22_v2.0(RSP)中文版深度剖析】:掌握核心特性,引领技术革新
# 摘要
SGP.22_v2.0(RSP)作为一种先进的技术标准,在本论文中得到了全面的探讨和解析。第一章概述了SGP.22_v2.0(RSP)的核心特性,为读者提供了对其功能与应用范围的基本理解。第二章深入分析了其技术架构,包括设计理念、关键组件功能以及核心功能模块的拆解,还着重介绍了创新技术的要点和面临的难点及解决方案。第三章通过案例分析和成功案例分享,展示了SGP.22_v2.0(RSP)在实际场景中的应用效果、
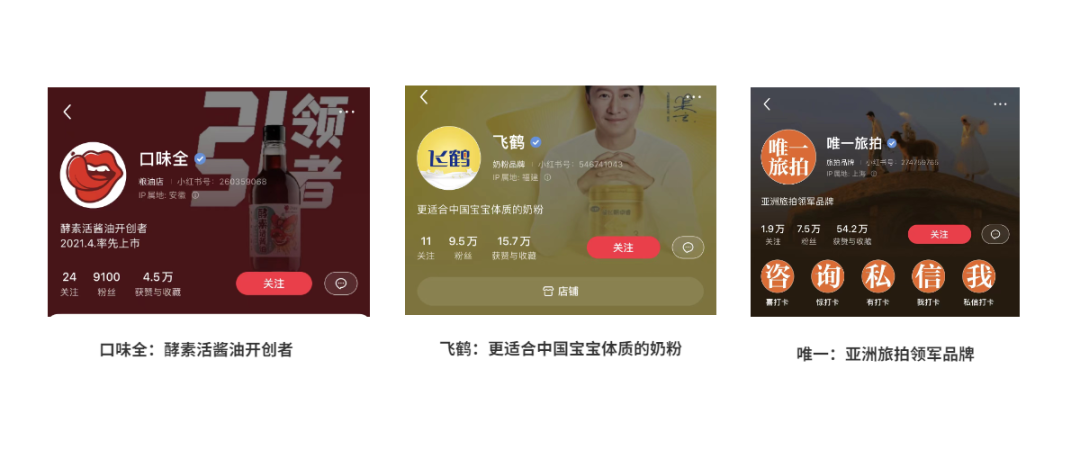
小红书企业号认证与内容营销:如何创造互动与共鸣
# 摘要
本文详细解析了小红书企业号的认证流程、内容营销理论、高效互动策略的制定与实施、小红书平台特性与内容布局、案例研究与实战技巧,并展望了未来趋势与企业号的持续发展。文章深入探讨了内容营销的重要性、目标受众分析、内容创作与互动策略,以及如何有效利用小红书平台特性进行内容分发和布局。此外,通过案例分析和实战技巧的讨论,本文提供了一系列实战操作方案,助力企业号管理者优化运营效果,增强用户粘性和品牌影响力
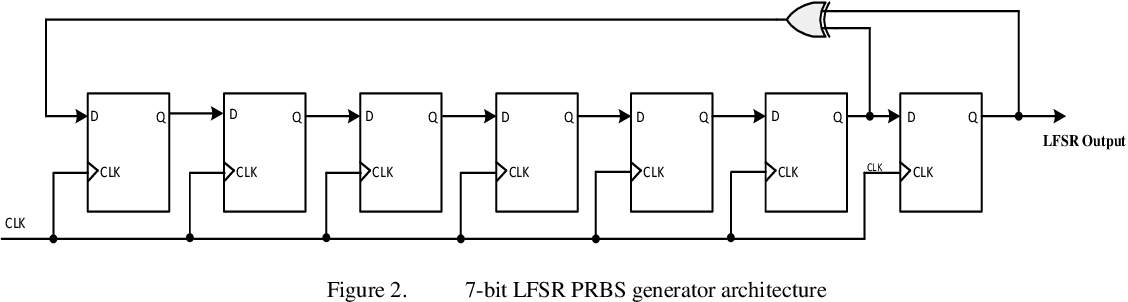
【数字电路设计】:优化PRBS生成器性能的4大策略
# 摘要
本文全面介绍了数字电路设计中的PRBS生成器原理、性能优化策略以及实际应用案例分析。首先阐述了PRBS生成器的工作原理和关键参数,重点分析了序列长度、反馈多项式、时钟频率等对生成器性能的影响。接着探讨了硬件选择、电路布局、编程算法和时序同步等多种优化方法,并通过实验环境搭建和案例分析,评估了这些策
【从零到专家】:一步步精通图书馆管理系统的UML图绘制

# 摘要
统一建模语言(UML)是软件工程领域广泛使用的建模工具,用于软件系统的设计、分析和文档化。本文旨在系统性地介绍UML图绘制的基础知识和高级应用。通过概述UML图的种类及其用途,文章阐明了UML的核心概念,包括元素与关系、可视化规则与建模。文章进一步深入探讨了用例图、类图和序列图的绘制技巧和在图书馆管理系统中的具体实例。最后,文章涉及活动图、状态图的绘制方法,以及组件图和
【深入理解Vue打印插件】:专家级别的应用和实践技巧
# 摘要
本文深入探讨了Vue打印插件的基础知识、工作原理、应用配置、优化方法、实践技巧以及高级定制开发,旨在为Vue开发者提供全面的打印解决方案。通过解析Vue打印插件内部的工作原理,包括指令和组件解析、打印流程控制机制以及插件架构和API设计,本文揭示了插件在项目
【Origin图表深度解析】:隐藏_显示坐标轴标题与图例的5大秘诀

# 摘要
本文旨在探讨Origin图表中坐标轴标题和图例的设置、隐藏与显示技巧及其重要性。通过分析坐标轴标题和图例的基本功能,本文阐述了它们在提升图表可读性和信息传达规范化中的作用。文章进一步介绍了隐藏与显示坐标轴标题和图例的需求及其实践方法,包括手动操作和编程自动化技术,强调了灵活控制这些元素对于创建清晰、直观图表的重要性。最后,本文展示了如何自定义图表以满足高级需求,并通过
【GC4663与物联网:构建高效IoT解决方案】:探索GC4663在IoT项目中的应用
# 摘要
GC4663作为一款专为物联网设计的芯片,其在物联网系统中的应用与理论基础是本文探讨的重点。首先,本文对物联网的概念、架构及其数据处理与传输机制进行了概述。随后,详细介绍了GC4663的技术规格,以及其在智能设备中的应用和物联网通信与安全机制。通过案例分析,本文探讨了GC4663在智能家居、工业物联网及城市基础设施中的实际应用,并分
Linux系统必备知识:wget命令的深入解析与应用技巧,打造高效下载与管理

# 摘要
本文旨在深入介绍Linux系统中广泛使用的wget命令的基础知识、高级使用技巧、实践应用、进阶技巧与脚本编写,以及在不同场景下的应用案例分析。通过探讨wget命令的下载控制、文件检索、网络安全、代理设置、定时任务、分段下载、远程文件管理等高级功能,文章展示了wget
EPLAN Fluid故障排除秘籍:快速诊断与解决,保证项目顺畅运行
# 摘要
EPLAN Fluid作为一种工程设计软件,广泛应用于流程控制系统的规划和实施。本文旨在提供EPLAN Fluid的基础介绍、常见问题的解决方案、实践案例分析,以及高级故障排除技巧。通过系统性地探讨故障类型、诊断步骤、快速解决策略、项目管理协作以及未来发展趋势,本文帮助读者深入理解EPLAN Fluid的应用,并提升在实际项目中的故障处理能力。
华为SUN2000-(33KTL, 40KTL) MODBUS接口故障排除技巧

# 摘要
本文旨在全面介绍MODBUS协议及其在华为SUN2000逆变器中的应用。首先,概述了MODBUS协议的起源、架构和特点,并详细介绍了其功能码和数据模型。随后,对华为SUN2000逆变器的工作原理、通信接口及与MODBUS接口相关的设置进行了讲解。文章还专门讨论了MODBUS接口故障诊断的方法和工具,以及如
资源上传下载、课程学习等过程中有任何疑问或建议,欢迎提出宝贵意见哦~我们会及时处理!
点击此处反馈


专栏目录
最低0.47元/天 解锁专栏
买1年送3月
百万级
高质量VIP文章无限畅学
千万级
优质资源任意下载
C知道
免费提问 ( 生成式Al产品 )