没有合适的资源?快使用搜索试试~ 我知道了~
首页树莓派入门指南:从零开始探索无限可能
树莓派入门指南:从零开始探索无限可能
需积分: 9 6 下载量 194 浏览量
更新于2024-07-18
收藏 42.91MB PDF 举报
"Raspberry Pi for Beginners All you need" 这篇资源是针对树莓派初学者的经典入门指南。树莓派,这款信用卡大小的计算机,已经在全球范围内产生了巨大影响,销售超过一百万部,并激发了全世界孩子和成年人的创新热情。对于孩子们来说,它是一个进入编程世界的理想途径;对于成年人来说,它是实现创意的无限平台。借助一些外设和基础编程知识,你可以让树莓派执行各种意想不到的任务。 该指南首先介绍开始使用树莓派所需的配件,包括如何设置和安装你熟悉的发行版,如Raspbian。Raspbian教程将引导你了解设备的潜力。书中包含了一系列项目教程,教你如何创建天气站、音乐流媒体服务器以及网络摄像头服务器等。此外,还有专门章节介绍了如何开始学习Scratch(一种图形化编程语言)和Python编程,这些都是利用树莓派进行项目开发的基础技能。 每个新领域的探索都会遇到挑战,因此,此书还贴心地提供了一个故障排查和常见问题解答部分,帮助读者解决在使用过程中可能遇到的问题。这个资源是2014年出版的,确保了内容的新鲜度和实用性,100%独立,旨在为树莓派新手提供全面的支持。 "Raspberry Pi for Beginners" 是一个全面且实用的教程,无论你是想要让孩子接触编程,还是自己想发掘树莓派的可能性,这本书都能提供详尽的指导,让你从零开始一步步掌握树莓派的操作与编程。通过本书,你可以了解到树莓派的基础知识,学习如何设置和配置,以及如何编写代码来实现各种有趣的应用,同时也能应对可能出现的技术难题。
资源详情
资源推荐
A
lthough the Raspberry Pi has many
operating systems that are compatible
and configured for use with its hardware,
there are some which the users of the Raspberry
Pi have clamoured for since its arrival. Two of
these in particular are Android – the operating
system used on smartphones and tablets; and
Chromium OS – the development operating system
based on that used in Google Chromebooks.
At this time, there are examples of each available
to download and test on the Raspberry Pi. However,
they are extremely problematic and are considered
as being experimental by the developers and the
community as a whole. But that doesn’t mean they
are impossible to install or experiment with.
The main issue with these other distros is purely
one of experience. By this we mean that when
embarking on testing these distros you, as a novice
user, will most likely be stretching your working
knowledge of the Raspberry Pi to its very limits.
While this is a perfectly enjoyable experience for
some, for others it can be quite stressful, especially
when you’ve spent some time preparing the
work only to have it fail without reason. Therefore
our advice would be to take it easy, keep the
experimentation of the other operating systems
a fun project and accept that in the world of
computing, things do go inexplicably wrong from
time to time. Still, don’t be afraid to go for it!
Android on Raspberry Pi
Android is a Google-funded and developed Linux-
based operating system designed for mobile
devices such as smartphones and tablets.
Android comes in many versions, the latest
being version 4.4 (codenamed KitKat), and is a very
versatile and modern operating system. There are
literally thousands of apps available for it, and it
is continually improving and implementing new
technologies with every new release. However,
herein lies the problem: The modern smartphone is
a deceptively powerful device, several times more
powerful than the Raspberry Pi, with specifically
designed hardware inside. So porting such an
advanced operating system to a lesser specified
hardware base comes with many challenges.
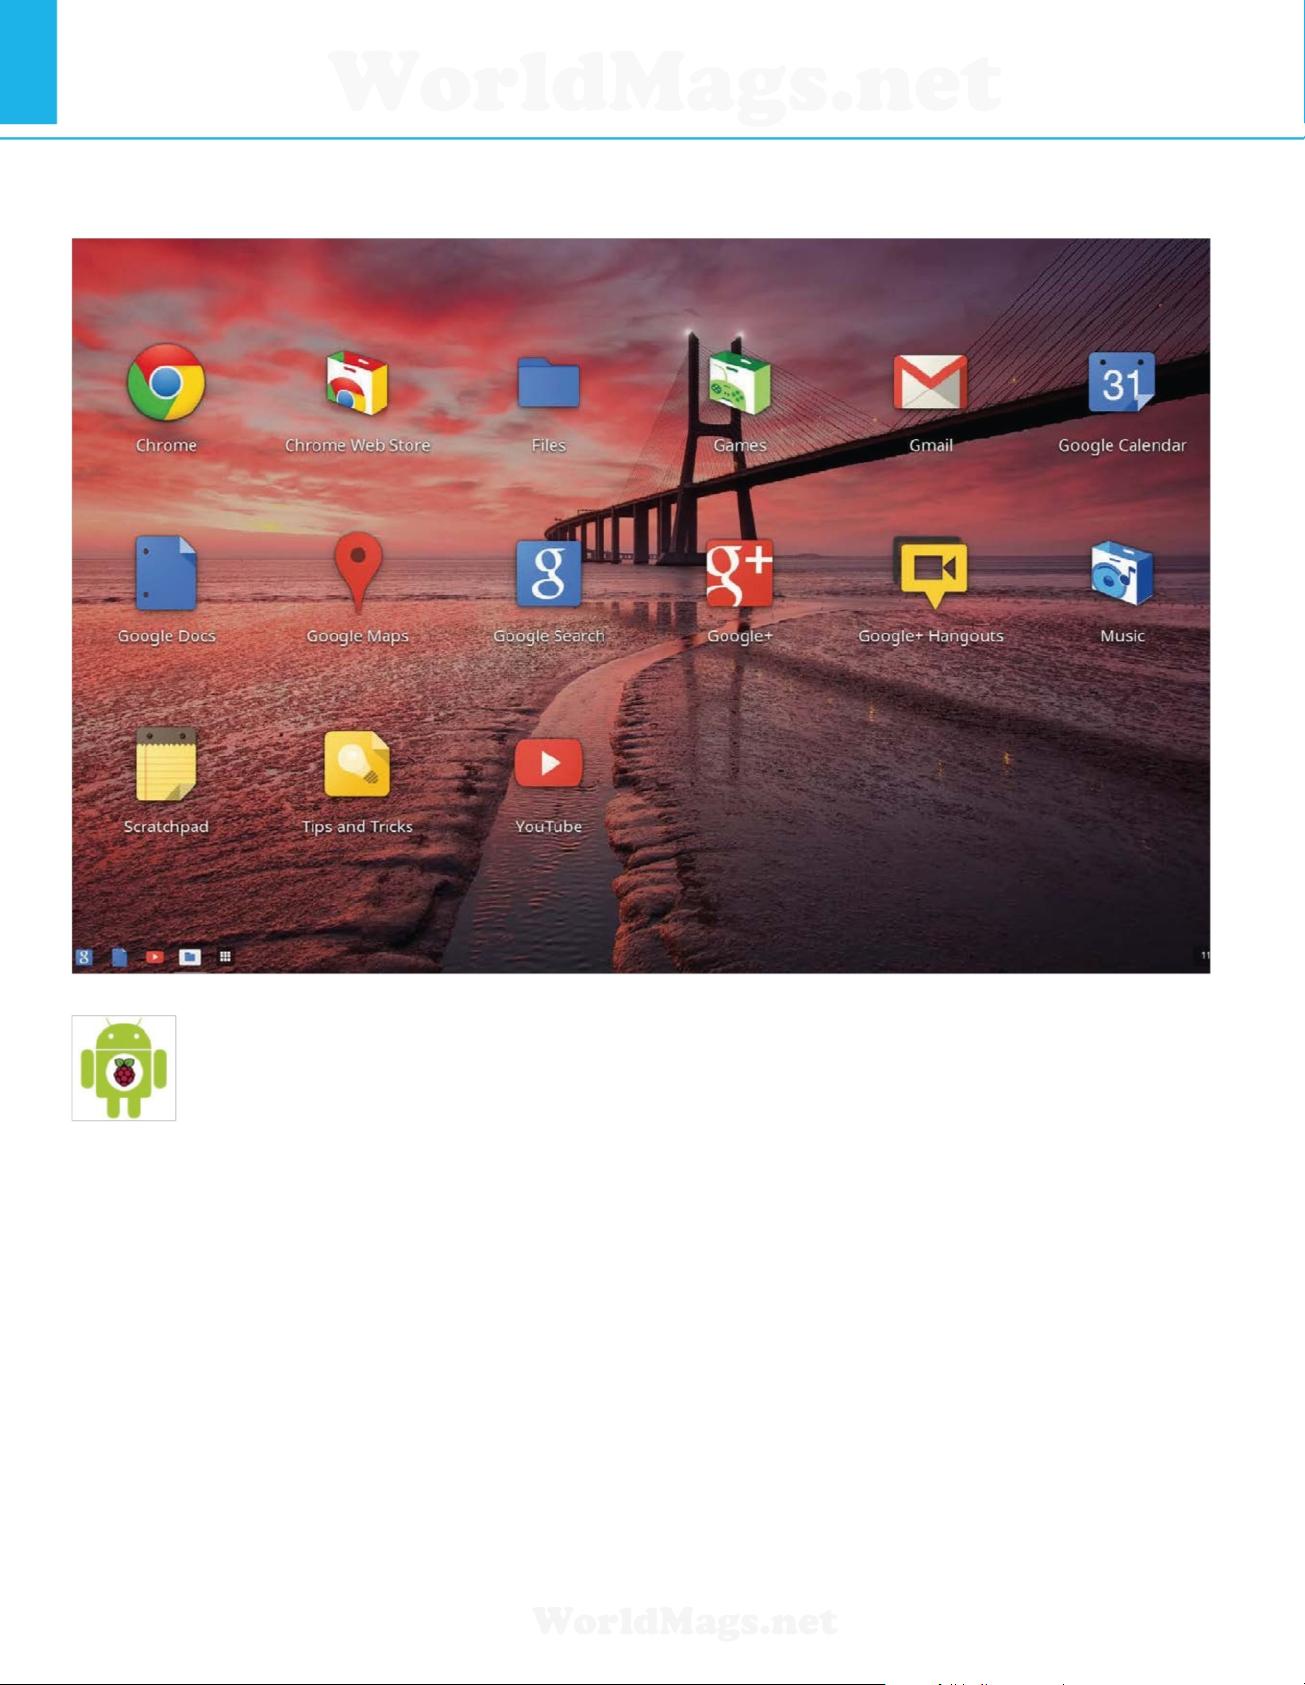
In the summer of 2012, the Raspberry Pi
Foundation announced that a port of Android
version 4.0 (Ice Cream Sandwich) is in the works and
features hardware accelerated video and graphics,
but lacks audio. Unfortunately though, it was pretty
unusable by anyone’s standards when installed on
the Raspberry Pi (Fig 1).
The Android on Pi project has since stalled, as Liz
Upton, who handles the PR work for the Raspberry
Pi Foundation, stated on the Pi forum: “We’ve got
a finite amount of engineering resources, and
we’re putting it into things that are important for
the educational purpose of the Pi, and making
the wider user experience better… Android
16 Raspberry Pi for Beginners16 Raspberry Pi for Beginners
The basics
Other operating systems
Learn about the efforts to bring Android and Chromium to the Raspberry Pi
WorldMags.net
WorldMags.net
WorldMags.net
development is dormant for now; we have things
that will benefit the
whole
community we’re
working on.”
Chromium OS
Chromium OS is another Linux-based operating
system. Designed by Google, it is the open source
development version of the Google Chrome OS
used on the firm’s Chromebooks.
Liam McLoughlin, aka Hexxeh, has been working
tirelessly over the last year or so to try to bring the
development Chromium OS to the Raspberry Pi.
Unfortunately though, he no longer has the time to
dedicate himself to the project. To quote his blog
entry: “I’d still like to see Chrome on the Raspberry Pi,
but I don’t have time for it at present, and I’m kind of
at a dead end in terms of where to go with it. It’s not
dead, so I might have something to share with you
in the future for this one.”
It is possible to install Chromium OS onto the
Raspberry Pi (Fig 2). However, the bad news is that
it’s terribly slow, to the point of being unusable, and
you’ll need to have some advanced knowledge of
how to compile and build images and packages, so
it’s not exactly beginner-friendly by any stretch of
the imagination.
Try them out
Should you wish to try the Android port on the
Raspberry Pi, take a moment to point your browser
to goo.gl/gT5De. This is the official wiki page for the
project and towards the bottom of the page you’ll
find the links to the relevant images.
Simply download the image and transfer it to
an SD card in the same way you transferred your
primary Raspberry Pi operating system. Then, insert
the SD card into the Raspberry Pi and apply power.
In time you should be at the Android start screen,
but be warned, it’s painfully slow, and using a
mouse is nowhere near as intuitive in Android as
using touch-screen technology.
Getting Chromium OS to run on the Raspberry
Pi is a little more complex than that of the Android
build. For starters, there are a few prerequisites
necessary; however, a blog post located at
goo.gl/bEQdk should get you on track and ready to
test Chromium OS on the Raspberry Pi.
The Raspberry Pi has the potential to play
host to some great distributions. We have only
scratched the surface here, and there are more
being tested, packaged and created almost
by the day. There is very little doubt that you
will come into contact with some, if not all, of
the distros that are mentioned throughout the
pages of this book. And we are fairly sure that
you will enjoy the time you have with each.
One thing to remember when trying out a new
distro, though, is that it’s a personal thing. What
works fantastically with one may not work well
with another.
If you are interested in looking into even
more distros, then take a moment to browse on
over to this Raspberry Pi page: goo.gl/PPc8z,
and have a look at the lengthy selection of
available distros.
Even more distros
Take your Pi even further with a different distro
Raspberry Pi for Beginners 17Raspberry Pi for Beginners 17
Q Fig 2: Chromium OS can be installed on the Raspberry Pi, but it’s terribly unstable and impossibly slow to use
Q If you do decide to test Chromium on the Raspberry Pi,
then get used to screens like this
Q Fig 1: Sadly, the Android on Raspberry Pi project has
stalled, but it’s possible it could return in the future
Q Don’t be put off by the experimental nature of
Android or Chromium for Pi. They just need more work
WorldMags.net
WorldMags.net
WorldMags.net
Raspberry Pi (Model A)
While more limited than Model B in terms of hardware connections, it’s still a capable little machine
T
he main differences between the two
flavours of Pi are the RAM, the number of
USB 2.0 ports and the fact that the ModelA
doesn’t have an Ethernet port. While that results in
a lower price for the Model A, it means that a user
will have to buy a powered USB hub in order to get
it to work with the desktop or online. The Model A
is more aimed at those creating electronics projects
that require programming and control directly from
the command line interface.
Both Pi models use the Broadcom BCM2835
CPU, which is an ARM11-based processor running
at 700MHz. There are overclocking modes built in
for users to increase the speed as long as the core
doesn’t get too hot, at which point it is throttled
back. Also included is the Broadcom VideoCore IV
GPU with support for OpenGL ES 2.0, which can
perform 24 GFlops and decode and play H.264
video at 1080p resolution. Originally the Model A
was due to use 128MB RAM, but this was upgraded
to 256MB RAM with the Model B going from 256MB
to 512MB. The RAM is shared with the GPU.
The power supply to the Pi is via the 5V micro-
USB socket. As the Model A has fewer powered
interfaces it only requires 300mA, without any other
external connections, compared to the 700mA
that the Model B needs. The standard system of
connecting the Pi models is to use the HDMI port
(supports v1.3 and v1.4) to connect to a HDMI
socket on a TV or perhaps a DVI port on a monitor.
Both HDMI-HDMI and HDMI-DVI cables work well,
delivering 1080p video, or 1920x1080.
Sound is also sent through the HDMI connection,
but if using a monitor without speakers then there’s
the standard 3.5mm jack socket for audio. The RCA
composite video connection was designed for use
in countries where the level of technology is lower
and more basic displays such as older TVs are used.
It also means that the Pi can be wired up to an old
TV at home without taking over the main TV or
computer monitors. Both video outputs support
PAL and NTSC standards.
18 Raspberry Pi for Beginners18
Raspberry Pi for Beginners
The basics
Micro USB power
The Micro USB adapter doesn’t come with
your Pi. It has a minimum rating of 500mA
for Model A and 700mA for Model B
HDMI port
Hi-res video output with sound comes
courtesy of the HDMI socket that can
power TVs and monitors at 1080p
SD card slot
An SD card slot is
provided on the flipside
of your PI. The maximum
size it can hold is 32GB
Audio out
It also features a
3.5mm jack plug
for audio output
Video out
RCA composite
video means you can
use your Raspberry Pi to
watch pictures and video
Single USB port
There is only one USB port on
Model A, so the first accessory
to buy is a powered USB hub
WorldMags.net
WorldMags.net
WorldMags.net
Raspberry Pi (Model B)
For most users Model B is the version of choice, with its extra RAM and ethernet port
T
he decision to name the Pi versions Model
A and Model B comes from the BBC Micro
of the early Eighties. The BBC ModelA had
fewer interfaces and RAM and so was cheaper; the
Model B eventually completely replaced it.
With the Pi, the situation is the same and for
most people, the Model B is the obvious choice.
It has more RAM and, instead of one USB port
connected directly to the SoC, it has a hub with an
Ethernet (10/100Mb) RJ45 port and two USB ports.
This means that a keyboard and mouse can be
connected via USB and internet access is available
with a direct Ethernet connection to your modem/
router. It means the Model B is easier and quicker to
set up and requires fewer extra hardware purchases
to make operational.
Aside from the RAM and USB hub, the hardware
is the same, so both models also feature the 8-pin
General Purpose Input/Output (GPIO) header that
can be used for interfacing with electronics projects.
There’s also a CSI input connector for adding the
newly launched 5MP camera module.
There’s no hard drive in the Pi; it uses solid-state
storage courtesy of an SD card that plugs in. The
operating system and card must be set up on a
Windows or Mac computer, before booting the Pi.
The 26 pins of the GPIO offer a number of
different technologies for interfacing with the
outside world. Pins 3 and 5 are an Inter-Integrated
Circuit (I2C), which is a serial bus interface for
connection to simple devices using just two wires.
It’s limited to fairly slow speeds of up to 100Kbps.
On pins 8 and 10 is a Universal Asynchronous
Receiver/Transmitter (UART) for accessing the serial
console. There’s a clock signal pulse on pin 7 and
for more sophisticated sensors and simple displays,
there’s the Serial Peripheral Interface Bus on pins 19,
21, 23, 24 and 26. This is a two-way serial connection
with synchronised timing on pin 23, the SCLK.
Finally, over on pin 12 is a Pulse Width Modulation
(PWM) power supply for lighting up LEDs and
controlling simple motors.
Raspberry Pi for Beginners 19Raspberry Pi for Beginners 19
GPIO pin header
The GPIO pin header is
your doorway to a world
of connecting devices
and electronics for direct
control via the Pi
CSI connection
The recently launched 5MP
camera module plugs into here
and provides the Raspberry
Pi with the ability to capture
photographs and record videos
Ethernet port
Again, unlike Model A, Model B
features an ethernet port, so you
don’t need a Wi-Fi dongle as you
can connect to the internet
DSI display connector
You can attach an LCD panel
to your Pi via the DSI display
connector. It provides high
resolution display resulting in
flawless video output
The control centre
The main chip of the Pi is a
system-on-a-chip (SoC) that
houses the 700MHz Broadcom
CPU and the VideoCore IV GPU
Dual USB port
The main advantage of Model
B is that it has two USB ports
(as opposed to Model A). This
reduces the need of a USB hub
WorldMags.net
WorldMags.net
WorldMags.net
20 Raspberry Pi for Beginners20 Raspberry Pi for Beginners
The basics
Set up your
Raspberry Pi
Learn what goes where in your brand new
Raspberry Pi with our easy to follow guide
Monitor
The Raspberry Pi is capable of displaying
a 1920 x 1080 output – otherwise known
as 1080p. Some modern monitors allow
you to plug HDMI straight into them,
just like TVs do. However you may need
an adapter if your TV doesn’t
W
hile it looks daunting, setting up the Raspberry Pi for day-to-day
use is actually very simple. Like a TV or a normal computer, only
certain cables will fit into the specific slots, and the main job really
is making sure you’ve got plugged in what you need at any one time. The
Raspberry Pi itself doesn’t label much of the board. However, most good
cases will do that for you anyway - if you decide to invest in one.
Case and accessories
A case is not necessary to use the
Pi correctly, but a decent one can
keep it well protected from dust,
and make it easier to move while
in operation. You will need an SD
card, however, of at least 4GB
Power adapter
The Raspberry Pi is
powered using a microUSB
cable, much like a lot of
modern Android phones.
It can be powered off a
laptop or computer. But
to make the most out of it,
a proper mains adapter –
like this one – is ideal
Keyboard and mouse
Like any computer, you’ll need a keyboard and
mouse for any standard PC-style operations you
do with the Raspberry Pi. The more basic the
keyboard, the better; same with the mouse, as
some special ones need additional software
USB hub
There are only a limited number of USB
ports on a Raspberry Pi (just one, if you
have Model A). To get around this you
will need a USB hub. It’s important to get
a powered one, as the Pi cannot supply
enough juice on its own
WorldMags.net
WorldMags.net
WorldMags.net
剩余179页未读,继续阅读
YukinoSiro
- 粉丝: 988
- 资源: 5
上传资源 快速赚钱
- 我的内容管理 展开
- 我的资源 快来上传第一个资源
- 我的收益 登录查看自己的收益
- 我的积分 登录查看自己的积分
- 我的C币 登录后查看C币余额
- 我的收藏
- 我的下载
- 下载帮助
最新资源
- 十种常见电感线圈电感量计算公式详解
- 军用车辆:CAN总线的集成与优势
- CAN总线在汽车智能换档系统中的作用与实现
- CAN总线数据超载问题及解决策略
- 汽车车身系统CAN总线设计与应用
- SAP企业需求深度剖析:财务会计与供应链的关键流程与改进策略
- CAN总线在发动机电控系统中的通信设计实践
- Spring与iBATIS整合:快速开发与比较分析
- CAN总线驱动的整车管理系统硬件设计详解
- CAN总线通讯智能节点设计与实现
- DSP实现电动汽车CAN总线通讯技术
- CAN协议网关设计:自动位速率检测与互连
- Xcode免证书调试iPad程序开发指南
- 分布式数据库查询优化算法探讨
- Win7安装VC++6.0完全指南:解决兼容性与Office冲突
- MFC实现学生信息管理系统:登录与数据库操作
资源上传下载、课程学习等过程中有任何疑问或建议,欢迎提出宝贵意见哦~我们会及时处理!
点击此处反馈
安全验证
文档复制为VIP权益,开通VIP直接复制
信息提交成功