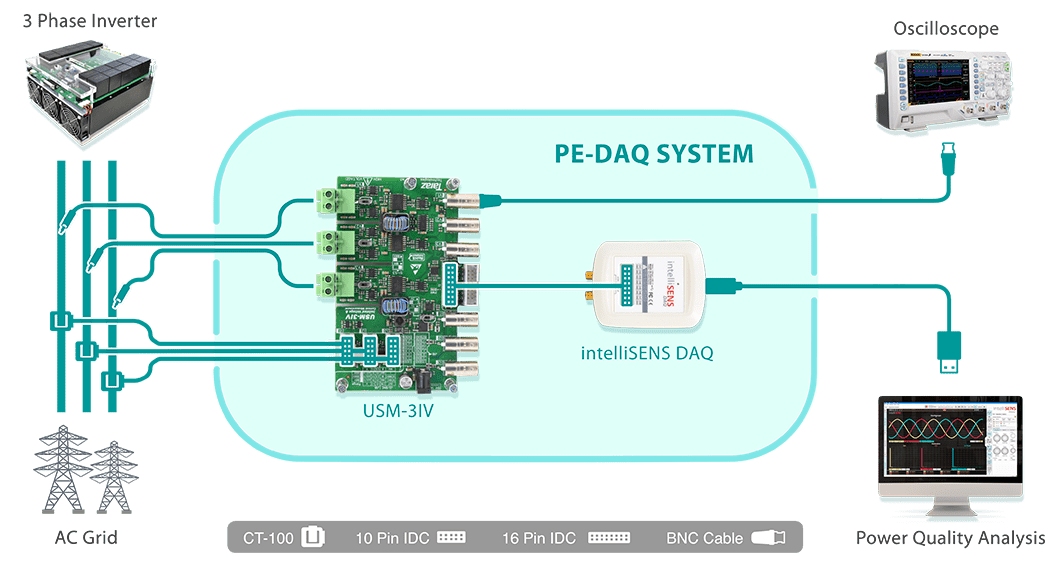
An Introduction to the Basic Interface of Visual Studio
发布时间: 2024-09-14 09:48:59 阅读量: 26 订阅数: 30 

beginning VisualBasic2010(英文版)入门必读
# 1. Introduction to the Basic Interface of Visual Studio
### I. Introduction to Visual Studio
Visual Studio is an integrated development environment (IDE) released by Microsoft for software development. The table below lists some common versions of Visual Studio and their release dates:
| Version | Release Date | New Features |
|------------------|--------------|-------------------------------------------------|
| Visual Studio 2010 | 2010 | .NET Framework 4.0, Azure development tools |
| Visual Studio 2012 | 2012 | Support for Windows 8 development, improvements in Blend |
| Visual Studio 2015 | 2015 | Support for C# 6.0, enhanced mobile development |
| Visual Studio 2019 | 2019 | *** Core, Live Share collaboration tool |
In Visual Studio, developers can use various programming languages (such as C#, C++, Python, etc.) to develop applications, including desktop, web, and mobile applications. Visual Studio offers a rich set of tools and features to help developers improve development efficiency and optimize code quality.
### II. Launching Visual Studio
Here are the general steps to launch Visual Studio:
1. Download and install Visual Studio, choosing the appropriate version based on individual or team needs.
2. After opening Visual Studio, you can choose to "Open a project" or "Create a new project" to start development work.
Once Visual Studio is launched, you can configure the development environment according to your needs, adjust the interface layout and theme colors to achieve a better development experience.
### III. Main Menu Navigation
The main menu in Visual Studio includes many commonly used functional options, including but not limited to:
- File menu: Provides file management, open, save, and other operations.
- Edit menu: Contains text editing-related functions, such as find and replace, cut and copy, etc.
- View menu: Used to adjust the editor layout, show or hide tool windows, etc.
Through main menu navigation, developers can quickly access various functions to improve work efficiency.
# 2. Introduction to the Basic Interface of Visual Studio
### II. Launching Visual Studio
Visual Studio is a powerful integrated development environment (IDE) that can be used for development with various programming languages. The following will provide detailed instructions on how to launch Visual Studio.
#### Installation and Configuration
Before launching Visual Studio, it is necessary to install and configure the software correctly. Here are the basic steps for installing Visual Studio:
1. Visit the official Visual Studio website, download the latest version of the installer.
2. Run the installer and select the required components and workloads according to the prompts.
3. After completing the installation, open Visual Studio and follow the prompts to perform necessary registration and activation.
#### Opening a Project
Once Visual Studio is installed and configured, you can then open a project for development. Here are the steps to open a project in Visual Studio:
1. Launch Visual Studio and select the "Open Project" option.
2. In the pop-up dialog, find the folder where the project is located and select the project file (such as a .sln file).
3. Click the "Open" button, and Visual Studio will load the project and display it in the Solution Explorer.
#### Visual Studio Startup Process
Below is a flowchart (using Mermaid format) of the Visual Studio startup process:
```mermaid
graph LR
A(Open Visual Studio) --> B{Installation and Configuration}
B --> C{Open Project}
C --> D[Start Development]
```
By following these steps, you can successfully launch Visual Studio and prepare to start project development.
# 3. Main Menu Navigation
In Visual Studio, main menu navigation includes the File menu, Edit menu, and View menu, among others. These menus provide a variety of functions and options to facilitate developer operations and configurations.
#### File Menu
The File menu mainly includes functions for creating, opening, and saving projects. Below are some common options in the File menu:
- **New Project**: Used to create a new project.
- **New File**: Creates a new file to be added to the current project.
- **Open Project**: Opens an existing project.
- **Save**: Saves changes to the current file.
- **Save As**: Saves a copy of the current file under a different name.
#### Edit Menu
The Edit menu is used for editing and managing code. Here are some common options in the Edit menu:
- **Undo**: Undoes the last operation.
- **Cut**: Cuts the selected content to the clipboard.
- **Copy**: Copies the selected content to the clipboard.
- **Paste**: Pastes the content from the clipboard to the current location.
#### View Menu
The View menu allows users to customize the Visual Studio interface and display methods. Here are some common options in the View menu:
- **Toolbox**: Displays available controls and tools.
- **Error List**: Shows errors during compilation and runtime.
- **Output**: Displays output information during project building and running.
With these functional menus, developers can quickly create, edit, and manage projects, improving development efficiency.
```mermaid
graph LR
A[File(File)] --> B{New Project(New Project)}
A --> C{Open Project(Open Project)}
A --> D{Save(Save)}
A --> E{Save As(Save As)}
```
```mermaid
graph TB
A[Edit(Edit)] --> B{Undo(Undo)}
A --> C{Cut(Cut)}
A --> D{Copy(Copy)}
A --> E{Paste(Paste)}
```
# 4. Toolbar Analysis
#### Standard Toolbar
- **File Operations:** Includes buttons for common file operations such as New, Open, Save, etc.
- **Edit Operations:** Includes buttons for common edit operations such as Undo, Redo, Cut, Copy, Paste, etc.
- **Debug Operations:** Includes buttons for common debug operations such as Start Debugging, Stop Debugging, Step Over, etc.
#### Debug Toolbar
- **Breakpoints:** Set breakpoints to interrupt program execution, facilitating line-by-line debugging.
- **Run Controls:** Includes buttons for run, pause, continue, and other run control operations.
- **Debug Windows:** Quickly open various debugger windows, such as the Watch window and the Locals window.
#### Custom Toolbar
- Users can customize the toolbar based on their needs, adding commonly used operation buttons.
- Customization is done through "View" -> "Other Windows" -> "Customize Toolbar."
- Custom toolbars can enhance the convenience and efficiency of user operations.
```mermaid
graph TD;
A[Standard Toolbar] -->|File Operations| B(New, Open, Save)
A -->|Edit Operations| C(Undo, Redo, Cut, Copy)
A -->|Debug Operations| D(Start Debugging, Stop Debugging)
E[Debug Toolbar] -->|Breakpoints| F(Set Breakpoints)
E -->|Run Controls| G(Run, Pause, Continue)
E -->|Debug Windows| H(Watch Window, Locals Window)
I[Custom Toolbar] -->|Custom Settings| J(Add Common Operation Buttons)
I -->|Operation Convenience| K(Enhance User Operation Experience)
I -->|Efficiency Improvement| L(Improve Work Efficiency)
```
In Visual Studio, the toolbar is an important interface element. With the buttons on the toolbar, file operations, editing operations, and debugging operations can be conveniently performed. Users can also customize the toolbar based on personal habits to improve operation convenience and efficiency.
# 5. Introduction to the Basic Interface of Visual Studio
### V. Code Editor
Visual Studio provides a powerful code editor that allows developers to write code efficiently. Here are some commonly used functions of the editor:
1. Syntax Highlighting: Different parts of the code are displayed in different colors, which helps improve code readability and writing efficiency.
2. Code Completion: Automatically pops up code suggestions to help developers quickly input code keywords.
3. Shortcuts: A variety of shortcut key combinations can help developers quickly complete code writing and editing.
| Shortcut | Function |
|--------------|-------------------|
| Ctrl + X | Cut |
| Ctrl + C | Copy |
| Ctrl + V | Paste |
| Ctrl + Z | Undo |
| Ctrl + S | Save |
Below is a simple Python code example demonstrating the functions of syntax highlighting and code completion:
```python
# Calculate the sum of two numbers
def add(a, b):
return a + b
result = add(5, 3)
print(result)
```
In addition, Visual Studio also supports developers customizing the appearance and behavior of the editor to meet individual needs.
```mermaid
graph TB
A(Code Editor) -- Syntax Highlighting --> B(Enhance Readability)
A -- Code Completion --> C(Fast Code Writing)
A -- Shortcuts --> D(Improve Writing Efficiency)
```
With these features, developers can more conveniently write code and improve development efficiency.
# 6. Introduction to the Basic Interface of Visual Studio
### VI. Solution Explorer
In Visual Studio, the Solution Explorer is a very important panel for managing project files and directory structures. The following will detail the functions and operations of the Solution Explorer:
1. **Creating a New Project:**
In the Solution Explorer, you can create a new project by following these steps:
- Open Visual Studio
- Select the "File" menu
- Click "New" -> "Project"
- In the pop-up dialog, select the project type and template, set the project name and location
- Click "OK" to create the new project
2. **Adding a New ***
***
***
*** "Add" -> "New Item" or "Existing Item"
- If "New Item" is selected, in the pop-up dialog, select the file type and template, set the file name
- If "Existing Item" is selected, select the existing file and add it to the project
3. **Project Configuration:**
Project configuration can also be performed in the Solution Explorer, including but not limited to:
- Modifying project properties
- Setting build options
- Configuring debugging options
Below is a Mermaid format flowchart showing how to create a new project and add a new file in the Solution Explorer:
```mermaid
graph LR
A(Open Visual Studio) --> B(Select "File" menu)
B --> C(Click "New" -> "Project")
C --> D(Select project type and template, set project name and location)
D --> E(Click "OK")
A --> F(Select the target location in the Solution Explorer)
F --> G(Right-click the target location)
G --> H(Select "Add" -> "New Item" or "Existing Item")
H --> I{Select New or Existing Item}
I --> J{New Item}
I --> K{Existing Item}
J --> L(Select file type and template, set file name)
K --> M(Select existing files and add to the project)
```
Through the above operations, developers can fully utilize the Solution Explorer to manage and configure projects.
# 7. Debugging Functionality
In Visual Studio, debugging functionality is a crucial part of the development process. Through debugging, developers can locate and resolve bugs in the code, ensuring the correctness and stability of the program.
#### 1. Breakpoint Setting
In the code editor, we can set breakpoints to pause the execution of the program, allowing for line-by-line debugging of the code. The steps to set a breakpoint are as follows:
```python
def divide(dividend, divisor):
# Set a breakpoint
result = dividend / divisor
return result
```
After setting a breakpoint, when the program execution reaches the breakpoint, it will automatically pause, and you can view the current variable values, call stacks, and other information, helping us locate the problem.
#### 2. Watch Window
The watch window helps developers view and monitor the value changes of specific variables, allowing for a better understanding of the code execution. The watch window is typically divided into "Locals" and "Watch," and we can add watch variables as needed.
#### 3. Debugger Options
Visual Studio provid***mon debugger options include breakpoint conditions, breakpoint actions, and debug information display.
During debugging, reasonable use of breakpoints, watch windows, and debugger options can help developers quickly locate and resolve bugs, improving the quality and stability of the code.
#### 4. Debugging Functionality Flowchart
```mermaid
graph TD
A(Set Breakpoint) --> B(Execute Program)
B --> C{Has the Program Reached the Breakpoint?}
C -- Yes --> D(Pause Execution)
C -- No --> B
D --> E(View Variable Values)
E --> F(Modify Code)
F --> G(Continue Execution)
G --> B
```
Through the introduction and flowchart of the debugging functionality above, readers can better understand how to use the debugging functionality in Visual Studio to improve the quality and efficiency of the code.

 百万级
高质量VIP文章无限畅学
百万级
高质量VIP文章无限畅学
 千万级
优质资源任意下载
千万级
优质资源任意下载
 C知道
免费提问 ( 生成式Al产品 )
C知道
免费提问 ( 生成式Al产品 )
0
0
相关推荐

专栏目录
最低0.47元/天 解锁专栏
买1年送3月
百万级
高质量VIP文章无限畅学
千万级
优质资源任意下载
C知道
免费提问 ( 生成式Al产品 )
最新推荐
【Xshell与Vmware交互解析】:打造零故障连接环境的5大实践

# 摘要
本文旨在探讨Xshell与Vmware的交互技术,涵盖远程连接环境的搭建、虚拟环境的自动化管理、安全交互实践以及高级应用等方面。首
火电厂资产管理系统:IT技术提升资产管理效能的实践案例
# 摘要
本文深入探讨了火电厂资产管理系统的背景、挑战、核心理论、实践开发、创新应用以及未来展望。首先分析了火电厂资产管理的现状和面临的挑战,然后介绍了资产管理系统的理论框架,包括系统架构设计、数据库管理、流程优化等方面。接着,本文详细描述了系统的开发实践,涉及前端界面设计、后端服务开发、以及系统集成与测试。随后,文章探讨了火电厂资产管理系统在移动端应用、物联网技术应用以及
Magento多店铺运营秘籍:高效管理多个在线商店的技巧
# 摘要
随着电子商务的蓬勃发展,Magento多店铺运营成为电商企业的核心需求。本文全面概述了Magento多店铺运营的关键方面,包括后台管理、技术优化及运营实践技巧。文中详细介绍了店铺设置、商品和订单管理,以及客户服务的优化方法。此外,本文还探讨了性能调优、安全性增强和第三方集成技术,为实现有效运营提供了技术支撑。在运营实践方面,本文阐述了有效的营销
【实战攻略】MATLAB优化单脉冲测角算法与性能提升技巧

# 摘要
本文全面探讨了MATLAB环境下优化单脉冲测角算法的过程、技术及应用。首先介绍了单脉冲测角算法的基础理论,包括测角原理、信号处理和算法实现步骤。其次,文中详细阐述了在MATLAB平台下进行算法性能优化的策略,包括代码加速、并行计算和G
OPA656行业案例揭秘:应用实践与最佳操作规程

# 摘要
本文深入探讨了OPA656行业应用的各个方面,涵盖了从技术基础到实践案例,再到操作规程的制定与实施。通过解析OPA656的核心组件,分析其关键性能指标和优势,本文揭示了OPA656在工业自动化和智慧城市中的具体应用案例。同时,本文还探讨了OPA656在特定场景下的优化策略,包括性能
【二极管热模拟实验操作教程】:实验室中模拟二极管发热的详细步骤

# 摘要
本文通过对二极管热模拟实验基础的研究,详细介绍了实验所需的设备与材料、理论知识、操作流程以及问题排查与解决方法。首先,文中对温度传感器的选择和校准、电源与负载设备的功能及操作进行了说明,接着阐述了二极管的工作原理、PN结结构特性及电流-电压特性曲线分析,以及热效应的物理基础和焦耳效应。文章进一步详述了实验操作的具体步骤,包括设备搭建、二极管的选取和安装、数据采
重命名域控制器:专家揭秘安全流程和必备准备
# 摘要
本文深入探讨了域控制器重命名的过程及其对系统环境的影响,阐述了域控制器的工作原理、角色和职责,以及重命名的目的和必要性。文章着重介绍了重命名前的准备工作,包括系统环境评估、备份和恢复策略以及变更管理流程,确保重命名操作的安全性和系统的稳定运行。实践操作部分详细说明了实施步骤和技巧,以及重命名后的监控和调优方法。最后,本文讨论了在重命名域控制器过程中的安全最佳实践和合规性检查,以满足信息安全和监管要求。整体而言,
【精通增量式PID】:参数调整与稳定性的艺术
# 摘要
增量式PID控制器是一种常见的控制系统,以其结构简单、易于调整和较高的控制精度广泛应用于工业过程控制、机器人系统和汽车电子等领域。本文深入探讨了增量式PID控制器的基本原理,详细分析了参数调整的艺术、稳定性分析与优化策略,并通过实际应用案例,展现了其在不同系统中的性能。同时,本文介绍了模糊控制、自适应PID策略和预测控制技术与增量式PID结合的
CarSim参数与控制算法协同:深度探讨与案例分析

# 摘要
本文介绍了CarSim软件的基本概念、参数系统及其与控制算法之间的协同优化方法。首先概述了CarSim软件的特点及参数系统,然后深入探讨了参数调整
资源上传下载、课程学习等过程中有任何疑问或建议,欢迎提出宝贵意见哦~我们会及时处理!
点击此处反馈


专栏目录
最低0.47元/天 解锁专栏
买1年送3月
百万级
高质量VIP文章无限畅学
千万级
优质资源任意下载
C知道
免费提问 ( 生成式Al产品 )