Matlab坐标轴范围对齐秘诀:多图表对比,一目了然,提升数据可读性
发布时间: 2024-06-16 03:23:06 阅读量: 120 订阅数: 95 
# 1. 坐标轴范围对齐的意义**
坐标轴范围对齐是一种数据可视化技术,它将不同图表或同一图表中不同坐标轴的范围调整为一致。这对于比较和分析不同数据集非常有用,因为它消除了由于不同范围导致的视觉偏差。通过对齐坐标轴,可以更准确地比较数据值,识别趋势和模式,并做出更明智的决策。
# 2. 坐标轴范围对齐的实现
### 2.1 手动调整坐标轴范围
手动调整坐标轴范围是最直接的方法,可以通过设置 `xlim` 和 `ylim` 参数来实现。
```python
import matplotlib.pyplot as plt
# 创建数据
x = [1, 2, 3, 4, 5]
y1 = [2, 4, 6, 8, 10]
y2 = [1, 3, 5, 7, 9]
# 创建图形
fig, ax = plt.subplots()
# 手动设置坐标轴范围
ax.set_xlim(0, 6)
ax.set_ylim(0, 12)
# 绘制数据
ax.plot(x, y1, label="数据1")
ax.plot(x, y2, label="数据2")
# 添加图例
plt.legend()
# 显示图形
plt.show()
```
### 2.2 使用内置函数对齐坐标轴范围
matplotlib 提供了 `autoscale()` 函数,可以自动调整坐标轴范围以适应数据。
```python
import matplotlib.pyplot as plt
# 创建数据
x = [1, 2, 3, 4, 5]
y1 = [2, 4, 6, 8, 10]
y2 = [1, 3, 5, 7, 9]
# 创建图形
fig, ax = plt.subplots()
# 自动调整坐标轴范围
ax.autoscale()
# 绘制数据
ax.plot(x, y1, label="数据1")
ax.plot(x, y2, label="数据2")
# 添加图例
plt.legend()
# 显示图形
plt.show()
```
### 2.3 使用第三方工具包对齐坐标轴范围
第三方工具包,如 `pandas` 和 `seaborn`,也提供了对齐坐标轴范围的功能。
**使用 `pandas`**
```python
import pandas as pd
import matplotlib.pyplot as plt
# 创建数据
df = pd.DataFrame({
"数据1": [2, 4, 6, 8, 10],
"数据2": [1, 3, 5, 7, 9]
})
# 自动对齐坐标轴范围
df.plot()
# 显示图形
plt.show()
```
**使用 `seaborn`**
```python
import seaborn as sns
import matplotlib.pyplot as plt
# 创建数据
df = pd.DataFrame({
"数据1": [2, 4, 6, 8, 10],
"数据2": [1, 3, 5, 7, 9]
})
# 自动对齐坐标轴范围
sns.lineplot(data=df)
# 显示图形
plt.show()
```
# 3. 坐标轴范围对齐的应用
### 3.1 多个图表对比
当有多个图表需要进行对比时,对齐坐标轴范围可以有效地帮助用户识别不同图表之间数据的差异。例如,下图展示了不同城市的人口增长情况。
```python
import matplotlib.pyplot as plt
# 创建数据
cities = ['北京', '上海', '广州', '深圳', '杭州']
populations = [21542000, 24281000, 15305000, 12583000, 11936000]
# 创建图表
plt.figure(figsize=(10, 6))
for i, city in enumerate(cities):
plt.subplot(1, 5, i+1)
plt.bar(city, populations[i])
plt.title(city)
# 对齐坐标轴范围
plt.subplots_adjust(wspace=0.3, hspace=0.3)
plt.show()
```
代码逻辑逐行解读:
- `plt.figure(figsize=(10, 6))`:创建画布,设置画布大小为 10x6 英寸。
- `for i, city in enumerate(cities)`:遍历城市列表,`i` 为索引,`city` 为城市名称。
- `plt.subplot(1, 5, i+1)`:创建子图,`1` 表示行数,`5` 表示列数,`i+1` 表示子图位置。
- `plt.bar(city, populations[i])`:绘制条形图,`city` 为横坐标,`populations[i]` 为纵坐标。
- `plt.title(city)`:设置子图标题。
- `plt.subplots_adjust(wspace=0.3, hspace=0.3)`:对齐子图之间的间距,`wspace` 为水平间距,`hspace` 为垂直间距。
- `plt.show()`:显示图表。
通过对齐坐标轴范围,我们可以清晰地看到不同城市的人口差异,北京和上海的人口明显高于其他城市。
### 3.2 数据可读性提升
对齐坐标轴范围可以提高数据的可读性,使图表更容易理解。例如,下图展示了不同年份的销售额数据。
```python
import matplotlib.pyplot as plt
# 创建数据
years = [2015, 2016, 2017, 2018, 2019]
sales = [10000, 12000, 15000, 18000, 20000]
# 创建图表
plt.figure(figsize=(10, 6))
plt.plot(years, sales)
plt.title('销售额趋势')
# 对齐坐标轴范围
plt.gca().set_ylim([0, 25000])
plt.show()
```
代码逻辑逐行解读:
- `plt.figure(figsize=(10, 6))`:创建画布,设置画布大小为 10x6 英寸。
- `plt.plot(years, sales)`:绘制折线图,`years` 为横坐标,`sales` 为纵坐标。
- `plt.title('销售额趋势')`:设置图表标题。
- `plt.gca().set_ylim([0, 25000])`:对齐纵坐标范围,设置范围为 0-25000。
- `plt.show()`:显示图表。
对齐纵坐标范围后,图表变得更加清晰易读,我们可以更直观地看到销售额的增长趋势。
### 3.3 视觉效果优化
对齐坐标轴范围还可以优化图表
# 4. 坐标轴范围对齐的注意事项
### 4.1 不同类型数据的处理
不同类型的数据在对齐坐标轴范围时需要考虑其特性:
- **连续数据:**如温度、收入等,可以采用线性缩放或对数缩放的方式对齐。
- **分类数据:**如性别、职业等,无法直接缩放,需要使用其他方法,如抖动(jitter)或分组(binning)。
- **时间数据:**如日期、时间等,需要考虑时间间隔和刻度单位,以确保对齐后仍然具有可读性。
### 4.2 异常值的影响
异常值是指明显偏离数据分布的极端值。在对齐坐标轴范围时,异常值可能会导致范围过大,影响其他数据的可视化效果。
处理异常值的方法:
- **移除异常值:**如果异常值不具有代表性,可以将其移除。
- **缩小异常值:**将异常值缩小到一个合理的范围内,使其不会对坐标轴范围产生过大影响。
- **使用对数缩放:**对数缩放可以压缩异常值的影响,使其在图表中更加合理地显示。
### 4.3 坐标轴刻度和标签的调整
对齐坐标轴范围后,需要调整坐标轴刻度和标签,以确保数据可读性和准确性:
- **刻度间隔:**选择合适的刻度间隔,使数据分布均匀,易于读取。
- **标签格式:**设置清晰易懂的标签格式,包括单位、精度等信息。
- **标签位置:**调整标签位置,避免重叠或遮挡数据。
**示例代码:**
```python
import matplotlib.pyplot as plt
# 创建数据
data1 = [1, 2, 3, 4, 5]
data2 = [10, 20, 30, 40, 50]
# 对齐坐标轴范围
plt.plot(data1, label="Data 1")
plt.plot(data2, label="Data 2")
plt.gca().set_ylim([0, 60])
# 调整刻度间隔和标签
plt.xticks(range(0, 6))
plt.yticks(range(0, 60, 10))
# 添加标签
plt.xlabel("X-axis")
plt.ylabel("Y-axis")
plt.legend()
# 显示图表
plt.show()
```
**代码逻辑分析:**
- `plt.gca().set_ylim([0, 60])`:设置 y 轴范围为 [0, 60],对齐两个数据集的范围。
- `plt.xticks(range(0, 6))`:设置 x 轴刻度间隔为 1。
- `plt.yticks(range(0, 60, 10))`:设置 y 轴刻度间隔为 10。
- `plt.xlabel("X-axis")` 和 `plt.ylabel("Y-axis")`:添加 x 轴和 y 轴标签。
# 5. 坐标轴范围对齐的进阶技巧
### 5.1 动态对齐
动态对齐是指在图表渲染过程中实时调整坐标轴范围,以适应不断变化的数据。这在处理流式数据或交互式图表时非常有用。
**实现方法:**
```python
import matplotlib.pyplot as plt
import numpy as np
# 创建一个动态更新的图表
fig, ax = plt.subplots()
ax.set_autoscale_on(True) # 启用自动缩放
# 生成随机数据并实时更新图表
for i in range(100):
data = np.random.rand(100)
ax.plot(data)
fig.canvas.draw()
plt.pause(0.1) # 暂停以允许图表更新
```
**逻辑分析:**
* `set_autoscale_on(True)` 启用自动缩放,使坐标轴范围根据数据动态调整。
* `plot(data)` 绘制新的数据点。
* `canvas.draw()` 更新图表。
* `pause(0.1)` 暂停执行,允许图表更新。
### 5.2 交互式对齐
交互式对齐允许用户手动调整坐标轴范围,以满足特定需求。
**实现方法:**
```python
import matplotlib.pyplot as plt
import numpy as np
# 创建一个交互式图表
fig, ax = plt.subplots()
ax.set_autoscale_on(False) # 禁用自动缩放
# 添加交互式缩放工具栏
plt.connect('button_press_event', on_click)
def on_click(event):
if event.button == 1: # 左键单击
ax.set_xlim(event.xdata - 1, event.xdata + 1)
ax.set_ylim(event.ydata - 1, event.ydata + 1)
fig.canvas.draw()
```
**逻辑分析:**
* `set_autoscale_on(False)` 禁用自动缩放,使坐标轴范围可以手动调整。
* `connect('button_press_event', on_click)` 添加一个事件监听器,在左键单击时触发 `on_click` 函数。
* `on_click` 函数获取单击位置的数据坐标,并使用 `set_xlim` 和 `set_ylim` 设置新的坐标轴范围。
### 5.3 多维数据对齐
在处理多维数据时,对齐坐标轴范围可能变得复杂。以下是一个示例,展示如何对齐三个维度的散点图:
**实现方法:**
```python
import matplotlib.pyplot as plt
import numpy as np
# 生成三维数据
data = np.random.rand(100, 3)
# 创建散点图
fig = plt.figure()
ax = fig.add_subplot(111, projection='3d')
ax.scatter(data[:, 0], data[:, 1], data[:, 2])
# 对齐坐标轴范围
ax.set_xlim3d(np.min(data[:, 0]), np.max(data[:, 0]))
ax.set_ylim3d(np.min(data[:, 1]), np.max(data[:, 1]))
ax.set_zlim3d(np.min(data[:, 2]), np.max(data[:, 2]))
```
**逻辑分析:**
* `add_subplot(111, projection='3d')` 创建一个三维子图。
* `scatter` 绘制散点图。
* `set_xlim3d`、`set_ylim3d` 和 `set_zlim3d` 设置三个维度的坐标轴范围。
# 6. 坐标轴范围对齐的案例分享
### 6.1 股票数据对比
**应用场景:**比较不同股票在相同时间段内的表现。
**操作步骤:**
1. 导入必要的库:
```python
import matplotlib.pyplot as plt
import pandas as pd
```
2. 加载股票数据:
```python
df = pd.read_csv('stock_data.csv')
```
3. 绘制折线图:
```python
plt.plot(df['Date'], df['Stock A'], label='Stock A')
plt.plot(df['Date'], df['Stock B'], label='Stock B')
plt.xlabel('Date')
plt.ylabel('Price')
plt.legend()
```
4. 对齐坐标轴范围:
```python
plt.gca().set_xlim(df['Date'].min(), df['Date'].max())
plt.gca().set_ylim(df['Stock A'].min(), df['Stock B'].max())
```
### 6.2 实验数据分析
**应用场景:**分析不同实验条件下的实验结果。
**操作步骤:**
1. 导入数据:
```python
import numpy as np
import matplotlib.pyplot as plt
data = np.loadtxt('experiment_data.txt', delimiter=',')
```
2. 绘制散点图:
```python
plt.scatter(data[:, 0], data[:, 1], label='Condition A')
plt.scatter(data[:, 2], data[:, 3], label='Condition B')
plt.xlabel('X-axis')
plt.ylabel('Y-axis')
plt.legend()
```
3. 对齐坐标轴范围:
```python
plt.gca().set_xlim(np.min([data[:, 0], data[:, 2]]), np.max([data[:, 0], data[:, 2]]))
plt.gca().set_ylim(np.min([data[:, 1], data[:, 3]]), np.max([data[:, 1], data[:, 3]]))
```
### 6.3 图像处理结果展示
**应用场景:**展示图像处理算法的处理前后效果。
**操作步骤:**
1. 导入图像和图像处理库:
```python
import cv2
import matplotlib.pyplot as plt
original_image = cv2.imread('original_image.jpg')
processed_image = cv2.cvtColor(original_image, cv2.COLOR_BGR2GRAY)
```
2. 显示原始图像和处理后图像:
```python
plt.subplot(1, 2, 1)
plt.imshow(original_image)
plt.title('Original Image')
plt.subplot(1, 2, 2)
plt.imshow(processed_image, cmap='gray')
plt.title('Processed Image')
```
3. 对齐坐标轴范围:
```python
plt.gca().set_xlim(0, original_image.shape[1])
plt.gca().set_ylim(original_image.shape[0], 0)
```

 百万级
高质量VIP文章无限畅学
百万级
高质量VIP文章无限畅学
 千万级
优质资源任意下载
千万级
优质资源任意下载
 C知道
免费提问 ( 生成式Al产品 )
C知道
免费提问 ( 生成式Al产品 )
0
0
相关推荐

专栏简介
**Matlab坐标轴范围宝典**
本专栏提供全面的指南,帮助您掌握Matlab坐标轴范围的设置、调整、自定义和锁定技巧。通过15个实用技巧,您可以绘制清晰、美观且信息丰富的图表。了解如何对齐坐标轴、格式化刻度线和标签、添加网格线、设置背景色、旋转坐标轴、导出设置、创建动画和交互式坐标轴。此外,本专栏还涵盖了多轴、极坐标、对数刻度、时间刻度、非线性刻度和3D坐标轴的深入讲解。无论您是数据分析师、研究人员还是学生,本专栏都能为您提供所需的知识和技能,以有效地控制坐标轴范围,从而提升图表的美观度和可读性。
专栏目录
最低0.47元/天 解锁专栏
买1年送3月
百万级
高质量VIP文章无限畅学
千万级
优质资源任意下载
C知道
免费提问 ( 生成式Al产品 )
最新推荐
STM32F030C8T6专攻:最小系统扩展与高效通信策略
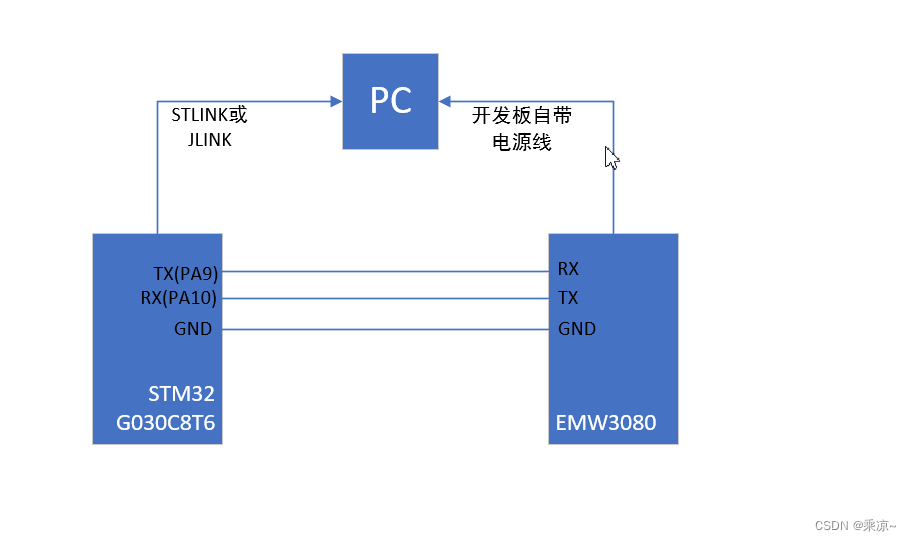
# 摘要
本文首先介绍了STM32F030C8T6微控制器的基础知识和最小系统设计的要点,涵盖硬件设计、软件配置及最小系统扩展应用案例。接着深入探讨了高效通信技术,包括不同通信协议的使用和通信策略的优化。最后,文章通过项目管理与系统集成的实践案例,展示了如何在实际项目中应用这些技术和知识,进行项目规划、系统集成、测试及故障排除,以提高系统的可靠性和效率。
# 关键字
STM32F030C8T6;
【PyCharm专家教程】:如何在PyCharm中实现Excel自动化脚本

# 摘要
本文旨在全面介绍PyCharm集成开发环境以及其在Excel自动化处理中的应用。文章首先概述了PyCharm的基本功能和Python环境配置,进而深入探讨了Python语言基础和PyCharm高级特性。接着,本文详细介绍了Excel自动化操作的基础知识,并着重分析了openpyxl和Pandas两个Python库在自动化任务中的运用。第四章通过实践案
ARM处理器时钟管理精要:工作模式协同策略解析

# 摘要
本文系统性地探讨了ARM处理器的时钟管理基础及其工作模式,包括处理器运行模式、异常模式以及模式间的协同关系。文章深入分析了时钟系统架构、动态电源管理技术(DPM)及协同策略,揭示了时钟管理在提高处理器性能和降低功耗方面的重要性。同时,通过实践应用案例的分析,本文展示了基于ARM的嵌入式系统时钟优化策略及其效果评估,并讨论了时钟管理常见问题的
【提升VMware性能】:虚拟机高级技巧全解析
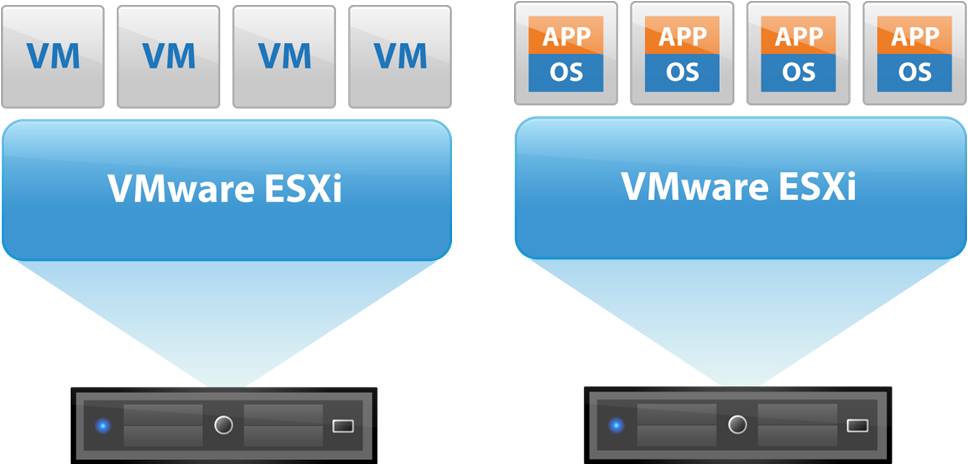
# 摘要
随着虚拟化技术的广泛应用,VMware作为市场主流的虚拟化平台,其性能优化问题备受关注。本文综合探讨了VMware在虚拟硬件配置、网络性能、系统和应用层面以及高可用性和故障转移等方面的优化策略。通过分析CPU资源分配、内存管理、磁盘I/O调整、网络配置和操作系统调优等关键技术点,本文旨在提供一套全面的性能提升方案。此外,文章还介绍了性能监控和分析工具的运用,帮助用户及时发
【CEQW2数据分析艺术】:生成报告与深入挖掘数据洞察
# 摘要
本文全面探讨了数据分析的艺术和技术,从报告生成的基础知识到深入的数据挖掘方法,再到数据分析工具的实际应用和未来趋势。第一章概述了数据分析的重要性,第二章详细介绍了数据报告的设计和高级技术,包括报告类型选择、数据可视化和自动化报告生成。第三章深入探讨了数据分析的方法论,涵盖数据清洗、统计分析和数据挖掘技术。第四章探讨了关联规则、聚类分析和时间序列分析等更高级的数据洞察技术。第五章将
UX设计黄金法则:打造直觉式移动界面的三大核心策略

# 摘要
随着智能移动设备的普及,直觉式移动界面设计成为提升用户体验的关键。本文首先概述移动界面设计,随后深入探讨直觉式设计的理论基础,包括用户体验设计简史、核心设计原则及心理学应用。接着,本文提出打造直觉式移动界面的实践策略,涉及布局、导航、交互元素以及内容呈现的直觉化设计。通过案例分析,文中进一步探讨了直觉式交互设计的成功与失败案例,为设
数字逻辑综合题技巧大公开:第五版习题解答与策略指南

# 摘要
本文旨在回顾数字逻辑基础知识,并详细探讨综合题的解题策略。文章首先分析了理解题干信息的方法,包括题目要求的分析与题型的确定,随后阐述了数字逻辑基础理论的应用,如逻辑运算简化和时序电路分析,并利用图表和波形图辅助解题。第三章通过分类讨论典型题目,逐步分析了解题步骤,并提供了实战演练和案例分析。第四章着重介绍了提高解题效率的技巧和避免常见错误的策略。最后,第五章提供了核心习题的解析和解题参考,旨在帮助读者巩固学习成果并提供额外的习题资源。整体而言,本文为数字逻辑
Zkteco智慧云服务与备份ZKTime5.0:数据安全与连续性的保障
# 摘要
本文全面介绍了Zkteco智慧云服务的系统架构、数据安全机制、云备份解决方案、故障恢复策略以及未来发展趋势。首先,概述了Zkteco智慧云服务的概况和ZKTime5.0系统架构的主要特点,包括核心组件和服务、数据流向及处理机制。接着,深入分析了Zkteco智慧云服务的数据安全机制,重点介绍了加密技术和访问控制方法。进一步,本文探讨了Zkteco云备份解决方案,包括备份策略、数据冗余及云备份服务的实现与优化。第五章讨论了故障恢复与数据连续性保证的方法和策略。最后,展望了Zkteco智慧云服务的未来,提出了智能化、自动化的发展方向以及面临的挑战和应对策略。
# 关键字
智慧云服务;系统
Java安全策略高级优化技巧:local_policy.jar与US_export_policy.jar的性能与安全提升

# 摘要
Java安全模型是Java平台中确保应用程序安全运行的核心机制。本文对Java安全模型进行了全面概述,并深入探讨了安全策略文件的结构、作用以及配置过程。针对性能优化,本文提出了一系列优化技巧和策略文件编写建议,以减少不必要的权限声明,并提高性能。同时,本文还探讨了Java安全策略的安全加固方法,强调了对local_po
海康二次开发实战攻略:打造定制化监控解决方案

# 摘要
海康监控系统作为领先的视频监控产品,其二次开发能力是定制化解决方案的关键。本文从海康监控系统的基本概述与二次开发的基础讲起,深入探讨了SDK与API的架构、组件、使用方法及其功能模块的实现原理。接着,文中详细介绍了二次开发实践,包括实时视频流的获取与处理、录像文件的管理与回放以及报警与事件的管理。此外,本文还探讨了如何通过高级功能定制实
资源上传下载、课程学习等过程中有任何疑问或建议,欢迎提出宝贵意见哦~我们会及时处理!
点击此处反馈


专栏目录
最低0.47元/天 解锁专栏
买1年送3月
百万级
高质量VIP文章无限畅学
千万级
优质资源任意下载
C知道
免费提问 ( 生成式Al产品 )