深入理解Android Studio中的布局编辑器
发布时间: 2024-04-07 18:41:03 阅读量: 8 订阅数: 11 
# 1. Android Studio布局编辑器概述
Android Studio是一款功能强大的集成开发环境,其中的布局编辑器是Android应用程序UI设计的重要工具之一。本章将介绍Android Studio布局编辑器的作用与重要性,以及布局编辑器的界面介绍与基本操作,同时还会涉及Android Studio中常见的布局类型。让我们一起来深入了解吧!
# 2. 布局编辑器中常用的布局控件
在Android Studio的布局编辑器中,常用的布局控件是设计UI界面的重要组成部分。下面将介绍几种常见的布局控件及其在布局编辑器中的应用。
### 2.1 线性布局(Layout)
线性布局是最常用的布局之一,通过设置子控件的排列方向(水平或垂直),可以实现各种简单到复杂的布局结构。下面是一个简单的线性布局示例:
```java
<LinearLayout
android:layout_width="match_parent"
android:layout_height="wrap_content"
android:orientation="vertical">
<TextView
android:layout_width="wrap_content"
android:layout_height="wrap_content"
android:text="Hello, World!"/>
<Button
android:layout_width="wrap_content"
android:layout_height="wrap_content"
android:text="Click Me"/>
</LinearLayout>
```
在上述代码中,LinearLayout指定了垂直排列子控件,其中包含一个TextView和一个Button。
### 2.2 相对布局(RelativeLayout)
相对布局允许子控件相对于父容器或其他子控件进行定位,灵活性较高。下面是一个简单的相对布局示例:
```java
<RelativeLayout
android:layout_width="match_parent"
android:layout_height="match_parent">
<TextView
android:id="@+id/textView"
android:layout_width="wrap_content"
android:layout_height="wrap_content"
android:text="Hello, World!"
android:layout_centerInParent="true"/>
<Button
android:layout_width="wrap_content"
android:layout_height="wrap_content"
android:text="Click Me"
android:layout_below="@id/textView"/>
</RelativeLayout>
```
上面的代码中,TextView位于父容器中心,Button位于TextView下方。
### 2.3 约束布局(ConstraintLayout)
约束布局是Android Studio中推荐的布局方式,通过约束条件将子控件相对定位,适用于复杂的UI界面设计。以下是一个简单的约束布局示例:
```java
<android.support.constraint.ConstraintLayout xmlns:android="http://schemas.android.com/apk/res/android"
xmlns:app="http://schemas.android.com/apk/res-auto"
xmlns:tools="http://schemas.android.com/tools"
android:layout_width="match_parent"
android:layout_height="match_parent">
<TextView
android:id="@+id/textView"
android:layout_width="wrap_content"
android:layout_height="wrap_content"
android:text="Hello, World!"
app:layout_constraintTop_toTopOf="parent"
app:layout_constraintStart_toStartOf="parent"
app:layout_constraintEnd_toEndOf="parent"
app:layout_constraintBottom_toTopOf="@id/button"/>
<Button
android:id="@+id/button"
android:layout_width="wrap_content"
android:layout_height="wrap_content"
android:text="Click Me"
app:layout_constraintTop_toBottomOf="@id/textView"
app:layout_constraintStart_toStartOf="parent"
app:layout_constraintEnd_toEndOf="parent"
app:layout_constraintBottom_toBottomOf="parent"/>
</android.support.constraint.ConstraintLayout>
```
在上述约束布局中,TextView位于顶部,Button位于TextView下方并水平居中。
### 2.4 帧布局(FrameLayout)
帧布局是一种简单的布局方式,子控件会叠加在屏幕上,后添加的子控件会覆盖在前面的子控件上。以下是帧布局的示例:
```java
<FrameLayout
android:layout_width="match_parent"
android:layout_height="match_parent">
<ImageView
android:layout_width="match_parent"
android:layout_height="match_parent"
android:src="@drawable/background_image"/>
<TextView
android:layout_width="wrap_content"
android:layout_height="wrap_content"
android:text="Hello, World!"
android:layout_gravity="center"/>
</FrameLayout>
```
 最低0.47元/天 解锁专栏
 15个月+AI工具集
 百万级
高质量VIP文章无限畅学
百万级
高质量VIP文章无限畅学
 千万级
优质资源任意下载
千万级
优质资源任意下载
 C知道
免费提问 ( 生成式Al产品 )
C知道
免费提问 ( 生成式Al产品 )
0
0
相关推荐

专栏简介
Android Studio下载专栏提供了一系列全面的教程,涵盖Android Studio的安装、配置和高级功能。从初学者指南到深入的主题,该专栏指导用户创建Android应用程序,包括UI设计、布局编辑、代码编写、调试、性能优化、版本控制和模拟器使用。专栏还探讨了高级主题,如插件开发、Gradle构建、多模块项目管理、测试驱动开发、网络请求、权限管理、混淆、多语言支持和React Native开发。通过这些教程,用户可以深入了解Android Studio的功能,并提高其Android应用程序开发技能。
专栏目录
最低0.47元/天 解锁专栏
15个月+AI工具集
百万级
高质量VIP文章无限畅学
千万级
优质资源任意下载
C知道
免费提问 ( 生成式Al产品 )
最新推荐
虚拟机迁移和高可用性方案比较
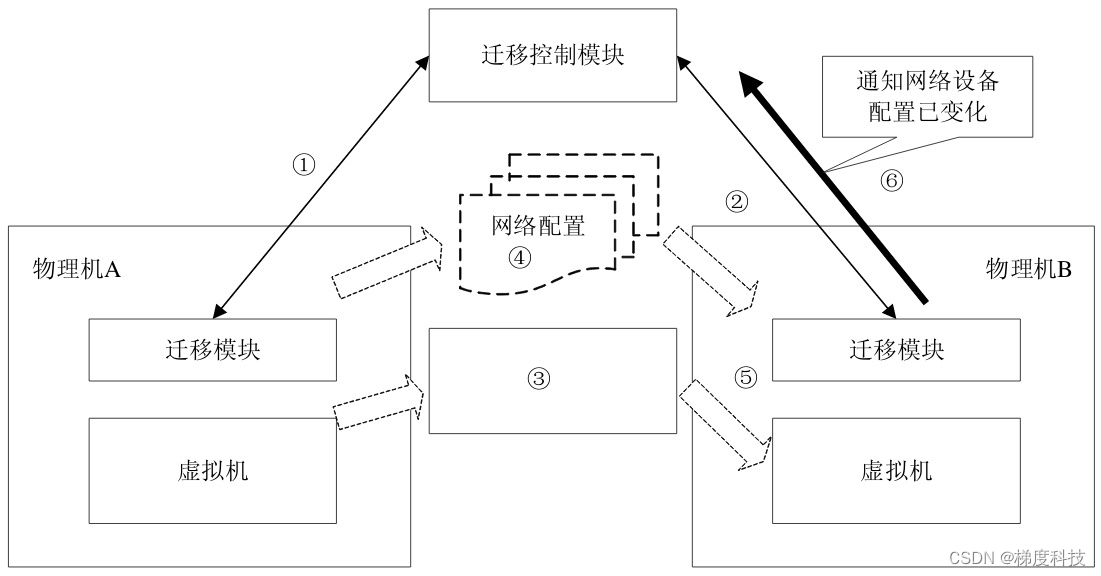
# 1. 虚拟机迁移概述**
虚拟机迁移是指将虚拟机从一个物理服务器或虚拟机管理程序迁移到另一个物理服务器或虚拟机管理程序的过程。虚拟机迁移可以用于各种目的,例如:
- **负载平衡:**将虚拟机从负载过重的服务器迁移到负载较轻的服务器,以优化资源利用率。
- **故障转移:**在发生硬件故障或计划维护时,将虚拟机迁移到备用服务器,以确保业务连续性。
- **数据中心合并:**将多个数据中心合并到一个数据中心,以降低成本和提
Anaconda更新和升级注意事项
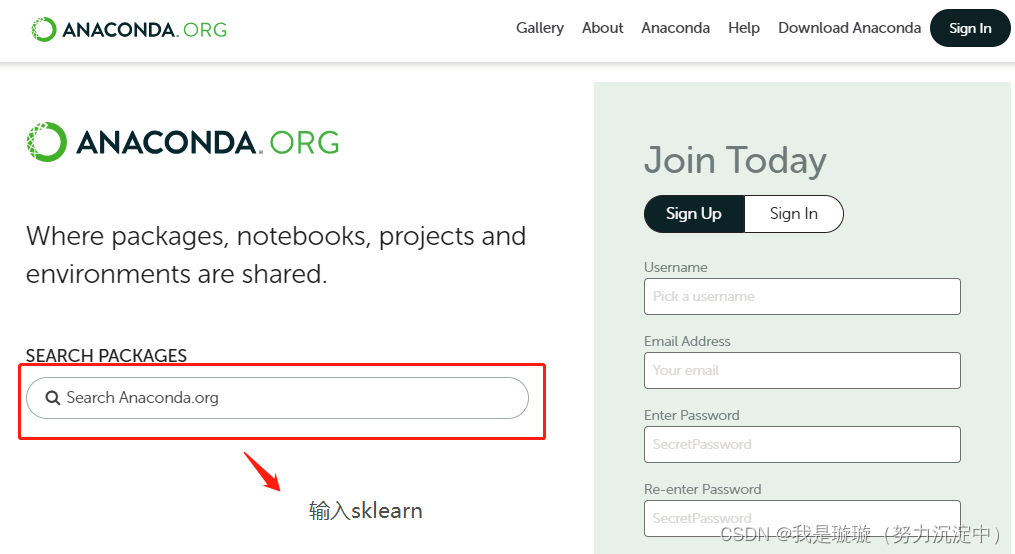
# 1. Anaconda 简介及优势
Anaconda 是一个开源的 Python 和 R 发行版,它包含了数据科学、机器学习和深度学习领域所需的大量库和工具。它提供了以下优势:
- **统一环境:**Anaconda 创建了一个统一的环境,其中包含所有必需的软件包和依赖项,简化了设置和管理。
- **包管理:**它提供了 conda 包管理器,用于轻松安装、更新和管理软件包,确保兼容性和依赖性。
- **社区
使用插件进行代码分享和协作

# 1. 代码分享与协作的必要性**
在现代软件开发中,代码分享与协作已成为必不可少的环节。随着项目规模和复杂性的不断增加,团队成员之间高效地共享代码和协作至关重要。代码分享与协作不仅可以提高开发效率,还可以促进知识共享和团队合作。
通过代码分享与协作,团队成员可以轻松地访问和使用彼此的代码,从而减少重复工作和错误。此外,它还可以促进代码审查和反馈,从而提高代码质量和可靠性。通过协作,团队成员可以共同解决问题,分
卡尔曼滤波MATLAB代码在预测建模中的应用:提高预测准确性,把握未来趋势
# 1. 卡尔曼滤波简介**
卡尔曼滤波是一种递归算法,用于估计动态系统的状态,即使存在测量噪声和过程噪声。它由鲁道夫·卡尔曼于1960年提出,自此成为导航、控制和预测等领域广泛应用的一种强大工具。
卡尔曼滤波的基本原理是使用两个方程组:预测方程和更新方程。预测方程预测系统状态在下一个时间步长的值,而更新方程使用测量值来更新预测值。通过迭代应用这两个方程,卡尔曼滤波器可以提供系统状态的连续估计,即使在存在噪声的情况下也是如此。
# 2. 卡尔曼滤波MATLAB代码
### 2.1 代码结构和算法流程
卡尔曼滤波MATLAB代码通常遵循以下结构:
```mermaid
graph L
MySQL版本升级与迁移实践指南

# 2.1 MySQL版本升级的原理和流程
MySQL版本升级是指将数据库从一个版本升级到另一个版本。其原理是通过替换或更新二进制文件、数据文件和配置文件来实现的。升级流程一般分为以下几个步骤:
1. **备份数据库:**在升
:YOLO目标检测算法的挑战与机遇:数据质量、计算资源与算法优化,探索未来发展方向
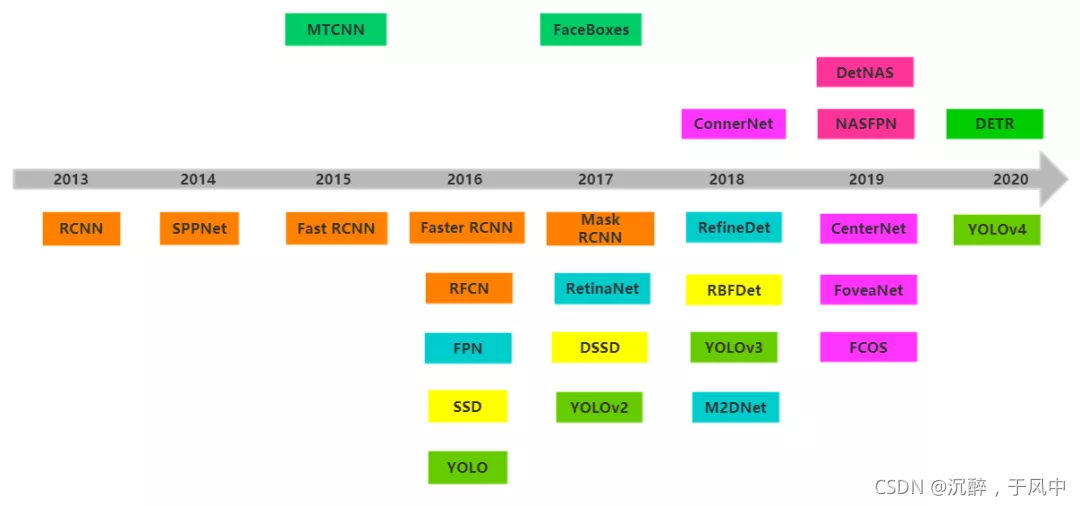
# 1. YOLO目标检测算法简介
YOLO(You Only Look Once)是一种
PyCharm更新和升级注意事项
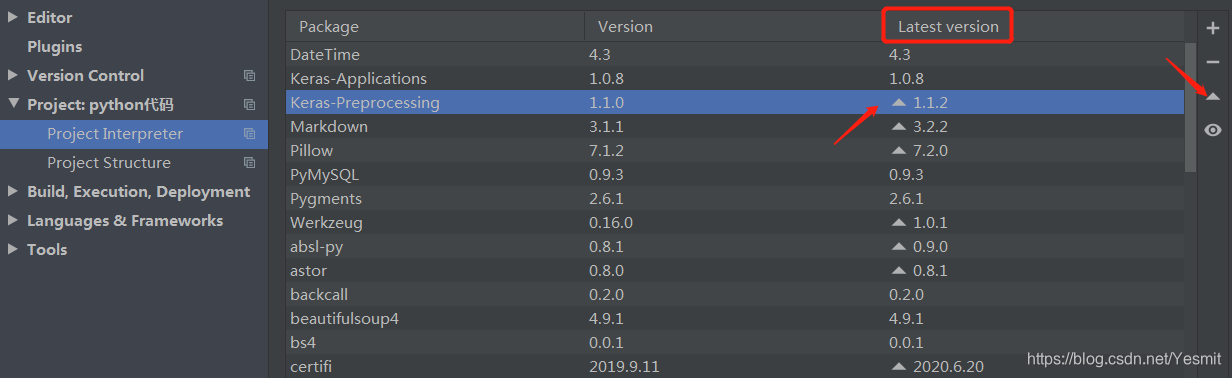
# 1. PyCharm更新和升级概述
PyCharm是一款功能强大的Python集成开发环境(IDE),它不断更新和升级以提供新的功能、改进性能并修复错误。了解PyCharm更新和
MATLAB圆形Airy光束前沿技术探索:解锁光学与图像处理的未来

# 2.1 Airy函数及其性质
Airy函数是一个特殊函数,由英国天文学家乔治·比德尔·艾里(George Biddell Airy)于1838年首次提出。它在物理学和数学中
爬虫与云计算:弹性爬取,应对海量数据

# 1. 爬虫技术概述**
爬虫,又称网络蜘蛛,是一种自动化程序,用于从网络上抓取和提取数据。其工作原理是模拟浏览器行为,通过HTTP请求获取网页内容,并
MATLAB稀疏阵列在自动驾驶中的应用:提升感知和决策能力,打造自动驾驶新未来
# 1. MATLAB稀疏阵列基础**
MATLAB稀疏阵列是一种专门用于存储和处理稀疏数据的特殊数据结构。稀疏数据是指其中大部分元素为零的矩阵。MATLAB稀疏阵列通过只存储非零元素及其索引来优化存储空间,从而提高计算效率。
MATLAB稀疏阵列的创建和操作涉及以下关键概念:
* **稀疏矩阵格式:**MATLAB支持多种稀疏矩阵格式,包括CSR(压缩行存
资源上传下载、课程学习等过程中有任何疑问或建议,欢迎提出宝贵意见哦~我们会及时处理!
点击此处反馈


专栏目录
最低0.47元/天 解锁专栏
15个月+AI工具集
百万级
高质量VIP文章无限畅学
千万级
优质资源任意下载
C知道
免费提问 ( 生成式Al产品 )