Webpack打包工具使用技巧详解
发布时间: 2024-02-17 17:07:28 阅读量: 36 订阅数: 24 
# 1. Webpack简介与基本概念
## 1.1 Webpack是什么
Webpack是一个现代JavaScript应用程序的静态模块打包工具。它主要用于打包、压缩、编译JavaScript、CSS等文件,能够将各种资源文件视作模块并进行打包,使得前端开发更加高效化。
## 1.2 模块化开发与打包工具
模块化开发是指将程序拆分为多个独立且可重用的模块,便于维护和管理。而Webpack作为一种模块化打包工具,能够将各种模块打包成静态资源,提高网页加载速度。
## 1.3 Webpack基本概念解析
在Webpack中,有一些基本概念需要了解:
- Entry:入口,指示Webpack从哪个文件开始构建其依赖图。
- Output:输出,指示Webpack在哪里输出它所创建的 bundles。
- Loader:模块转换器,用于将各种文件转换为模块。
- Plugin:插件系统,用于扩展Webpack的功能。
- Module:模块,Webpack将所有内容都视为模块,包括代码、样式、图片等。
- Chunk:代码块,Webpack根据模块之间的依赖关系将代码块分块。
以上是Webpack的一些基本概念,对于后续章节的学习和实践具有重要意义。
# 2. 基本配置与使用
**2.1 安装Webpack及基本配置**
在开始使用Webpack之前,首先需要安装Webpack到项目中。通过npm来安装Webpack:
```bash
npm install webpack webpack-cli --save-dev
```
安装完成后,可以在项目根目录下创建一个`webpack.config.js`文件,用于配置Webpack的基本信息:
```javascript
// webpack.config.js
const path = require("path");
module.exports = {
entry: "./src/index.js",
output: {
filename: "bundle.js",
path: path.resolve(__dirname, "dist")
}
};
```
这里配置了入口文件为`src/index.js`,输出文件为`dist/bundle.js`。
**2.2 入口与出口配置**
在Webpack中,入口指示Webpack应该从哪个模块开始构建其内部依赖图,而出口指示Webpack在哪里输出打包后的文件。
```javascript
// webpack.config.js
module.exports = {
entry: {
main: "./src/index.js",
vendor: "./src/vendor.js"
},
output: {
filename: "[name].bundle.js",
path: path.resolve(__dirname, "dist")
}
};
```
这里配置了两个入口文件`index.js`和`vendor.js`,分别打包成`main.bundle.js`和`vendor.bundle.js`。
**2.3 Loader的使用与配置**
Loader用于加载各种非JavaScript文件(如CSS,Sass,图片等),并将它们转换为模块,供应用程序使用。
```javascript
// webpack.config.js
module.exports = {
module: {
rules: [
{
test: /\.(png|jpg|gif)$/,
use: [
{
loader: 'file-loader',
options: {
name: '[name].[ext]',
outputPath: 'images/'
}
}
]
}
]
}
};
```
在上述配置中,当Webpack遇到图片文件时,会使用`file-loader`来处理,并将文件输出到`dist/images`目录下。
**2.4 Plugin的使用与配置**
Plugin用于扩展Webpack的功能,在打包过程中执行更多操作。
```javascript
// webpack.config.js
const HtmlWebpackPlugin = require('html-webpack-plugin');
module.exports = {
plugins: [
new HtmlWebpackPlugin({
template: './src/index.html'
})
]
};
```
在上述配置中,使用`html-webpack-plugin`插件来在输出文件夹中自动生成一个带有打包输出文件的HTML文件。
通过以上章节的介绍,你可以了解到Webpack的基本配置与使用方法,包括安装与配置、入口与出口、Loader的使用与配置以及Plugin的使用与配置。
# 3. 优化与性能提升
在这一章节中,我们将介绍如何通过各种优化手段和技术提升Webpack打包工具的性能和效率。
### 3.1 Tree Shaking优化
Tree Shaking是一个非常重要的优化手段,它可以帮助我们去除JavaScript代码中未被使用的部分,减小打包后的文件体积。一般配合ES6的模块化语法(import/export)来使用,通过静态分析代码,去除无用代码。
```javascript
// math.js
export function square(x) {
return x * x;
}
export function cube(x) {
return x * x * x;
}
// index.js
import { square } from './math.js';
console.log(square(5));
```
通过使用Tree Shaking,只会将`square`方法打包进入最终的bundle中,`cube`方法会被去除。
### 3.2 代码分割与懒加载
代码分割可以将代码分割成不同的bundle,然后按需加载。懒加载则是在需要的时候再加载相关的代码,而不是一次性加载所有代码。这样可以提高页面的加载速度。
```javascript
// webpack.config.js
module.exports = {
optimization: {
splitChunks: {
chunks: 'all',
},
},
};
```
### 3.3 缓存与持久化
为了提高Webpack的构建速度,可以使用缓存和持久化来避免重复的工作。可以使用`cache-loader`和`hard-source-webpack-plugin`等插件来实现缓存和持久化。
```javascript
// webpack.config.js
const HardSourceWebpackPlugin = require('hard-source-webpack-plugin');
module.exports = {
plugins: [
new HardSourceWebpackPlugin(),
],
};
```
### 3.4 性能监控与调优
使用Webpack提供的性能分析工具可以帮助我们监控打包过程中的性能表现,并进行调优。可以通过`webpack-bundle-analyzer`等工具进行打包分析,找出性能瓶颈并进行优化。
```bash
# 在命令行中执行以下命令
webpack --profile --json > stats.json
npx webpack-bundle-analyzer stats.json
```
以上是关于优化与性能提升方面的一些技巧,在实际开发中结合具体场景和需求,选择适合的优化手段将会大大提升Webpack打包工具的效率和性能。
# 4. 高级功能与工程实践
在这一章中,我们将深入探讨Webpack的高级功能和工程实践,帮助你更好地利用Webpack来构建复杂的项目和应用。从多环境配置到模块热替换,从自定义Webpack插件到与框架的配合,让我们一起深入学习!
#### 4.1 多环境配置与打包
在实际项目中,我们通常需要针对不同的环境进行配置和打包,例如开发环境、生产环境等。Webpack提供了很好的支持来实现多环境配置和打包,让我们来看一个简单的示例:
```javascript
const path = require('path');
const { CleanWebpackPlugin } = require('clean-webpack-plugin');
module.exports = (env, argv) => {
const isProduction = argv.mode === 'production';
return {
entry: './src/index.js',
output: {
filename: isProduction ? '[name].[contenthash].js' : '[name].js',
path: path.resolve(__dirname, 'dist'),
},
plugins: [
new CleanWebpackPlugin(),
],
};
};
```
在上面的代码中,我们通过`argv.mode`来判断当前的构建模式是生产环境还是开发环境,从而确定输出的文件名。同时,我们可以根据环境配置不同的插件和Loader,实现更灵活的多环境配置。
#### 4.2 模块热替换(HMR)
模块热替换(HMR)是Webpack提供的一项强大功能,能够在应用运行时,实现模块的热替换,而不需要刷新整个页面。让我们来演示一下如何在Webpack中使用HMR:
```javascript
if (module.hot) {
module.hot.accept('./print.js', function() {
console.log('Accepting the updated printMe module!');
printMe();
});
}
```
通过以上代码,我们监听了`print.js`模块的变化,并在模块更新时执行相关操作,从而实现模块的热替换,提升开发效率。
#### 4.3 自定义Webpack插件
除了使用现有的插件,我们也可以编写自定义的Webpack插件来满足特定需求。一个简单的自定义插件示例如下:
```javascript
class MyPlugin {
apply(compiler) {
compiler.hooks.emit.tap('MyPlugin', compilation => {
console.log('Assets created:');
for (const file of Object.keys(compilation.assets)) {
console.log(file);
}
});
}
}
module.exports = {
plugins: [new MyPlugin()],
};
```
在上面的例子中,我们定义了一个自定义插件`MyPlugin`,并在Webpack的`emit`阶段输出所有生成的文件名,实现了简单的自定义功能。
#### 4.4 配合框架使用的实践经验
最后,在实际项目中,Webpack通常与各种框架一起使用,如React、Vue等。在配合这些框架时,我们需要注意一些特殊的配置和使用技巧,以确保项目能够正常构建和运行。通过学习实践经验,我们可以更好地利用Webpack来构建现代化的前端应用。
以上就是第四章的内容,希望能为你提供有益的帮助!
# 5. 与其他工具的整合与应用
Webpack作为一个打包工具,在实际项目中往往需要与其他工具进行整合与应用,以满足项目的需求。下面我们将介绍Webpack与其他工具的整合方式及应用场景:
### 5.1 与Babel、TypeScript的结合使用
在实际项目中,我们通常会使用Babel或TypeScript来对JavaScript代码进行转译,以兼容不同浏览器或引入类型检查等功能。Webpack可以与Babel或TypeScript配合使用,实现更高级的应用需求。
```javascript
// webpack.config.js
const path = require('path');
module.exports = {
entry: './src/index.js',
output: {
filename: 'bundle.js',
path: path.resolve(__dirname, 'dist'),
},
module: {
rules: [
{
test: /\.js$/,
exclude: /node_modules/,
use: {
loader: 'babel-loader',
options: {
presets: ['@babel/preset-env'],
},
},
},
{
test: /\.ts$/,
exclude: /node_modules/,
use: 'ts-loader',
},
],
},
resolve: {
extensions: ['.js', '.ts'],
},
};
```
### 5.2 与React、Vue等框架的集成
Webpack可以与React、Vue等流行的前端框架进行集成,实现更加高效的开发流程。通过配置对应的Loader和Plugin,可以实现对框架组件、样式等资源的打包和优化。
```javascript
// webpack.config.js
const path = require('path');
const HtmlWebpackPlugin = require('html-webpack-plugin');
module.exports = {
entry: './src/index.js',
output: {
filename: 'bundle.js',
path: path.resolve(__dirname, 'dist'),
},
module: {
rules: [
{
test: /\.jsx?$/,
exclude: /node_modules/,
use: 'babel-loader',
},
{
test: /\.vue$/,
exclude: /node_modules/,
use: 'vue-loader',
},
],
},
plugins: [
new HtmlWebpackPlugin({
template: './public/index.html',
}),
],
};
```
### 5.3 与CSS预处理器的配合使用
在前端项目中,我们经常会使用CSS预处理器如Sass、Less等来优化样式代码的编写。Webpack可以与这些CSS预处理器配合使用,实现样式文件的打包和管理。
```javascript
// webpack.config.js
const path = require('path');
const MiniCssExtractPlugin = require('mini-css-extract-plugin');
module.exports = {
entry: './src/index.js',
output: {
filename: 'bundle.js',
path: path.resolve(__dirname, 'dist'),
},
module: {
rules: [
{
test: /\.scss$/,
use: [
MiniCssExtractPlugin.loader,
'css-loader',
'sass-loader',
],
},
],
},
plugins: [
new MiniCssExtractPlugin({
filename: 'styles.css',
}),
],
};
```
### 5.4 与测试工具的联动应用
在项目开发过程中,测试工具如Jest、Mocha等的使用是必不可少的。Webpack可以与这些测试工具进行联动应用,实现对代码质量的保障和自动化测试的实现。
```javascript
// jest.config.js
module.exports = {
// Jest配置
};
// package.json
{
"scripts": {
"test": "jest"
},
"devDependencies": {
"jest": "^27.2.0"
}
}
```
通过以上内容,我们可以看到Webpack与其他工具的整合与应用,进一步提升了前端项目的开发效率和质量。
# 6. 常见问题解决与开发技巧分享
在本章中,我们将讨论一些常见的Webpack打包问题解决方法以及一些实用的开发技巧和经验分享,帮助你更好地应对开发过程中的挑战。
#### 6.1 常见Webpack打包问题分析与解决方法
在实际的项目开发中,我们经常会遇到各种Webpack打包问题,比如打包速度慢、体积过大、引入模块出错等。针对这些问题,我们可以通过以下方法逐一解决:
- **打包速度慢**:可以通过使用插件如`HardSourceWebpackPlugin`来缓存构建结果,使用多进程构建`parallel-webpack`来加速打包,或者通过合理配置`optimization.splitChunks`来优化打包速度。
- **体积过大**:可以通过使用Tree Shaking来去除无用代码、分离第三方库、使用CDN等方式来减小打包体积。
- **引入模块出错**:可以通过检查模块引入路径是否正确、版本是否匹配、查看Webpack日志来诊断问题并解决。
#### 6.2 开发中的实用技巧与经验分享
在实际开发中,我们还可以运用一些实用的技巧和经验来提升开发效率和质量,例如:
- **使用Webpack Dev Server进行开发**:可以在本地快速启动一个开发服务器,支持热更新、代理等功能,方便开发调试。
- **配置Source Map**:在开发环境中配置Source Map,方便定位代码问题和调试。
- **定制Webpack插件**:根据项目需求,编写定制的Webpack插件,进一步优化打包流程。
#### 6.3 前沿技术与趋势展望
随着前端技术的不断发展,Webpack也在不断演进。未来的发展趋势可能包括更加智能化的打包策略、更高效的Tree Shaking算法、更友好的配置方式等。
#### 6.4 Webpack在实际项目中的应用案例分享
最后,我们将分享一些Webpack在实际项目中的应用案例,介绍如何结合具体的业务场景和需求,使用Webpack进行配置和优化,从而达到更好的开发效果和用户体验。
通过不断学习和总结经验,我们可以更好地应对项目开发中的挑战,提升自己的技术水平和项目质量。希望这些经验和技巧能对你在Webpack项目开发中有所帮助!

 百万级
高质量VIP文章无限畅学
百万级
高质量VIP文章无限畅学
 千万级
优质资源任意下载
千万级
优质资源任意下载
 C知道
免费提问 ( 生成式Al产品 )
C知道
免费提问 ( 生成式Al产品 )
0
0
相关推荐

专栏简介
这个专栏“前端面试精讲指南”涵盖了前端开发的各个关键领域,为读者提供了全面的学习指导和实践经验。从HTML与CSS基础知识详解,到JavaScript的数据类型与运算符,再到DOM操作与事件处理的深入理解,专栏逐步引导读者掌握前端开发的基础。同时,通过对ES6新特性的解析与应用实例,Vue.js与React的组件化开发,以及前端路由管理与状态管理的最佳实践,读者将深入了解现代前端技术的应用与实践。此外,专栏还涉及Webpack打包工具的使用技巧,前端自动化测试的入门与实战,以及移动端开发、PWA技术、可视化等领域的实践经验,帮助读者构建全面的前端开发能力。通过专栏的学习,读者将掌握一系列前沿技术,为前端面试和职场发展提供有力支持。
最低0.47元/天 解锁专栏
买1年送1年
百万级
高质量VIP文章无限畅学
千万级
优质资源任意下载
C知道
免费提问 ( 生成式Al产品 )
最新推荐
Standard.jar资源优化:压缩与性能提升的黄金法则

# 1. Standard.jar资源优化概述
在现代软件开发中,资源优化是提升应用性能和用户体验的重要手段之一。特别是在处理大型的Java应用程序包(如Standard.jar)时,合理的资源优化策略可以显著减少应用程序的启动时间、运行内存消耗,并增强其整体性能。本章旨在为读者提供一个关于Standard.jar资源优化的概览,并介绍后续章节中将详细讨论
MATLAB图像特征提取中的光流法与运动分析:深入理解与应用
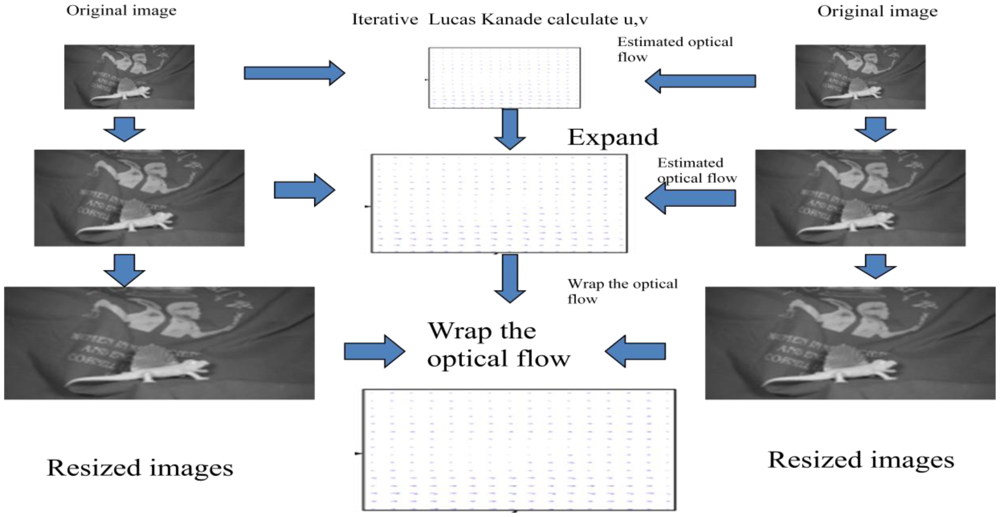
# 1. 光流法与运动分析概述
## 1.1 光流法与运动分析的重要性
在计算机视觉领域,光流法与运动分析是核心的技术之一,它们帮助我们理解和解释动态世界中的视觉信息。光流法是分析和解释动态图像序列中像素运动的基础,广泛应用于自动驾驶、视频监控、机器人导航等多个领域。运动分析则是从更宏观的角度,对视频中物体的运动模式进行解读
Python遗传算法的并行计算:提高性能的最新技术与实现指南
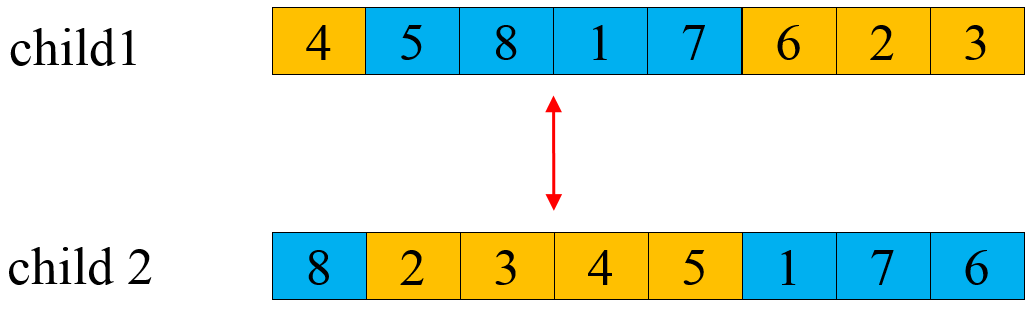
# 1. 遗传算法基础与并行计算概念
遗传算法是一种启发式搜索算法,模拟自然选择和遗传学原理,在计算机科学和优化领域中被广泛应用。这种算法在搜索空间中进行迭代,通过选择、交叉(杂交)和变异操作,逐步引导种群进化出适应环境的最优解。并行计算则是指使用多个计算资源同时解决计算问题的技术,它能显著缩短问题求解时间,提高计算效率。当遗传算法与并行计算结合时,可以处理更为复杂和大规模的优化问题,其并行化的核心是减少计算过程中的冗余和依赖,使得多个种群或子种群可以独
【MATLAB应用诊断与修复】:快速定位问题,轻松解决问题的终极工具
# 1. MATLAB的基本概念和使用环境
MATLAB,作为数学计算与仿真领域的一种高级语言,为用户提供了一个集数据分析、算法开发、绘图和数值计算等功能于一体的开发平台。本章将介绍MATLAB的基本概念、使用环境及其在工程应用中的地位。
## 1.1 MATLAB的起源与发展
MATLAB,全称为“Matrix Laboratory”,由美国MathWorks公司于1984年首次推出。它是一种面向科学和工程计算的高性能语言,支持矩阵运算、数据可视化、算法设计、用户界面构建等多方面任务。
## 1.2 MATLAB的安装与配置
安装MATLAB通常包括下载安装包、安装必要的工具箱以及环境
【数据并行技术详解】:Horovod的高效应用策略
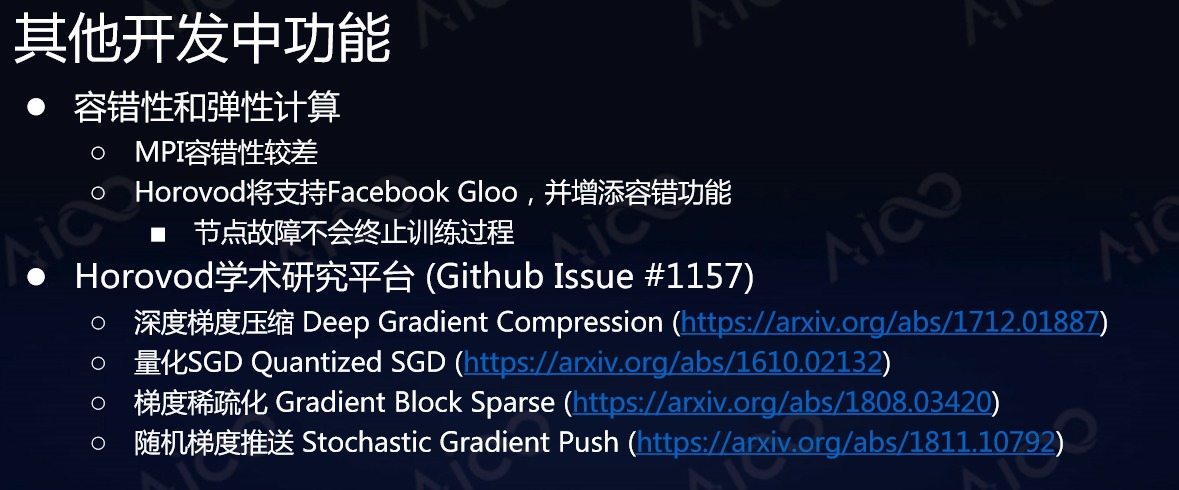
# 1. 数据并行技术概述
在当今快速发展的数据时代,深度学习模型的规模和复杂性不断增长,使得单机训练变得不再可行。为了应对这一挑战,数据并行技术应运而生,它通过在多个计算节点之间分布数据,以加速模型的训练过程。数据并行不仅有助于缩短训练时间,还提高了计算资源的利用率,允许研究者和工程师处理更大规模的数据集和更复杂的模型。
## 2.
JSTL响应式Web设计实战:适配各种设备的网页构建秘籍
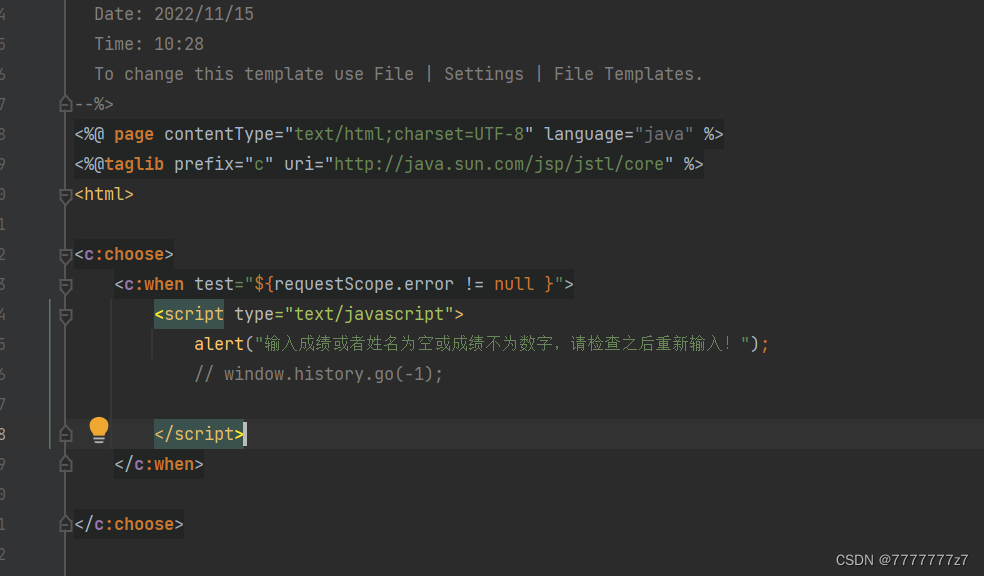
# 1. 响应式Web设计的理论基础
响应式Web设计是创建能够适应多种设备屏幕尺寸和分辨率的网站的方法。这不仅提升了用户体验,也为网站拥有者节省了维护多个版本网站的成本。理论基础部分首先将介绍Web设计中常用的术语和概念,例如:像素密度、视口(Viewport)、流式布局和媒体查询。紧接着,本章将探讨响应式设计的三个基本组成部分:弹性网格、灵活的图片以及媒体查询。最后,本章会对如何构建一个响应式网页进行初步的概述,为后续章节使用JSTL进行实践
MATLAB噪声过滤技术:条形码识别的清晰之道

# 1. MATLAB噪声过滤技术概述
在现代计算机视觉与图像处理领域中,噪声过滤是基础且至关重要的一个环节。图像噪声可能来源于多种因素,如传感器缺陷、传输干扰、或环境光照不均等,这些都可能对图像质量产生负面影响。MATLAB,作为一种广泛使用的数值计算和可视化平台,提供了丰富的工具箱和函数来处理这些噪声问题。在本章中,我们将概述MATLAB中噪声过滤技术的重要性,以及它在数字图像处理中
算法优化:MATLAB高级编程在热晕相位屏仿真中的应用(专家指南)
# 1. 热晕相位屏仿真基础与MATLAB入门
热晕相位屏仿真作为一种重要的光波前误差模拟方法,在光学设计与分析中发挥着关键作用。本章将介绍热晕相位屏仿真的基础概念,并引导读者入门MATLAB,为后续章节的深入学习打下坚实的基础。
## 1.1 热晕效应概述
热晕效应是指在高功率激光系统中,由于温度变化导致的介质折射率分
Git协作宝典:代码版本控制在团队中的高效应用
# 1. Git版本控制基础
## Git的基本概念与安装配置
Git是目前最流行的版本控制系统,它的核心思想是记录快照而非差异变化。在理解如何使用Git之前,我们需要熟悉一些基本概念,如仓库(repository)、提交(commit)、分支(branch)和合并(merge)。Git可以通过安装包或者通过包管理器进行安装,例如在Ubuntu系统上可以使用`sudo apt-get install git`
【异步任务处理方案】:手机端众筹网站后台任务高效管理
# 1. 异步任务处理概念与重要性
在当今的软件开发中,异步任务处理已经成为一项关键的技术实践,它不仅影响着应用的性能和可扩展性,还直接关联到用户体验的优化。理解异步任务处理的基本概念和它的重要性,对于开发者来说是必不可少的。
## 1.1 异步任务处理的基本概念
异步任务处理是指在不阻塞主线程的情况下执行任务的能力。这意味着,当一个长时间运行的操作发生时,系统不会暂停响应用户输入,而是让程序在后台处理这些任务
资源上传下载、课程学习等过程中有任何疑问或建议,欢迎提出宝贵意见哦~我们会及时处理!
点击此处反馈


专栏目录

文章持续更新中,敬请期待~
最低0.47元/天 解锁专栏
买1年送1年
百万级
高质量VIP文章无限畅学
千万级
优质资源任意下载
C知道
免费提问 ( 生成式Al产品 )