没有合适的资源?快使用搜索试试~ 我知道了~
首页单细胞测序拟时间序列分析R包monocel教程(附4个学习案例)
资源详情
资源评论
资源推荐
What's new in Monocle 3
Monocle 3 has been re-engineered to analyze large, complex single-cell datasets. The algorithms at the core of Monocle 3 are highly scalable and
can handle millions of cells. Monocle 3 will add some powerful new features that enable the analysis of organism- or embryo-scale experiments:
A better structured workow to learn developmental trajectories.
Support for the UMAP (https://github.com/lmcinnes/umap) algorithm to initialize trajectory inference.
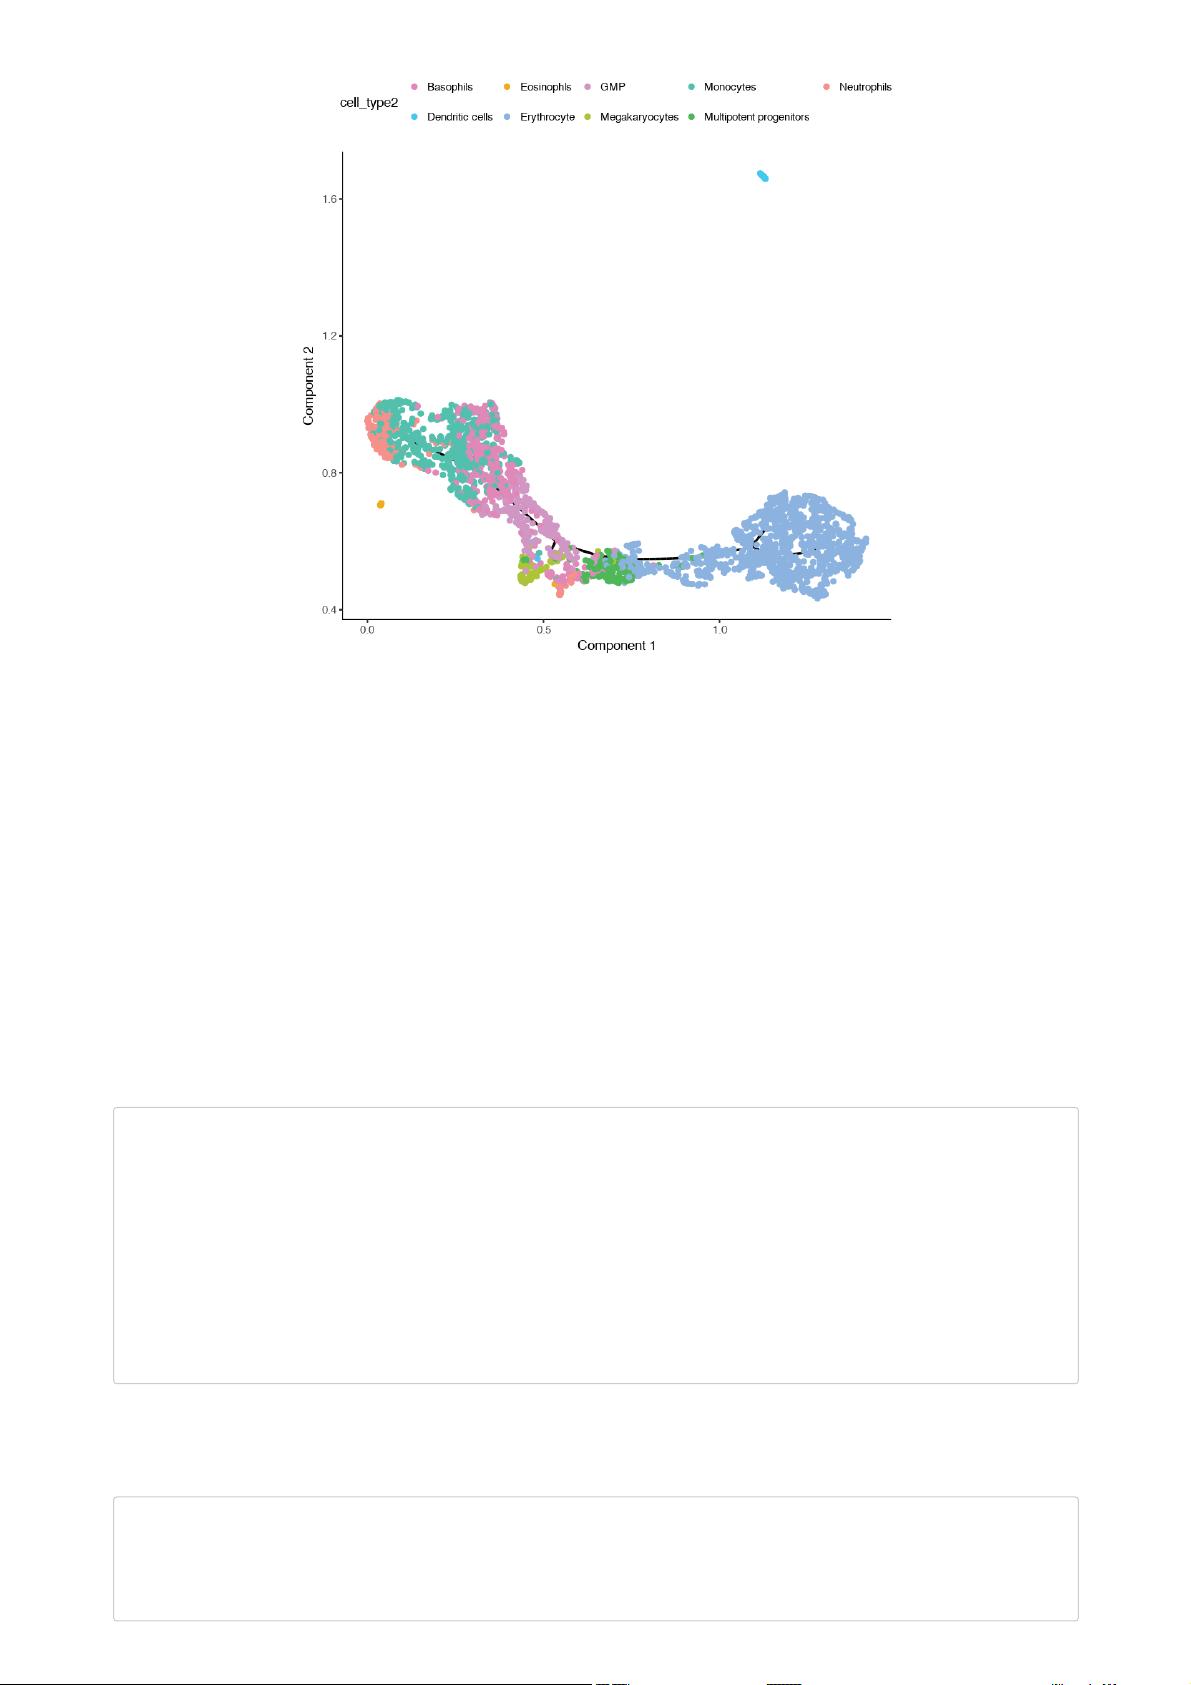
Support for trajectories with multiple roots.
Ways to learn trajectories that have loops or points of convergence.
Algorithms that automatically partition cells to learn disjoint or parallel trajectories using ideas from "approximate graph abstraction"
(https://www.biorxiv.org/content/early/2017/10/25/208819).
A new statistical test for genes that have trajectory-dependent expression.
A 3D interface to visualize trajectories and gene expression.
Monocle 3 is still under active development. This rst early alpha release only includes some of the features listed above. We plan to release
updates to Monocle 3 every few weeks that add the functionality you see mentioned here. Moreover, the above is only a partial list of the new
features being added to Monocle 3, and more may be announced over the next few weeks and months. Note that some of Monocle 2's functions
haven't yet been forward ported to Monocle 3. We welcome users' bug reports, comments and feedback.
The features discussed here will be described in more detail in upcoming manuscripts.
Below, you can nd more details about some of the major new ideas and features in Monocle 3.
Uniform Manifold Approximation and Projection
Recently, Leland McInnes and John Healy introduced UMAP, a powerful new manifold learning technique that we've found works extremely well on
single-cell RNA-seq data. Monocle 3 uses UMAP to embed cells in a low dimensional space, and then uses our principal graph embedding algorithms
to learn a trajectory that ts the cells' UMAP coordinates. This approach enables Monocle 3 to learn very complex, potentially disjoint trajectories
without much parameter optimization. Monocle 3 currently relies on the python implementation of UMAP (https://github.com/lmcinnes/umap). You
can check out the preprint about UMAP here:
McInnes, L, Healy, J, UMAP: Uniform Manifold Approximation and Projection for Dimension Reduction (https://arxiv.org/abs/1802.03426), ArXiv e-
prints 1802.03426, 2018).
In Monocle 3 we provide a standard alone function UMAP to run umap. UMAP is also seamlessly integrated into the reduceDimension function.
Installing Monocle 3
Required software
Monocle runs in the R statistical computing environment (http://www.r-project.org/). You will need R version 3.5 or higher, Bioconductor version 3.7,
and monocle 2.99.0 or higher to have access to the latest features. To install Bioconductor (http://bioconductor.org/install/):
source("http://bioconductor.org/biocLite.R")
biocLite()
Once you've installed Bioconductor, make sure you've installed Monocle 2 and all of its required dependencies:
biocLite("monocle")
Install DDRTree (simple-ppt-like branch) from our GitHub repo:
::install_github("cole-trapnell-lab/DDRTree", ref="simple-ppt-like")
Install the latest version of L1-graph from our GitHub repo:
::install_github("cole-trapnell-lab/L1-graph")
Install several python packages Monocle 3 depends on:
install.packages("reticulate")
library(reticulate)
py_install('umap-learn', pip = T, pip_ignore_installed = T) # Ensure the latest version of UMAP is installed
py_install("louvain")
Then pull the monocle3_alpha branch of the Monocle GitHub repo:
::install_github("cole-trapnell-lab/monocle-release", ref="monocle3_alpha")
Testing the installation
devtools
devtools
devtools
To ensure that Monocle was installed correctly, start a new R session and type:
library(monocle)
Getting help
Questions about Monocle 3 should be posted on our Google Group (https://groups.google.com/forum/#!forum/monocle-users). Please use
monocle.users@gmail.com (mailto:monocle.users@gmail.com) for private communications that cannot be addressed by the Monocle user
community. Please do not email technical questions to Monocle contributors directly.
The Monocle 3 workow
Before we get into the details of ordering cells along a trajectory, it's important to understand what Monocle is doing. The ordering workow shown
above has ve main steps, each of which involve a signicant machine learning task.
Step 1: Normalizing and pre-processing the data
To analyze a single-cell dataset, Monocle rst normalizes expression values to account for technical variation in RNA recovery and sequencing
depth.
Step 2: Reducing the dimensionality of the data
Next, to eliminate noise and make downstream computations more tractable, it projects each cell onto the top 50 (by default) principal components.
Then, you as the user choose whether to reduce the dimensionality further using one of two non-linear methods for dimensionality reduction: t-SNE
or UMAP. The former is an extremely popular and widely accepted technique for visualizing single-cell RNA-seq data. The latter is faster, and often
better preserves the global structure of the data but is also newer and therefore less well tested by the single-cell community. Then, Monocle 3 will
cluster your cells, organize them into trajectories, or both.
Step 3: Clustering and partitioning the cells
Monocle 3 can learn multiple disconnected or "disjoint" trajectories. This is important because many experiments will capture a community of cells
that are responding to a stimulus or undergoing differentiation, with each type of cell responding differently. Because Monocle 2 assumes that all of
your data is part of a single trajectory, in order to construct individual trajectories you would have to manually split up each group of related cell
types and stages into different sets, and then run the trajectory analysis separately on each group of cells. In contrast, Monocle 3 can detect that
some cells are part of a different process than others in the dataset, and can therefore build multiple trajectories in parallel from a single dataset.
Monocle 3 achieves this by "partitioning" the cells into "supergroups" using a method derived from "approximate graph abstraction"
(https://www.biorxiv.org/content/early/2017/10/25/208819) (AGA) (Wolf et al, 2017). Cells from different supergroups cannot be part of the
same trajectory.
Step 4: Learning the principal graph
Monocle 3 provides three different ways to organize cells into trajectories, all of which are based on the concept of "reversed graph embedding".
DDRTree is the method used in Monocle 2 to learn tree-like trajectories, and has received some important updates in Monocle 3. In particular, these
updates have massively improved the throughout of DDRTree, which can now process millions of cells in minutes. SimplePPT works similarly to
DDRTree in that it learns a tree-like trajectory, but it does not attempt to further reduce the dimensionality of the data. L1Graph is an advanced
optimization method that can learn trajectories that have loops in them (that is, trajectories that aren't trees).
Once Monocle 3 has learned a principal graph that ts within the data, each cell is projected onto the graph. Then, the user selects one or more
positions on the graph that dene the starting points of the trajetory. Monocle measures the distance from these start points to each cell, traveling
along the graph as it does so. A cell's pseudotime is simply the distance from each cell to the closest starting point on the graph.
Step 5: Differential expression analysis and visualization
Once this is complete, you can run tests for genes that are specic to each cluster, nd genes that vary over the course of a trajectory, and plot your
data in many different ways. Monocle 3 provides a suite of regression tests to nd genes that differ between clusters and over trajectories.
Monocle 3 also introduces a new test that uses the principal graph directly and can help nd genes that vary in complex ways over a trajectory with
loops and more intricate structures.
Tutorial 1: learning trajectories with Monocle 3
In this tutorial, we demonstrate how to use Monocle 3 (alpha release) to resolve multiple disjoint trajectories. We will mainly introduce:
How to learn tree-like trajectories with monocle 3 in two or three dimensions.
How to choose the starting point(s) for the trajectory.
How to visualize these trajectories in static 2D plots and interactive 3D plots.
Preliminaries: Load Monocle and the data
rm(list = ls()) # Clear the environment
options(warn=-1) # Turn off warning message globally
library(monocle) # Load Monocle
Let's load up the data from Paul et. al, which explored hematopoeisis at single-cell resolution. To save time, we'll just load a CellDataSet object.
Monocle 3 makes some changes to the CellDataSet class, so we'll call a function to "upgrade" the old object to the new format. If you're starting
from an expression matrix and building a new CellDataSet from scratch, you don't need to call updateCDS() .
We'll also change the cluster IDs from the original study into easier to read names. Then we'll set up some colors for each of them that we'll use in
some plots later.
cds <- readRDS(gzcon(url("http://trapnell-lab.gs.washington.edu/public_share/valid_subset_GSE72857_cds2.RDS")))
# Update the old CDS object to be compatible with Monocle 3
cds <- updateCDS(cds)
pData(cds)$cell_type2 <- ::revalue(as.character(pData(cds)$cluster),
c("1" = 'Erythrocyte',
"2" = 'Erythrocyte',
"3" = 'Erythrocyte',
"4" = 'Erythrocyte',
"5" = 'Erythrocyte',
"6" = 'Erythrocyte',
"7" = 'Multipotent progenitors',
"8" = 'Megakaryocytes',
"9" = 'GMP',
"10" = 'GMP',
"11" = 'Dendritic cells',
"12" = 'Basophils',
"13" = 'Basophils',
"14" = 'Monocytes',
"15" = 'Monocytes',
"16" = 'Neutrophils',
"17" = 'Neutrophils',
"18" = 'Eosinophls',
"19" = 'lymphoid'))
cell_type_color <- c("Basophils" = "#E088B8",
"Dendritic cells" = "#46C7EF",
"Eosinophls" = "#EFAD1E",
"Erythrocyte" = "#8CB3DF",
"Monocytes" = "#53C0AD",
"Multipotent progenitors" = "#4EB859",
"GMP" = "#D097C4",
"Megakaryocytes" = "#ACC436",
"Neutrophils" = "#F5918A",
'NA' = '#000080')
Step 1: Noramlize and pre-process the data
We then estimate size factors for each cell and dispersion function for the genes in the cds as usual. Monocle 3 now performs these operations using
the DelayedArray packages so they work on datasets with millions of cells. The dispersion calculation and several other operations rely on the
DelayedArray package in Bioconductor, which splits the operation into blocks in order to avoid exhausting the computer's memory. You can control
the block size and the verbosity of these operations as shown below:
# Pass TRUE if you want to see progress output on some of Monocle 3's operations
:::set_verbose_block_processing(TRUE)
# Passing a higher value will make some computations faster but use more memory. Adjust with caution!
options(DelayedArray.block.size=1000e6)
cds <- estimateSizeFactors(cds)
cds <- estimateDispersions(cds)
Next, run the preprocessCDS() function to project the data onto the top principal components:
cds <- preprocessCDS(cds, num_dim = 20)
plyr
DelayedArray
Step 2: Reduce the dimensionality of the data
Then, apply a further round of (nonlinear) dimensionality reduction using UMAP:
cds <- reduceDimension(cds, reduction_method = 'UMAP')
Now we're ready to start learning trajectories!
Step 3: Partition the cells into supergroups
Rather than forcing all cells into a single developmental trajectory, Monocle 3 enables you to learn a set of trajectories that describe the biological
process you're studying. For example, if you're looking at a community of immune cells responding to infection, each cell type will respond to antigen
(and each other) in a different way, so they should be organized into distinct trajectories. This can also be helpful when you have small groups of
outlier cells that for either technical or biological reasons are very dissimilar from the rest of the cells in your experiment. They can confuse a
trajectory analysis. Monocle 3's partitioning strategy circumvents this issue because such groups often wind up in their own partition. In the Paul
data, there is a small outgroup the authors classied as dendritic cells that Monocle automatically partitions away from the main trajectory.
In Monocle 3, we recognize "disjoint" trajectories by drawing on ideas from Alex Wolf and colleagues, who recently introduced the concept of
abstract graph participation. Monocle 3 implements the test for cell community connectedness from Wolf et al via the partitionCells() function,
which divides the cells into "supergroups".
cds <- partitionCells(cds)
Step 4: Learn the principal graph
Now that the cells are paritioned, we can organize each supergroup into a separate trajectory. The default method for doing this in Monocle 3 is
SimplePPT, which assumes that each trajectory is a tree (albeit one that may have multiple roots). Learn these trees with the learnGraph function:
cds <- learnGraph(cds, RGE_method = 'SimplePPT')
After you've learned the graph, it's time to assign each cell's pseudotime value with orderCells() . But before we get to that, let's see how to plot
the trajectory so we know where the beginning of the trajectory should be.
Step 5: Visualize the trajectory
Once the you've learned the trajectory, you can visualize the it and color the cells in different ways.
plot_cell_trajectory(cds,
color_by = "cell_type2") +
scale_color_manual(values = cell_type_color)
You can see that Monocle has learned two trajectories, one of which is tiny and essentially trivial. The other has one major branch. SimplePPT
essentially is nding a principal graph that ts nicely within the cells as projected in the UMAP coordinate space.
Adjusting the start of pseudotime with orderCells
In the trajectory above, you can see that the "Multipotent progenitor" cells are located roughly in the middle of the longer trajectory segment. We
know from extensive past study of hematopoeisis that these are the "root" cell state that generates all the others in the primary trajectory. We
need to tell Monocle that these cells are the "beginning" of the trajectory. In Monocle 2, this wouldn't be possible, because the software required
that the root be one of the leaves of the tree. Monocle 3 allows you to specify an internal part of the tree as the root. There are two ways to do this:
1. You can speciy the name of a specic cell or principal graph node as the root by passing it to orderCells() .
2. You can call orderCells() with no root specied and it will open a window for you to select the root(s) with your mouse cursor. This latter
option is only available in interactive sessions, and doesn't work in Jupyter notebooks.
Once you select one or more roots, orderCells() computes the shortest path from each cell's location on the princiapl graph to the nearest root
node. That is, a cell's pseudotime value is the geodesic distance from it to the nearest root, traveling over the graph. Any cell that is not reachable
from some root will be assigned a pseudotime value of innity.
You may nd it helpful to automatically pick the root according to any number of biologically-driven criteria. For example, you could nd the nodes at
which cells expressing a certain marker gene are concentrated. Or we could select the node where cells from an early experimental timepoint land.
Here, we provide one such helper function to show you how to do this kind of thing:
# a helper function to identify the root principal points:
get_correct_root_state <- function(cds, cell_phenotype, root_type){
cell_ids <- which(pData(cds)[, cell_phenotype] == root_type)
closest_vertex <-
cds@auxOrderingData[[cds@rge_method]]$pr_graph_cell_proj_closest_vertex
closest_vertex <- as.matrix(closest_vertex[colnames(cds), ])
root_pr_nodes <-
V(cds@minSpanningTree)$name[as.numeric(names
(which.max(table(closest_vertex[cell_ids,]))))]
root_pr_nodes
}
In the above function, we are accessing pr_graph_cell_proj_closest_vertex which is just a matrix with a single column that stores for each
cell, the ID of the principal graph node it's closest to. This is handy for computing statistics (e.g. with dplyr) about the principal graph nodes and
which cells of what type map to them.
Now we can call this function to automatically nd the node in the principal graph where our multipotent progenitors reside:
MPP_node_ids = get_correct_root_state(cds,
cell_phenotype =
'cell_type2', "Multipotent progenitors")
cds <- orderCells(cds, root_pr_nodes = MPP_node_ids)
plot_cell_trajectory(cds)
剩余100页未读,继续阅读
SmartCells
- 粉丝: 5
- 资源: 8
上传资源 快速赚钱
- 我的内容管理 收起
- 我的资源 快来上传第一个资源
- 我的收益 登录查看自己的收益
- 我的积分 登录查看自己的积分
- 我的C币 登录后查看C币余额
- 我的收藏
- 我的下载
- 下载帮助
会员权益专享
最新资源
- zigbee-cluster-library-specification
- JSBSim Reference Manual
- c++校园超市商品信息管理系统课程设计说明书(含源代码) (2).pdf
- 建筑供配电系统相关课件.pptx
- 企业管理规章制度及管理模式.doc
- vb打开摄像头.doc
- 云计算-可信计算中认证协议改进方案.pdf
- [详细完整版]单片机编程4.ppt
- c语言常用算法.pdf
- c++经典程序代码大全.pdf
- 单片机数字时钟资料.doc
- 11项目管理前沿1.0.pptx
- 基于ssm的“魅力”繁峙宣传网站的设计与实现论文.doc
- 智慧交通综合解决方案.pptx
- 建筑防潮设计-PowerPointPresentati.pptx
- SPC统计过程控制程序.pptx
资源上传下载、课程学习等过程中有任何疑问或建议,欢迎提出宝贵意见哦~我们会及时处理!
点击此处反馈
安全验证
文档复制为VIP权益,开通VIP直接复制
信息提交成功
评论1