Java网络编程实战:Socket、NIO、Netty,构建高效网络应用
发布时间: 2024-05-23 19:19:08 阅读量: 83 订阅数: 31 


Java网络编程 NIO Netty

# 1. Java网络编程基础**
Java网络编程是利用Java语言开发网络应用程序的基础。本章将介绍Java网络编程的基础知识,包括:
- **网络编程的概念:**网络编程的定义、目的和应用场景。
- **网络模型:**介绍客户端-服务器模型、对等模型和分布式模型,并分析其优缺点。
- **网络协议:**介绍TCP/IP协议栈,重点讲解TCP和UDP协议的特性和区别。
# 2. Socket编程实战**
**2.1 Socket编程基础**
**2.1.1 Socket的概念和类型**
Socket是一种网络编程接口,它允许应用程序通过网络与其他计算机进行通信。Socket可以分为两类:
- **流式Socket:**用于传输连续的数据流,如文本、图像或视频。
- **数据报Socket:**用于传输离散的数据包,如网络数据包或电子邮件。
**2.1.2 Socket的创建和连接**
要创建Socket,需要使用`java.net.Socket`类。该类提供了一个构造函数,用于指定目标主机和端口号。
```java
Socket socket = new Socket("localhost", 8080);
```
创建Socket后,可以使用`connect()`方法将其连接到远程主机。
```java
socket.connect(new InetSocketAddress("localhost", 8080));
```
**2.2 Socket通信协议**
Socket编程使用两种主要的通信协议:
**2.2.1 TCP协议**
TCP(传输控制协议)是一种面向连接的协议,它提供可靠、有序的数据传输。TCP建立连接后,会维护一个状态机,以确保数据按顺序传输,并且不会丢失或损坏。
**2.2.2 UDP协议**
UDP(用户数据报协议)是一种无连接的协议,它提供不可靠、无序的数据传输。UDP不会建立连接,而是直接将数据包发送到目标主机。UDP适用于不需要可靠性或顺序传输的应用,如视频流或网络游戏。
**2.3 Socket编程实例**
**2.3.1 客户端-服务器通信**
以下是使用Socket进行客户端-服务器通信的示例:
**客户端代码:**
```java
Socket socket = new Socket("localhost", 8080);
OutputStreamWriter writer = new OutputStreamWriter(socket.getOutputStream());
writer.write("Hello from client!");
writer.flush();
```
**服务器代码:**
```java
ServerSocket serverSocket = new ServerSocket(8080);
Socket clientSocket = serverSocket.accept();
InputStreamReader reader = new InputStreamReader(clientSocket.getInputStream());
BufferedReader bufferedReader = new BufferedReader(reader);
String message = bufferedReader.readLine();
System.out.println("Received message from client: " + message);
```
**2.3.2 多线程并发编程**
为了处理多个客户端连接,可以使用多线程并发编程。以下示例使用线程池来处理客户端请求:
```java
ExecutorService executorService = Executors.newFixedThreadPool(10);
ServerSocket serverSocket = new ServerSocket(8080);
while (true) {
Socket clientSocket = serverSocket.accept();
executorService.submit(() -> {
// 处理客户端请求
});
}
```
# 3. NIO编程实战
### 3.1 NIO编程基础
#### 3.1.1 NIO的概念和优势
NIO(Non-Blocking IO)是一种非阻塞式的IO模型,它与传统的阻塞式IO模型相比,具有以下优势:
- **非阻塞:** NIO不会阻塞线程,即使在等待IO操作完成时也是如此。这使得NIO可以处理大量的并发连接,而不会导致线程饥饿。
- **高性能:** NIO使用缓冲区和选择器来高效地管理IO操作,从而提高了应用程序的性能。
- **可扩展性:** NIO可以轻松地扩展到处理大量的并发连接,因为它不会阻塞线程。
#### 3.1.2 NIO的缓冲区和选择器
NIO使用缓冲区和选择器来管理IO操作。缓冲区用于存储数据,而选择器用于监控多个IO通道的状态。
**缓冲区:** 缓冲区是用于存储数据的内存区域。NIO使用两种类型的缓冲区:
- **直接缓冲区:** 直接缓冲区直接映射到物理内存,从而可以更有效地访问数据。
- **非直接缓冲区:** 非直接缓冲区将数据复制到JVM堆中,然后再进行访问。
**选择器:** 选择器是一个Java类,它允许应用程序同时监控多个IO通道。选择器可以检测以下事件:
- **读事件:** 通道中有数据可读。
- **写事件:** 通道可以写入数据。
- **连接事件:** 通道已连接或断开连接。
### 3.2 NIO编程实例
#### 3.2.1 Echo服务器
以下是一个使用NIO实现的Echo服务器示例:
```java
import java.io.IOException;
import java.net.InetSocketAddress;
import java.nio.ByteBuffer;
import java.nio.channels.SelectionKey;
import java.nio.channels.Selector;
import java.nio.channels.ServerSocketChannel;
import java.nio.channels.SocketChannel;
import java.util.Iterator;
import java.util.Set;
public class EchoServer {
private Selector selector;
private ServerSocketChannel serverSocketChannel;
public EchoServer(int port) throws IOException {
selector = Selector.open();
serverSocketChannel = ServerSocketChannel.open();
serverSocketChannel.bind(new InetSocketAddress(port));
serverSocketChannel.configureBlocking(false);
serverSocketChannel.register(selector, SelectionKey.OP_ACCEPT);
}
public void start() throws IOException {
while (true) {
selector.select();
Set<SelectionKey> selectedKeys = selector.selectedKeys();
Iterator<SelectionKey> iterator = selectedKeys.iterator();
while (iterator.hasNext()) {
SelectionKey key = iterator.next();
iterator.remove();
if (key.isAcceptable()) {
accept(key);
} else if (key.isReadable()) {
read(key);
} else if (key.isWritable()) {
write(key);
}
}
}
}
private void accept(SelectionKey key) throws IOException {
ServerSocketChannel serverSocketChannel = (ServerSocketChannel) key.channel();
SocketChannel socketChannel = serverSocketChannel.accept();
socketChannel.configureBlocking(false);
socketChannel.register(selector, SelectionKey.OP_READ);
}
private void read(SelectionKey key) throws IOException {
SocketChannel socketChannel = (SocketChannel) key.channel();
ByteBuffer buffer = ByteBuffer.allocate(1024);
int readBytes = socketChannel.read(buffer);
if (readBytes > 0) {
buffer.flip();
socketChannel.register(selector, SelectionKey.OP_WRITE);
}
}
private void write(SelectionKey key) throws IOException {
SocketChannel socketChannel = (SocketChannel) key.channel();
ByteBuffer buffer = (ByteBuffer) key.attachment();
socketChannel.write(buffer);
buffer.clear();
socketChannel.register(selector, SelectionKey.OP_READ);
}
public static void main(String[] args) throws IOException {
EchoServer echoServer = new EchoServer(8080);
echoServer.start();
}
}
```
**代码逻辑逐行解读:**
1. **ServerSocketChannel serverSocketChannel = ServerSocketChannel.open();** 创建一个ServerSocketChannel,用于监听客户端连接。
2. **serverSocketChannel.bind(new InetSocketAddress(port));** 将ServerSocketChannel绑定到指定端口。
3. **serverSocketChannel.configureBlocking(false);** 设置ServerSocketChannel为非阻塞模式。
4. **serverSocketChannel.register(selector, SelectionKey.OP_ACCEPT);** 将ServerSocketChannel注册到Selector,并监听接受事件。
5. **while (true) {** 进入一个死循环,持续监听IO事件。
6. **selector.select();** 阻塞等待IO事件发生。
7. **Set<SelectionKey> selectedKeys = selector.selectedKeys();** 获取发生的IO事件的SelectionKey集合。
8. **Iterator<SelectionKey> iterator = selectedKeys.iterator();** 遍历SelectionKey集合。
9. **while (iterator.hasNext()) {** 遍历每个SelectionKey。
10. **SelectionKey key = iterator.next();** 获取当前SelectionKey。
11. **iterator.remove();** 从SelectionKey集合中移除当前SelectionKey。
12. **if (key.isAcceptable()) {** 如果当前SelectionKey表示一个接受事件,则调用accept()方法处理。
13. **accept(key);** 处理接受事件,接受客户端连接并将其注册到Selector。
14. **if (key.isReadable()) {** 如果当前SelectionKey表示一个可读事件,则调用read()方法处理。
15. **read(key);** 处理可读事件,从客户端读取数据并将其注册到Selector。
16. **if (key.isWritable()) {** 如果当前SelectionKey表示一个可写事件,则调用write()方法处理。
17. **write(key);** 处理可写事件,向客户端写入数据并将其注册到Selector。
#### 3.2.2 文件传输
NIO还可以用于实现文件传输。以下是一个使用NIO实现文件传输的示例:
```java
import java.io.FileInputStream;
import java.io.FileOutputStream;
import java.io.IOException;
import java.net.InetSocketAddress;
import java.nio.ByteBuffer;
import java.nio.channels.FileChannel;
import java.nio.channels.SocketChannel;
public class FileTransfer {
public static void main(String[] args) throws IOException {
// 客户端
SocketChannel clientSocketChannel = SocketChannel.open();
clientSocketChannel.connect(new InetSocketAddress("localhost", 8080));
// 服务端
SocketChannel serverSocketChannel = SocketChannel.open();
serverSocketChannel.bind(new InetSocketAddress(8080));
serverSocketChannel.configureBlocking(false);
// 文件传输
FileInputStream fileInputStream = new FileInputStream("file.txt");
FileChannel fileChannel = fileInputStream.getChannel();
ByteBuffer buffer = ByteBuffer.allocate(1024);
while (fileChannel.read(buffer) > 0) {
buffer.flip();
clientSocketChannel.write(buffer);
buffer.clear();
}
fileChannel.close();
FileOutputStream fileOutputStream = new FileOutputStream("file_copy.txt");
FileChannel fileChannel2 = fileOutputStream.getChannel();
while (serverSocketChannel.read(buffer) > 0) {
buffer.flip();
fileChannel2.write(buffer);
buffer.clear();
}
fileChannel2.close();
}
}
```
**代码逻辑逐行解读:**
1. **SocketChannel clientSocketChannel = SocketChannel.open();** 创建一个客户端SocketChannel。
2. **clientSocketChannel.connect(new InetSocketAddress("localhost", 8080));** 连接到服务端。
3. **SocketChannel serverSocketChannel = SocketChannel.open();** 创建一个服务端SocketChannel。
4. **serverSocketChannel.bind(new InetSocketAddress(8080));** 绑定到指定端口。
5. **serverSocketChannel.configureBlocking(false);** 设置服务端SocketChannel为非阻塞模式。
6. **FileInputStream fileInputStream = new FileInputStream("file.txt");** 打开要传输的文件。
7. **FileChannel fileChannel = fileInputStream.getChannel();** 获取文件通道。
8. **ByteBuffer buffer = ByteBuffer.allocate(1024);** 创建一个缓冲区。
9. **while (fileChannel.read(buffer) > 0) {** 循环读取文件内容到缓冲区。
10. **buffer.flip();** 准备缓冲区读取。
11. **clientSocketChannel.write(buffer);** 向客户端写入缓冲区中的数据。
12. **buffer.clear();** 清空缓冲区。
13. **fileChannel.close();** 关闭文件通道。
14. **FileOutputStream fileOutputStream = new FileOutputStream("file_copy.txt");
# 4. Netty框架实战**
## 4.1 Netty框架简介
### 4.1.1 Netty框架的特点和优势
Netty是一个异步事件驱动的网络应用程序框架,具有以下特点和优势:
- **高性能:** Netty采用NIO(非阻塞IO)技术,可以高效地处理大量并发连接,提供高吞吐量和低延迟。
- **可扩展性:** Netty提供了丰富的API和组件,支持各种网络协议和通信模式,便于扩展和定制。
- **稳定性:** Netty经过广泛的测试和验证,具有很高的稳定性,可以确保网络应用程序的可靠运行。
- **易用性:** Netty提供了简洁易用的API,简化了网络编程的复杂性,降低了开发难度。
### 4.1.2 Netty框架的架构和组件
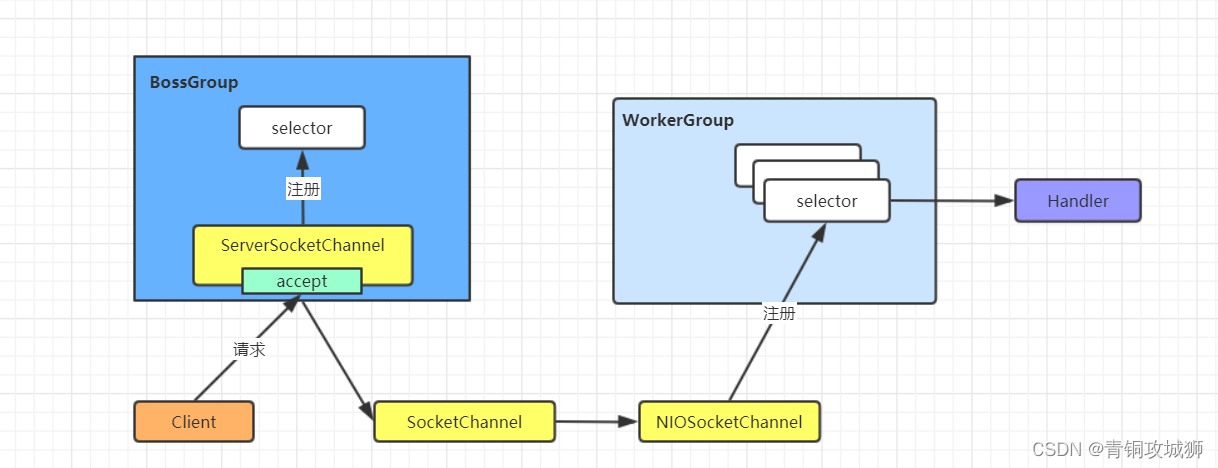
Netty框架采用分层架构,主要组件包括:
- **Channel:** 表示网络连接,负责数据的读写和传输。
- **EventLoop:** 负责处理网络事件,包括连接、读写、关闭等。
- **ChannelHandler:** 处理网络事件的处理器,可以自定义实现不同的网络协议和通信逻辑。
- **Codec:** 负责数据的编解码,将字节流转换为对象或对象转换为字节流。
## 4.2 Netty编程实例
### 4.2.1 Echo服务器
下面是一个使用Netty实现Echo服务器的示例:
```java
import io.netty.bootstrap.ServerBootstrap;
import io.netty.channel.ChannelFuture;
import io.netty.channel.ChannelInitializer;
import io.netty.channel.ChannelOption;
import io.netty.channel.EventLoopGroup;
import io.netty.channel.nio.NioEventLoopGroup;
import io.netty.channel.socket.SocketChannel;
import io.netty.channel.socket.nio.NioServerSocketChannel;
import io.netty.handler.codec.string.StringDecoder;
import io.netty.handler.codec.string.StringEncoder;
public class EchoServer {
public static void main(String[] args) throws Exception {
// 创建EventLoopGroup
EventLoopGroup bossGroup = new NioEventLoopGroup();
EventLoopGroup workerGroup = new NioEventLoopGroup();
try {
// 创建ServerBootstrap
ServerBootstrap bootstrap = new ServerBootstrap();
bootstrap.group(bossGroup, workerGroup)
.channel(NioServerSocketChannel.class)
.option(ChannelOption.SO_BACKLOG, 128)
.childHandler(new ChannelInitializer<SocketChannel>() {
@Override
protected void initChannel(SocketChannel ch) throws Exception {
// 添加编解码器
ch.pipeline().addLast(new StringDecoder());
ch.pipeline().addLast(new StringEncoder());
// 添加业务处理器
ch.pipeline().addLast(new EchoServerHandler());
}
});
// 绑定端口
ChannelFuture f = bootstrap.bind(8080).sync();
// 等待服务器关闭
f.channel().closeFuture().sync();
} finally {
// 优雅关闭EventLoopGroup
bossGroup.shutdownGracefully();
workerGroup.shutdownGracefully();
}
}
}
```
**逻辑分析:**
- 创建两个EventLoopGroup,分别用于处理连接请求和处理读写事件。
- 创建ServerBootstrap,配置服务器端相关参数,包括EventLoopGroup、Channel类型、选项等。
- 添加ChannelInitializer,负责初始化Channel的ChannelPipeline。
- 在ChannelPipeline中添加编解码器,用于将字节流转换为字符串和字符串转换为字节流。
- 添加业务处理器EchoServerHandler,负责处理网络事件和业务逻辑。
- 绑定端口,启动服务器。
- 等待服务器关闭,优雅关闭EventLoopGroup。
### 4.2.2 HTTP服务器
下面是一个使用Netty实现HTTP服务器的示例:
```java
import io.netty.bootstrap.ServerBootstrap;
import io.netty.channel.ChannelFuture;
import io.netty.channel.ChannelInitializer;
import io.netty.channel.ChannelOption;
import io.netty.channel.EventLoopGroup;
import io.netty.channel.nio.NioEventLoopGroup;
import io.netty.channel.socket.SocketChannel;
import io.netty.channel.socket.nio.NioServerSocketChannel;
import io.netty.handler.codec.http.HttpServerCodec;
import io.netty.handler.codec.http.HttpServerExpectContinueHandler;
public class HttpServer {
public static void main(String[] args) throws Exception {
// 创建EventLoopGroup
EventLoopGroup bossGroup = new NioEventLoopGroup();
EventLoopGroup workerGroup = new NioEventLoopGroup();
try {
// 创建ServerBootstrap
ServerBootstrap bootstrap = new ServerBootstrap();
bootstrap.group(bossGroup, workerGroup)
.channel(NioServerSocketChannel.class)
.option(ChannelOption.SO_BACKLOG, 128)
.childHandler(new ChannelInitializer<SocketChannel>() {
@Override
protected void initChannel(SocketChannel ch) throws Exception {
// 添加HTTP编解码器
ch.pipeline().addLast(new HttpServerCodec());
// 添加HTTP期待继续处理程序
ch.pipeline().addLast(new HttpServerExpectContinueHandler());
// 添加业务处理器
ch.pipeline().addLast(new HttpServerHandler());
}
});
// 绑定端口
ChannelFuture f = bootstrap.bind(8080).sync();
// 等待服务器关闭
f.channel().closeFuture().sync();
} finally {
// 优雅关闭EventLoopGroup
bossGroup.shutdownGracefully();
workerGroup.shutdownGracefully();
}
}
}
```
**逻辑分析:**
- 创建两个EventLoopGroup,分别用于处理连接请求和处理读写事件。
- 创建ServerBootstrap,配置服务器端相关参数,包括EventLoopGroup、Channel类型、选项等。
- 添加ChannelInitializer,负责初始化Channel的ChannelPipeline。
- 在ChannelPipeline中添加HTTP编解码器,用于将HTTP请求和响应转换为字节流和字节流转换为HTTP请求和响应。
- 添加HTTP期待继续处理程序,用于处理HTTP期待继续请求。
- 添加业务处理器HttpServerHandler,负责处理HTTP请求和响应。
- 绑定端口,启动服务器。
- 等待服务器关闭,优雅关闭EventLoopGroup。
# 5.1 网络安全
### 5.1.1 网络安全威胁
网络安全威胁是指对网络系统、信息和数据造成损害或破坏的潜在风险。常见的网络安全威胁包括:
- **恶意软件:**病毒、蠕虫、木马等恶意程序,可破坏系统、窃取数据或控制设备。
- **网络攻击:**黑客通过网络漏洞或社会工程学手段,攻击系统或窃取信息。
- **数据泄露:**未经授权访问或泄露敏感数据,如个人信息、财务数据或商业机密。
- **网络钓鱼:**通过伪造邮件或网站,诱骗用户提供个人信息或登录凭据。
- **拒绝服务攻击(DoS):**向目标系统发送大量数据包,使其无法正常提供服务。
### 5.1.2 网络安全措施
为了保护网络系统和数据,需要采取以下网络安全措施:
- **防火墙:**在网络边界设置防火墙,阻挡未经授权的访问和攻击。
- **入侵检测系统(IDS):**监测网络流量,检测和阻止可疑活动。
- **安全协议:**使用加密协议(如HTTPS、TLS)保护数据传输和通信。
- **身份验证和授权:**通过用户名、密码或生物识别技术,限制对系统和数据的访问。
- **安全更新和补丁:**定期更新系统和软件,修复已知的安全漏洞。
- **安全意识培训:**提高员工对网络安全威胁的认识,避免社会工程学攻击。
- **灾难恢复计划:**制定计划,在网络安全事件发生时恢复系统和数据。
0
0


