Detailed Explanation of ST7789 Display Interface and Pin Functions
发布时间: 2024-09-15 02:03:13 阅读量: 5 订阅数: 9 
# 1. Introduction to the ST7789 Display
## 1.1 Features of the ST7789 Display
The ST7789 display is a high-performance, low-power consumption color TFT LCD that boasts the following features:
- High resolution with clear display effects
- Rich colors supporting 262K color display
- Built-in equalizer for stable display performance
- Low power consumption design, ideal for mobile devices
## 1.2 Applications of the ST7789 Display
The ST7789 display is widely used in various electronic products, including but not limited to:
- Smartwatches
- Wearable devices
- Instrument panel displays
- Industrial control panels
Thanks to its superior performance and stability, the ST7789 display has been extensively applied in diverse fields.
# 2. Introduction to the ST7789 Display Interfaces
As a common type of LCD, the ST7789 display features a variety of interfaces, including data interfaces, control interfaces, and communication protocols. This chapter will provide a detailed introduction to these aspects of the ST7789 display.
### 2.1 Data Interfaces
The ST7789 display transfers image data through data interfaces, with the commonly used ones being SPI and RGB interfaces. The SPI interface is a serial peripheral interface that transfers data using clock and data signals. The RGB interface is a parallel interface that achieves data transfer by simultaneously transmitting multiple data lines.
```python
# Python sample code: SPI interface data transfer
import spidev
spi = spidev.SpiDev()
spi.open(0, 0)
# Send data to the ST7789 display
spi.writebytes([0x01, 0x02, 0x03])
# Close the SPI interface
spi.close()
```
### 2.2 Control Interfaces
In addition to data interfaces, the ST7789 display requires control interfaces to manage various parameters of the display, such as orientation, brightness, ***mon control interfaces include pin control and SPI control.
```java
// Java sample code: Pin control interface for display orientation
public class ST7789Display {
private boolean isPortrait = true;
public void setOrientation(boolean portrait) {
this.isPortrait = portrait;
}
// Other control methods
}
```
### 2.3 Communication Protocols
Communication between the ST7789 display and microcontrollers typically employs the SPI communication protocol or the I2C communication protocol. The SPI protocol offers fast speeds and long transmission distances, making it suitable for high-speed applications, while the I2C protocol is a serial communication protocol ideal for short-distance, low-speed communication.
```javascript
// JavaScript sample code: Communication with the ST7789 display via the I2C protocol
const i2c = require('i2c-bus');
const i2cBus = i2c.openSync(1);
const address = 0x3C;
const cmd = Buffer.from([0xAF]);
i2cBus.i2cWrite(address, cmd.length, cmd, (err, bytesWritten, buffer) => {
if (err) {
console.error(err);
} else {
console.log('Command sent successfully');
}
});
```
This covers the introduction to the ST7789 display interfaces. The next chapter will delve into the pin functions of the ST7789 display.
# 3. Analysis of ST7789 Display Pin Functions
The pin functions of the ST7789 display are crucial, as different pins serve various functions, and correct connection and configuration of the pins are essential for proper operation.
#### 3.1 VCC Pin
The VCC pin is used for power supply reception, typically connected to a 5V or 3.3V voltage source.
#### 3.2 GND Pin
The GND pin connects to ground, serving as the ground connection for the screen circuit.
#### 3.3 SCK Pin
The SCK pin is the clock line for SPI communication, synchronizing data transfer.
#### 3.4 MOSI Pin
The MOSI pin is the master-out-slave-in (MOSI) line for SPI communication, used to transmit data to the display.
#### 3.5 RS Pin
The RS pin is used to specify whether the data sent to the display is data or a command.
#### 3.6 RST Pin
The RST pin is used to reset the display, reinitializing the display settings.
Properly connecting these pins and making the corresponding settings are key steps in using the ST7789 display and are crucial for ensuring normal display performance.
# 4. Precautions for Using the ST7789 Display
As a commonly used display device, there are certain precautions to be aware of when using the ST7789 display to ensure its proper use and prolong its service life.
#### 4.1 Voltage Input Range Precautions
- The voltage input range for the ST7789 display is typically between 2.5V to 3.3V; exceeding or falling below this range may result in poor display quality or device damage.
- When connecting the power supply, ensure the voltage is stable and meets the display's requirements to avoid voltage fluctuations or excessive voltage.
#### 4.2 Operating Temperature Range Precautions
- The operating temperature range for the ST7789 display is generally between -20℃ to 70℃; operating outside of this range may affect display quality and device lifespan.
- In extreme temperature conditions (such as high or low temperatures), it is advisable to take appropriate protective measures or reduce operating time to prevent damage to the display.
#### 4.3 Driver Settings Precautions
- When connecting the ST7789 display, appropriate driver settings must be made based on the specific controller type and driver IC, ensuring compatibility with the communication protocol of the microcontroller or microprocessor.
- Different driver settings may affect display quality and refresh rates; it is recommended to refer to relevant documentation or example codes for proper configuration.
When using the ST7789 display, the above precautions should be given special attention. Proper voltage supply, temperature control, and correct driver settings will contribute to the stable operation and reliability of the display.
# 5. Connection Methods Between the ST7789 Display and Microcontrollers
The ST7789 display is a common type of LCD that, when connected to a microcontroller, can achieve graphical display and data interaction. The following will introduce the connection methods between Arduino, Raspberry Pi, and STM32 and the ST7789 display.
#### 5.1 Connection Method Between Arduino and ST7789 Display
First, the following hardware is required for connecting Arduino and the ST7789 display:
- Arduino development board
- ST7789 display
- Dupont wires
Next, follow these steps to connect Arduino and the ST7789 display:
1. Connect the ST7789's VCC pin to the Arduino's 5V pin and the GND pin to the Arduino's GND pin.
2. Connect the SCL pin to the Arduino's A5 pin and the SDA pin to the Arduino's A4 pin.
3. Connect the RES pin to any digital pin of the Arduino and the DC pin to another digital pin.
Then, download and install the appropriate driver library, write Arduino code, and control the ST7789 display for graphical display via the SPI communication protocol.
```arduino
#include <Adafruit_GFX.h>
#include <Adafruit_ST7789.h>
#include <SPI.h>
#define TFT_CS 10
#define TFT_RST 9
#define TFT_DC 8
Adafruit_ST7789 tft = Adafruit_ST7789(&SPI, TFT_CS, TFT_DC, TFT_RST);
void setup() {
tft.init(240, 240);
tft.setRotation(2);
tft.fillScreen(ST77XX_BLACK);
tft.setTextColor(ST77XX_WHITE);
tft.setCursor(10, 10);
tft.setTextSize(2);
tft.println("Hello, Arduino!");
}
void loop() {
// Your code here
}
```
With the above code, Arduino successfully connects to the ST7789 display and displays the text "Hello, Arduino!" on the screen.
#### 5.2 Connection Method Between Raspberry Pi and ST7789 Display
Connecting Raspberry Pi to the ST7789 display also requires the following hardware:
- Raspberry Pi single-board computer
- ST7789 display
- Dupont wires
The connection steps are as follows:
1. Connect the ST7789's VCC pin to the Raspberry Pi's 3.3V pin and the GND pin to the Raspberry Pi's GND pin.
2. Connect the SCL pin to the Raspberry Pi's SPI SCLK pin and the DC pin to any Raspberry Pi GPIO pin.
3. Connect the RES pin to any Raspberry Pi GPIO pin; connect the BL pin to a PWM pin if necessary.
After installing the relevant driver library, you can control the ST7789 display for display purposes via SPI or other communication protocols.
#### 5.3 Connection Method Between STM32 and ST7789 Display
The connection method for STM32 and the ST7789 display is similar and requires the following hardware:
- STM32 development board
- ST7789 display
- Dupont wires
Connection steps:
1. Connect the ST7789's VCC pin to the STM32's 3.3V pin and the GND pin to the STM32's GND pin.
2. Connect the SCL pin to the STM32's SPI clock pin and the SDA pin to the STM32's SPI data pin.
3. Connect the DC pin to any STM32 GPIO pin and the RES pin to any STM32 GPIO pin.
Write the corresponding program on the STM32 to communicate with the ST7789 display via SPI or other communication protocols to achieve graphical display functionality.
This concludes the connection methods for Arduino, Raspberry Pi, and STM32 with the ST7789 display, enabling control and display of data on the display.
# 6. Case Study Analysis of ST7789 Display Applications
The ST7789 display, as a high-performance and widely applicable display, is extensively used in various electronic products. Below are analyses of several specific cases.
#### 6.1 Smartwatch Design Based on the ST7789 Display
In smartwatch design, the ST7789 display can be used to show time, date, weather information, exercise data, etc. By integrating with sensor modules, Bluetooth modules, and other components, the smartwatch's functions are realized. Below is a simple Python code example demonstrating how to connect an ST7789 display to a Raspberry Pi to show the current time:
```python
import time
import ST7789
# Initialize the ST7789 display
disp = ST7789.ST7789()
# Continuously display the current time
while True:
current_time = time.strftime("%H:%M:%S")
disp.show_text(current_time)
time.sleep(1)
```
**Code Explanation:**
- Import necessary libraries
- Initialize the ST7789 display object
- Continuously display the current time with a 1-second refresh rate
**Code Summary:**
The Python code realizes a smartwatch design based on the ST7789 display, providing real-time display of the current time.
**Result Explanation:**
After connecting the Raspberry Pi and the ST7789 display, the current time information can be seen displayed in real-time on the screen.
#### 6.2 Wearable Device Development Based on the ST7789 Display
In wearable device development, the ST7789 display can be used to show user health data, message notifications, calendar events, etc. By combining sensors, WiFi modules, and other components, the functions of wearable devices are realized. Below is a simple Java code example demonstrating how to connect an ST7789 display to an Arduino to display heart rate data:
```java
import ST7789;
// Initialize the ST7789 display
ST7789 disp = new ST7789();
// Continuously display heart rate data
while(true) {
int heart_rate = getHeartRate();
disp.showText("Heart Rate: " + heart_rate);
delay(1000);
}
```
**Code Explanation:**
- Import necessary libraries
- Initialize the ST7789 display object
- Continuously display heart rate data with a 1-second refresh rate
**Code Summary:**
The Java code realizes wearable device development based on the ST7789 display, providing real-time display of heart rate data.
**Result Explanation:**
After connecting the Arduino and the ST7789 display, the real-time heart rate information can be seen displayed on the screen.
#### 6.3 Instrument Panel Display Solution Based on the ST7789 Display
In the field of instrument panels, the ST7789 display can be used to show various measurement data, device status, alarm information, etc. By integrating with sensors, control modules, and other components, the display solution for instrument panels is realized. Below is a simple Go code example demonstrating how to connect an ST7789 display to an STM32 to display temperature data:
```go
package main
import (
"fmt"
"time"
"***/ST7789"
)
func main() {
disp := ST7789.New()
for {
temperature := getTemperature()
disp.ShowText(fmt.Sprintf("Temperature: %v", temperature))
time.Sleep(time.Second)
}
}
```
**Code Explanation:**
- Import necessary libraries
- Initialize the ST7789 display object
- Continuously display temperature data with a 1-second refresh rate
**Code Summary:**
The Go code realizes an instrument panel display solution based on the ST7789 display, providing real-time display of temperature data.
**Result Explanation:**
After connecting the STM32 and the ST7789 display, the real-time temperature information can be seen displayed on the screen.
Through the above case analyses, the application scenarios of the ST7789 display in different fields are demonstrated, offering readers more inspiration and reference for use.
 最低0.47元/天 解锁专栏
 送3个月
 百万级
高质量VIP文章无限畅学
百万级
高质量VIP文章无限畅学
 千万级
优质资源任意下载
千万级
优质资源任意下载
 C知道
免费提问 ( 生成式Al产品 )
C知道
免费提问 ( 生成式Al产品 )
0
0
相关推荐

专栏目录

文章持续更新中,敬请期待~
最低0.47元/天 解锁专栏
送3个月
百万级
高质量VIP文章无限畅学
千万级
优质资源任意下载
C知道
免费提问 ( 生成式Al产品 )
最新推荐
【持久化存储】:将内存中的Python字典保存到磁盘的技巧

# 1. 内存与磁盘存储的基本概念
在深入探讨如何使用Python进行数据持久化之前,我们必须先了解内存和磁盘存储的基本概念。计算机系统中的内存指的
【Python新手必备】:全方位入门指南及环境配置教程
# 1. Python编程语言概述
Python是一种高级编程语言,由吉多·范罗苏姆于1989年底发明。它以其简洁明了的语法和强大的功能而闻名于世,让开发者能够以更少的代码行实现更多的功能。Python的语法允许开发者用更少的代码进行迭代开发,特别适合初学者快速上手。
Python支持多种编程范式,包括面向对象、命令式、函数式和过程式编程。这使得Python在科学计算、数据挖掘、人工智能、网
Python list remove与列表推导式的内存管理:避免内存泄漏的有效策略
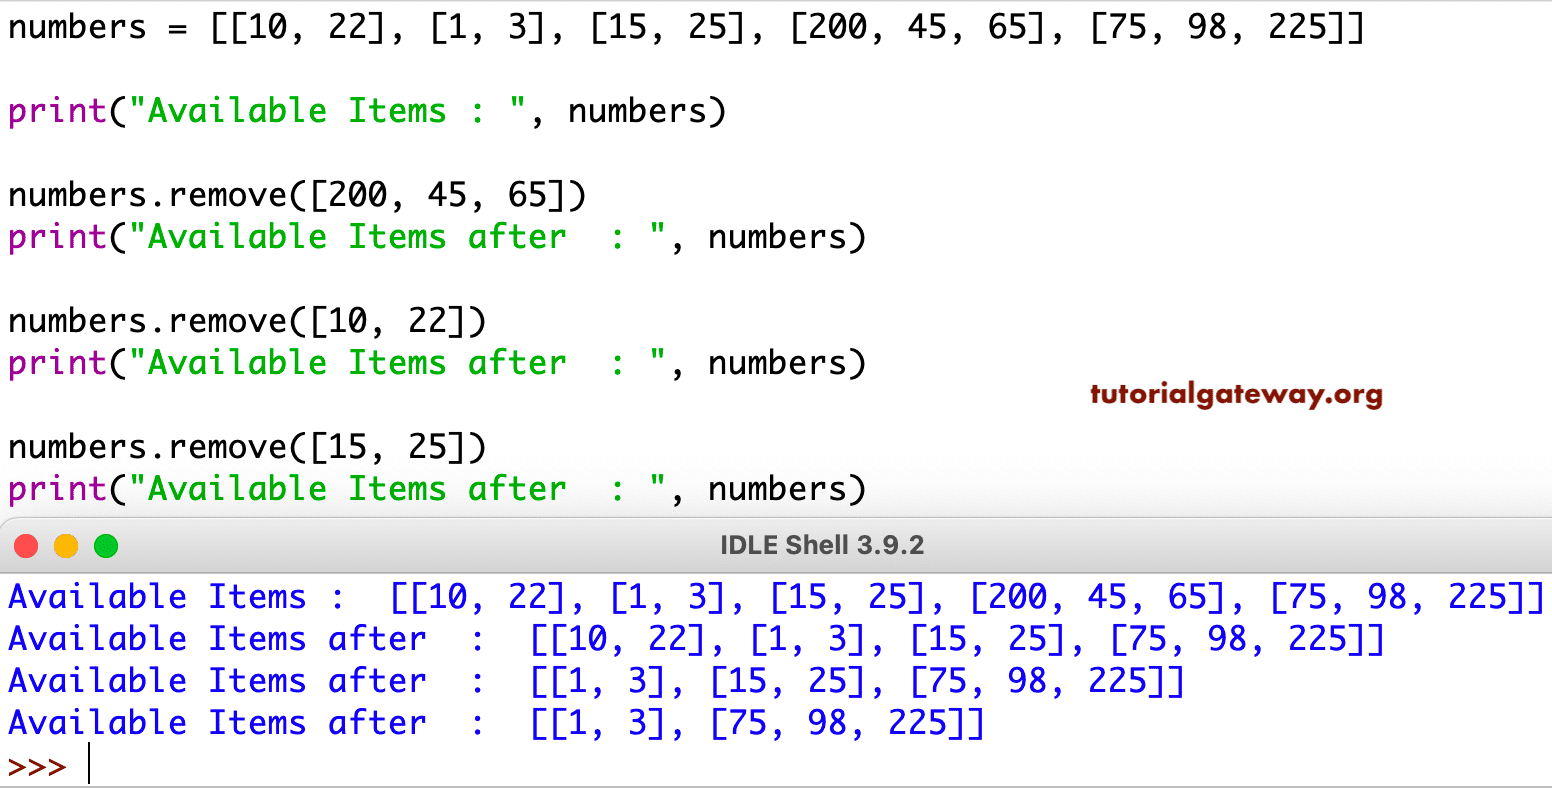
# 1. Python列表基础与内存管理概述
Python作为一门高级编程语言,在内存管理方面提供了众多便捷特性,尤其在处理列表数据结构时,它允许我们以极其简洁的方式进行内存分配与操作。列表是Python中一种基础的数据类型,它是一个可变的、有序的元素集。Python使用动态内存分配来管理列表,这意味着列表的大小可以在运行时根据需要进
【Python项目管理工具大全】:使用Pipenv和Poetry优化依赖管理

# 1. Python依赖管理的挑战与需求
Python作为一门广泛使用的编程语言,其包管理的便捷性一直是吸引开发者的亮点之一。然而,在依赖管理方面,开发者们面临着各种挑战:从包版本冲突到环境配置复杂性,再到生产环境的精确复现问题。随着项目的增长,这些挑战更是凸显。为了解决这些问题,需求便应运而生——需要一种能够解决版本
Python列表的函数式编程之旅:map和filter让代码更优雅
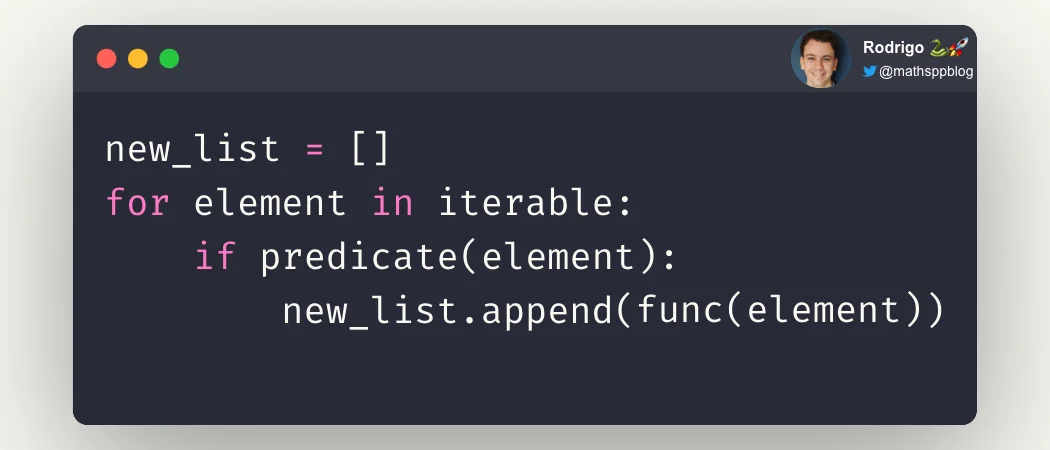
# 1. 函数式编程简介与Python列表基础
## 1.1 函数式编程概述
函数式编程(Functional Programming,FP)是一种编程范式,其主要思想是使用纯函数来构建软件。纯函数是指在相同的输入下总是返回相同输出的函数,并且没有引起任何可观察的副作用。与命令式编程(如C/C++和Java)不同,函数式编程
Python索引的局限性:当索引不再提高效率时的应对策略

# 1. Python索引的基础知识
在编程世界中,索引是一个至关重要的概念,特别是在处理数组、列表或任何可索引数据结构时。Python中的索引也不例外,它允许我们访问序列中的单个元素、切片、子序列以及其他数据项。理解索引的基础知识,对于编写高效的Python代码至关重要。
## 理解索引的概念
Python中的索引从0开始计数。这意味着列表中的第一个元素
Python并发控制:在多线程环境中避免竞态条件的策略

# 1. Python并发控制的理论基础
在现代软件开发中,处理并发任务已成为设计高效应用程序的关键因素。Python语言因其简洁易读的语法和强大的库支持,在并发编程领域也表现出色。本章节将为读者介绍并发控制的理论基础,为深入理解和应用Python中的并发工具打下坚实的基础。
## 1.1 并发与并行的概念区分
首先,理解并发和并行之间的区别至关重要。并发(Concurre
Python列表与数据库:列表在数据库操作中的10大应用场景
# 1. Python列表与数据库的交互基础
在当今的数据驱动的应用程序开发中,Python语言凭借其简洁性和强大的库支持,成为处理数据的首选工具之一。数据库作为数据存储的核心,其与Python列表的交互是构建高效数据处理流程的关键。本章我们将从基础开始,深入探讨Python列表与数据库如何协同工作,以及它们交互的基本原理。
## 1.1
【递归与迭代决策指南】:如何在Python中选择正确的循环类型
# 1. 递归与迭代概念解析
## 1.1 基本定义与区别
递归和迭代是算法设计中常见的两种方法,用于解决可以分解为更小、更相似问题的计算任务。**递归**是一种自引用的方法,通过函数调用自身来解决问题,它将问题简化为规模更小的子问题。而**迭代**则是通过重复应用一系列操作来达到解决问题的目的,通常使用循环结构实现。
## 1.2 应用场景
递归算法在需要进行多级逻辑处理时特别有用,例如树的遍历和分治算法。迭代则在数据集合的处理中更为常见,如排序算法和简单的计数任务。理解这两种方法的区别对于选择最合适的算法至关重要,尤其是在关注性能和资源消耗时。
## 1.3 逻辑结构对比
递归
索引与数据结构选择:如何根据需求选择最佳的Python数据结构
# 1. Python数据结构概述
Python是一种广泛使用的高级编程语言,以其简洁的语法和强大的数据处理能力著称。在进行数据处理、算法设计和软件开发之前,了解Python的核心数据结构是非常必要的。本章将对Python中的数据结构进行一个概览式的介绍,包括基本数据类型、集合类型以及一些高级数据结构。读者通过本章的学习,能够掌握Python数据结构的基本概念,并为进一步深入学习奠
资源上传下载、课程学习等过程中有任何疑问或建议,欢迎提出宝贵意见哦~我们会及时处理!
点击此处反馈


专栏目录
文章持续更新中,敬请期待~
最低0.47元/天 解锁专栏
送3个月
百万级
高质量VIP文章无限畅学
千万级
优质资源任意下载
C知道
免费提问 ( 生成式Al产品 )