【从文本到图像】:探索GAN实现文字描述生成图片的技术
发布时间: 2024-09-05 19:24:09 阅读量: 64 订阅数: 36 


# 1. 生成对抗网络(GAN)概述
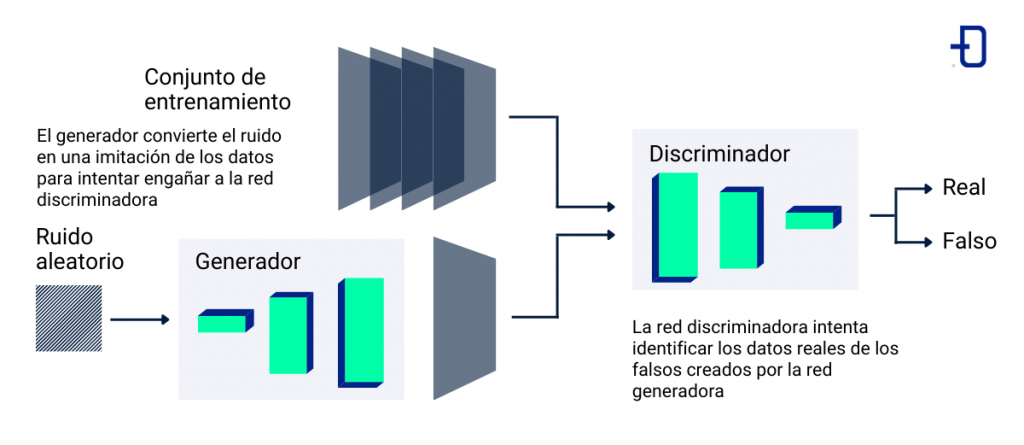
生成对抗网络(GAN)作为深度学习领域的一项重大创新,它的出现重新定义了机器学习模型训练和数据生成的方式。GAN由两部分组成:生成器(Generator)和判别器(Discriminator),这两者以一种独特的方式相互竞争,相互学习,最终达到生成高度逼真数据的目的。在本章节中,我们将简要介绍GAN的基本概念,它的工作原理,以及在现实世界中的应用案例。通过概述,我们将为读者建立一个理解GAN技术的基础框架,并激发深入探索的兴趣。
# 2. GAN的理论基础与关键概念
GAN(生成对抗网络)是一种特殊的深度学习模型,由生成器(Generator)和判别器(Discriminator)两个部分组成。理解GAN的理论基础和关键概念是深入学习和应用GAN的第一步。
### 2.1 GAN的组成与工作原理
#### 2.1.1 生成器(Generator)与判别器(Discriminator)的角色和关系
生成器的任务是生成尽可能真实的数据,而判别器的任务是尽可能地区分生成的数据和真实的数据。这两者在训练过程中不断竞争,推动对方的性能提升。生成器的输出不断变得更真实,而判别器的识别能力也越来越强。这种对抗的过程使得GAN能够在无监督学习环境中生成高质量的数据。
```python
import torch
import torch.nn as nn
# 简单的生成器和判别器结构
class Generator(nn.Module):
def __init__(self):
super(Generator, self).__init__()
# 定义生成器网络结构
self.main = nn.Sequential(
# input is Z, going into a convolution
nn.ConvTranspose2d(in_channels, out_channels, kernel_size=4, stride=2, padding=1, bias=False),
nn.BatchNorm2d(out_channels),
nn.ReLU(True),
# state size. 16 x 16 x 256
nn.ConvTranspose2d(out_channels, out_channels // 2, 4, 2, 1, bias=False),
nn.BatchNorm2d(out_channels // 2),
nn.ReLU(True),
# state size. 32 x 32 x 128
nn.ConvTranspose2d(out_channels // 2, out_channels // 4, 4, 2, 1, bias=False),
nn.BatchNorm2d(out_channels // 4),
nn.ReLU(True),
# state size. 64 x 64 x 64
nn.ConvTranspose2d(out_channels // 4, out_channels // 8, 4, 2, 1, bias=False),
nn.BatchNorm2d(out_channels // 8),
nn.ReLU(True),
# state size. 128 x 128 x 32
nn.ConvTranspose2d(out_channels // 8, out_channels // 16, 4, 2, 1, bias=False),
nn.BatchNorm2d(out_channels // 16),
nn.ReLU(True),
nn.ConvTranspose2d(out_channels // 16, 3, 4, 2, 1, bias=False),
nn.Tanh()
# state size. (nc) x 256 x 256
)
def forward(self, x):
return self.main(x)
class Discriminator(nn.Module):
def __init__(self):
super(Discriminator, self).__init__()
# 定义判别器网络结构
self.main = nn.Sequential(
# input is (nc) x 64 x 64
nn.Conv2d(3, out_channels, 4, 2, 1, bias=False),
nn.LeakyReLU(0.2, inplace=True),
# state size. (out_channels) x 32 x 32
nn.Conv2d(out_channels, out_channels * 2, 4, 2, 1, bias=False),
nn.BatchNorm2d(out_channels * 2),
nn.LeakyReLU(0.2, inplace=True),
# state size. (out_channels*2) x 16 x 16
nn.Conv2d(out_channels * 2, out_channels * 4, 4, 2, 1, bias=False),
nn.BatchNorm2d(out_channels * 4),
nn.LeakyReLU(0.2, inplace=True),
# state size. (out_channels*4) x 8 x 8
nn.Conv2d(out_channels * 4, out_channels * 8, 4, 2, 1, bias=False),
nn.BatchNorm2d(out_channels * 8),
nn.LeakyReLU(0.2, inplace=True),
# state size. (out_channels*8) x 4 x 4
nn.Conv2d(out_channels * 8, 1, 4, 1, 0, bias=False),
nn.Sigmoid()
)
def forward(self, x):
return self.main(x)
```
在这段代码中,生成器使用转置卷积层(`ConvTranspose2d`)来逐步增加输出的维度,从而生成图像。判别器则使用普通的卷积层(`Conv2d`)来减小输入的维度,最终输出一个判断是否为真实
0
0


