
STM32F031+串口中断串口中断+DMA发送发送
一、一、GPIO配置配置
上一篇博文已经介绍了F0和F1系列的不同点,这里不再赘述,先上代码:
这里给出相关文档的下载路径:
链接: STM32F031G4中文编程手册.
/*GPIOA初始化配置 */
void GPIOA_Config()
{
GPIO_InitTypeDef GPIO_InitStructure;
/*初始化GPIOA时钟*/
RCC_AHBPeriphClockCmd(RCC_AHBPeriph_GPIOA, ENABLE);
/*复用 AF1,看手册*/
GPIO_PinAFConfig(GPIOA,GPIO_PinSource8,GPIO_AF_1);
GPIO_PinAFConfig(GPIOA,GPIO_PinSource9,GPIO_AF_1);
GPIO_PinAFConfig(GPIOA,GPIO_PinSource10,GPIO_AF_1);
/* 配置PA9 ,PA10 串口*/
GPIO_InitStructure.GPIO_Pin = GPIO_Pin_9 | GPIO_Pin_10;
GPIO_InitStructure.GPIO_Mode = GPIO_Mode_AF; //设置端口复用
GPIO_InitStructure.GPIO_OType = GPIO_OType_PP;/* 推挽输出或开漏输出 */
GPIO_InitStructure.GPIO_PuPd = GPIO_PuPd_UP; /* 无、上拉或下拉 */
GPIO_InitStructure.GPIO_Speed = GPIO_Speed_Level_3;//50MHZ
GPIO_Init(GPIOA, &GPIO_InitStructure);
/*485使能引脚*/
GPIO_InitStructure.GPIO_Pin = GPIO_Pin_8;
GPIO_InitStructure.GPIO_Mode = GPIO_Mode_OUT;
GPIO_InitStructure.GPIO_OType = GPIO_OType_PP;
GPIO_InitStructure.GPIO_Speed = GPIO_Speed_50MHz;
GPIO_InitStructure.GPIO_PuPd = GPIO_PuPd_NOPULL;
GPIO_Init(GPIOA, &GPIO_InitStructure);
GPIO_ResetBits(GPIOA, GPIO_Pin_8);//初始化GPIOA8为低电平
}
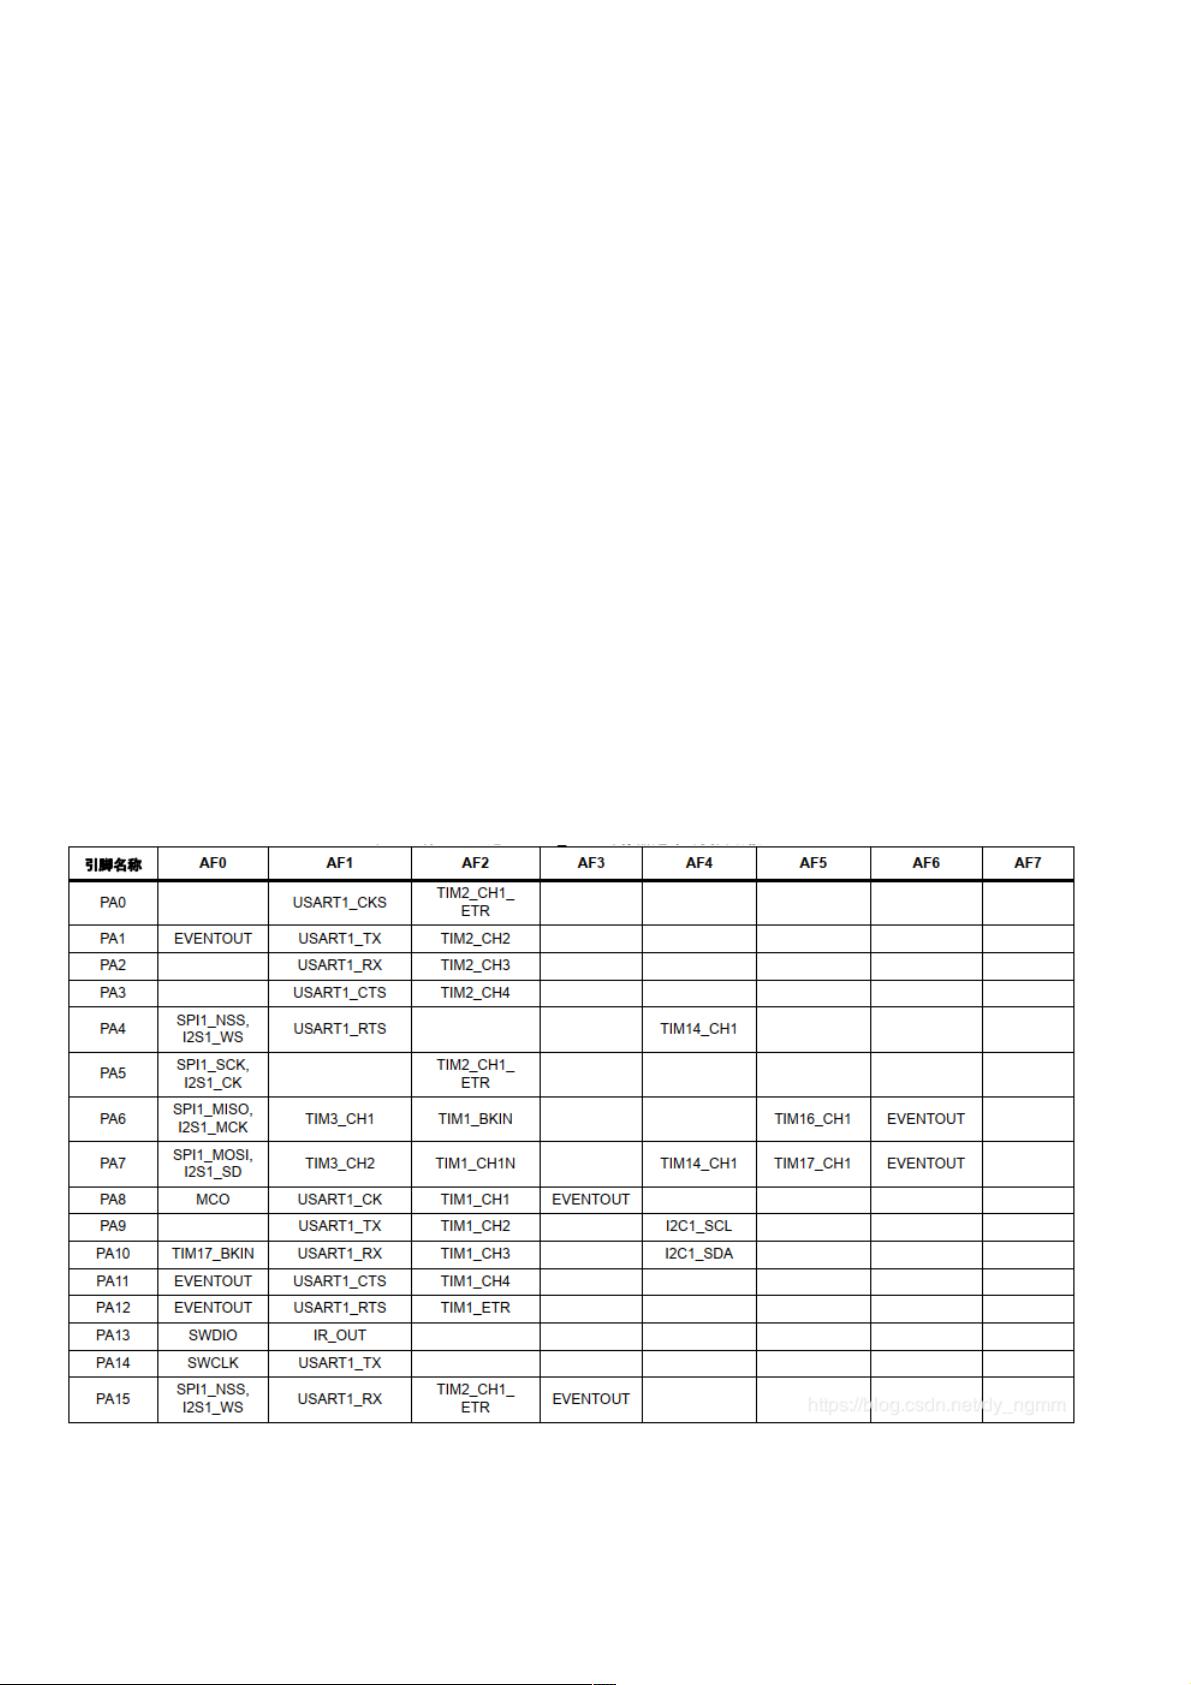
这里在上一篇文章说过,GPIO要配置成复用功能映射表,此处补充一张复用图:
二、二、USART配置配置
/*串口初始化配置 */
void USART_Config(void)
{
USART_InitTypeDef USART_InitStructure;
NVIC_InitTypeDef NVIC_InitStructure;
/*初始化USART1时钟*/
RCC_APB2PeriphClockCmd(RCC_APB2Periph_USART1, ENABLE);
USART_InitStructure.USART_BaudRate = 2500000;//设置串口波特率

weixin_38677648
- 粉丝: 5
- 资源: 886
 我的内容管理
收起
我的内容管理
收起
- 我的资源
快来上传第一个资源
 我的收益 登录查看自己的收益
 我的积分
登录查看自己的积分
我的积分
登录查看自己的积分
 我的C币
登录后查看C币余额
我的C币
登录后查看C币余额
 我的收藏
我的收藏  我的下载
我的下载  下载帮助
下载帮助

会员权益专享


最新资源
- BSC绩效考核指标汇总 (2).docx
- BSC资料.pdf
- BSC绩效考核指标汇总 (3).pdf
- C5000W常见问题解决方案.docx
- BSC概念 (2).pdf
- ESP8266智能家居.docx
- ESP8266智能家居.pdf
- BSC概念 HR猫猫.docx
- C5000W常见问题解决方案.pdf
- BSC模板:关键绩效指标示例(财务、客户、内部运营、学习成长四个方面).docx
- BSC概念.docx
- BSC模板:关键绩效指标示例(财务、客户、内部运营、学习成长四个方面).pdf
- BSC概念.pdf
- 各种智能算法的总结汇总.docx
- BSC概念 HR猫猫.pdf
- bsc概念hr猫猫.pdf
资源上传下载、课程学习等过程中有任何疑问或建议,欢迎提出宝贵意见哦~我们会及时处理!
点击此处反馈


