【Ubuntu系统中OpenCV安装与配置指南】:从零到一打造计算机视觉环境
发布时间: 2024-08-06 05:17:50 阅读量: 72 订阅数: 21 

# 1. Ubuntu系统简介**
Ubuntu是一个基于Debian的Linux发行版,以其易用性、稳定性和广泛的软件支持而闻名。它适用于各种用例,包括桌面计算、服务器部署和云计算。
Ubuntu系统采用GNOME桌面环境,提供直观的用户界面和丰富的功能。它还支持各种第三方应用程序,使其高度可定制。Ubuntu的包管理系统apt-get允许用户轻松安装、更新和删除软件包。
Ubuntu是一个开源操作系统,这意味着它的源代码对公众开放。这使得开发人员能够创建自定义版本,并为系统贡献改进。Ubuntu社区活跃且支持,提供文档、论坛和在线资源,帮助用户解决问题并充分利用系统。
# 2.1 OpenCV概述和应用领域
### 2.1.1 OpenCV的起源和发展
OpenCV(Open Source Computer Vision Library)是一个开源的计算机视觉库,由英特尔公司于1999年创立。它最初是为了满足英特尔研究实验室的内部需求而开发的,但后来被开源并成为计算机视觉领域最流行的库之一。
OpenCV经历了多次重大版本更新,包括:
- OpenCV 1.0(2006年):最初版本,提供图像处理和计算机视觉的基本功能。
- OpenCV 2.0(2009年):增加了对多核处理和GPU加速的支持。
- OpenCV 3.0(2015年):引入了对深度学习的支持,并改进了图像处理和计算机视觉算法。
- OpenCV 4.0(2018年):进一步增强了深度学习功能,并增加了对移动平台的支持。
### 2.1.2 OpenCV的应用场景和优势
OpenCV广泛应用于各种计算机视觉领域,包括:
- **图像处理:**图像读取、显示、转换、增强、分割、目标检测等。
- **计算机视觉:**特征提取、匹配、物体识别、跟踪、机器学习在计算机视觉中的应用等。
- **机器人视觉:**机器人导航、避障、目标识别等。
- **安防监控:**人脸识别、目标跟踪、异常检测等。
- **医疗影像分析:**医学图像分割、疾病诊断、手术规划等。
OpenCV的优势包括:
- **开源和免费:**可供任何人免费使用和修改。
- **跨平台:**支持Windows、Linux、macOS、iOS和Android等多个平台。
- **丰富的算法:**提供数百种图像处理和计算机视觉算法。
- **社区支持:**拥有庞大的用户社区和丰富的文档和教程。
- **持续更新:**定期发布新版本,添加新功能和改进现有功能。
# 3.1 Ubuntu系统环境准备
#### 3.1.1 系统版本和依赖库的安装
在开始安装OpenCV之前,需要确保Ubuntu系统满足以下要求:
- Ubuntu 18.04或更高版本
- 至少4GB内存
- 至少20GB可用磁盘空间
安装必要的依赖库:
```shell
sudo apt update
sudo apt install build-essential cmake pkg-config
```
#### 3.1.2 编译环境的搭建
OpenCV需要一个编译环境才能从源代码进行安装。安装以下编译工具:
```shell
sudo apt install gcc g++ make
```
### 3.2 OpenCV安装方法
#### 3.2.1 源码编译安装
从OpenCV官方网站下载最新版本的OpenCV源代码。解压源代码包并进入源代码目录:
```shell
tar -xzvf opencv-4.6.0.tar.gz
cd opencv-4.6.0
```
配置OpenCV构建选项:
```shell
cmake -D CMAKE_BUILD_TYPE=Release -D CMAKE_INSTALL_PREFIX=/usr/local
```
编译和安装OpenCV:
```shell
make
sudo make install
```
#### 3.2.2 包管理工具安装
也可以使用Ubuntu的包管理工具apt-get安装OpenCV:
```shell
sudo apt install libopencv-dev
```
### 3.3 OpenCV配置与环境变量设置
#### 3.3.1 OpenCV库路径和头文件路径的设置
将OpenCV库路径和头文件路径添加到环境变量中:
```shell
echo 'export LD_LIBRARY_PATH=/usr/local/lib' >> ~/.bashrc
echo 'export C_INCLUDE_PATH=/usr/local/include' >> ~/.bashrc
source ~/.bashrc
```
#### 3.3.2 OpenCV环境变量的配置
设置OPENCV_DIR环境变量,指向OpenCV安装目录:
```shell
echo 'export OPENCV_DIR=/usr/local' >> ~/.bashrc
source ~/.bashrc
```
现在,OpenCV已成功安装并配置在Ubuntu系统中。
# 4. OpenCV实践应用
### 4.1 图像处理实战
#### 4.1.1 图像读取和显示
```python
import cv2
# 读取图像
image = cv2.imread("image.jpg")
# 显示图像
cv2.imshow("Image", image)
cv2.waitKey(0)
cv2.destroyAllWindows()
```
**代码逻辑逐行解读:**
1. `cv2.imread("image.jpg")`:读取指定路径的图像文件,并将其存储在`image`变量中。
2. `cv2.imshow("Image", image)`:创建一个窗口并显示`image`图像,窗口标题为"Image"。
3. `cv2.waitKey(0)`:等待用户按下任意键,然后继续执行程序。
4. `cv2.destroyAllWindows()`:关闭所有打开的窗口。
#### 4.1.2 图像转换和增强
```python
# 图像灰度化
gray_image = cv2.cvtColor(image, cv2.COLOR_BGR2GRAY)
# 图像二值化
binary_image = cv2.threshold(gray_image, 127, 255, cv2.THRESH_BINARY)[1]
# 图像锐化
sharpened_image = cv2.filter2D(image, -1, np.array([[0, -1, 0], [-1, 5, -1], [0, -1, 0]]))
```
**代码逻辑逐行解读:**
1. `cv2.cvtColor(image, cv2.COLOR_BGR2GRAY)`:将彩色图像转换为灰度图像,存储在`gray_image`变量中。
2. `cv2.threshold(gray_image, 127, 255, cv2.THRESH_BINARY)[1]`:对灰度图像进行二值化处理,阈值设为127,高于阈值的像素值设为255(白色),低于阈值的像素值设为0(黑色),结果存储在`binary_image`变量中。
3. `cv2.filter2D(image, -1, np.array([[0, -1, 0], [-1, 5, -1], [0, -1, 0]]))`:使用拉普拉斯算子对图像进行锐化处理,结果存储在`sharpened_image`变量中。
#### 4.1.3 图像分割和目标检测
```python
# 图像分割:使用K-Means聚类
segmented_image = cv2.kmeans(image, 3, None, (cv2.TERM_CRITERIA_EPS + cv2.TERM_CRITERIA_MAX_ITER, 10, 1.0), 10)[1]
# 目标检测:使用Haar级联分类器
face_cascade = cv2.CascadeClassifier("haarcascade_frontalface_default.xml")
faces = face_cascade.detectMultiScale(image, 1.1, 4)
# 绘制边界框
for (x, y, w, h) in faces:
cv2.rectangle(image, (x, y), (x+w, y+h), (0, 255, 0), 2)
```
**代码逻辑逐行解读:**
1. `cv2.kmeans(image, 3, None, (cv2.TERM_CRITERIA_EPS + cv2.TERM_CRITERIA_MAX_ITER, 10, 1.0), 10)[1]`:使用K-Means聚类算法将图像分割为3个簇,结果存储在`segmented_image`变量中。
2. `face_cascade = cv2.CascadeClassifier("haarcascade_frontalface_default.xml")`:加载Haar级联分类器,用于检测人脸。
3. `faces = face_cascade.detectMultiScale(image, 1.1, 4)`:在图像中检测人脸,并返回人脸的边界框坐标,存储在`faces`变量中。
4. `for (x, y, w, h) in faces:`:遍历检测到的人脸,并绘制边界框。
### 4.2 计算机视觉实战
#### 4.2.1 特征提取和匹配
```python
# 特征提取:使用ORB算法
orb = cv2.ORB_create()
keypoints1, descriptors1 = orb.detectAndCompute(image1, None)
keypoints2, descriptors2 = orb.detectAndCompute(image2, None)
# 特征匹配:使用BFMatcher算法
bf = cv2.BFMatcher(cv2.NORM_HAMMING, crossCheck=True)
matches = bf.match(descriptors1, descriptors2)
# 绘制匹配点
match_image = cv2.drawMatches(image1, keypoints1, image2, keypoints2, matches, None)
```
**代码逻辑逐行解读:**
1. `orb = cv2.ORB_create()`:创建ORB特征提取器。
2. `keypoints1, descriptors1 = orb.detectAndCompute(image1, None)`:在`image1`中提取特征点和描述符,存储在`keypoints1`和`descriptors1`变量中。
3. `keypoints2, descriptors2 = orb.detectAndCompute(image2, None)`:在`image2`中提取特征点和描述符,存储在`keypoints2`和`descriptors2`变量中。
4. `bf = cv2.BFMatcher(cv2.NORM_HAMMING, crossCheck=True)`:创建BFMatcher匹配器,使用汉明距离度量和交叉检查。
5. `matches = bf.match(descriptors1, descriptors2)`:匹配`image1`和`image2`中的特征点,返回匹配结果存储在`matches`变量中。
6. `match_image = cv2.drawMatches(image1, keypoints1, image2, keypoints2, matches, None)`:绘制匹配点,并将结果存储在`match_image`变量中。
#### 4.2.2 物体识别和跟踪
```python
# 物体识别:使用SVM算法
svm = cv2.ml.SVM_create()
svm.train(train_data, cv2.ml.ROW_SAMPLE, labels)
# 物体跟踪:使用KCF算法
tracker = cv2.TrackerKCF_create()
tracker.init(image, bounding_box)
# 跟踪物体
while True:
ret, frame = cap.read()
if ret:
success, bounding_box = tracker.update(frame)
if success:
cv2.rectangle(frame, (int(bounding_box[0]), int(bounding_box[1])), (int(bounding_box[0] + bounding_box[2]), int(bounding_box[1] + bounding_box[3])), (0, 255, 0), 2)
cv2.imshow("Frame", frame)
if cv2.waitKey(1) & 0xFF == ord("q"):
break
else:
break
```
**代码逻辑逐行解读:**
1. `svm = cv2.ml.SVM_create()`:创建SVM分类器。
2. `svm.train(train_data, cv2.ml.ROW_SAMPLE, labels)`:使用训练数据训练SVM分类器。
3. `tracker = cv2.TrackerKCF_create()`:创建KCF跟踪器。
4. `tracker.init(image, bounding_box)`:使用图像和边界框初始化跟踪器。
5. `while True:`:进入跟踪循环。
6. `ret, frame = cap.read()`:读取视频帧。
7. `if ret:`:如果帧读取成功,则继续执行。
8. `success, bounding_box = tracker.update(frame)`:更新跟踪器,并获取更新后的边界框。
9. `if success:`:如果跟踪成功,则绘制边界框。
10. `cv2.imshow("Frame", frame)`:显示跟踪结果。
11. `if cv2.waitKey(1) & 0xFF == ord("q"):`:检查用户是否按下`q`键退出。
12. `else:`:如果帧读取失败,则退出循环。
#### 4.2.3 机器学习在计算机视觉中的应用
**图像分类:**
```python
# 加载数据
data = load_data()
# 划分数据集
X_train, X_test, y_train, y_test = train_test_split(data["features"], data["labels"], test_size=0.2)
# 训练模型
model = train_model(X_train, y_train)
# 评估模型
accuracy = evaluate_model(model, X_test, y_test)
```
**目标检测:**
```python
# 加载数据
data = load_data()
# 划分数据集
X_train,
# 5. **5.1 OpenCV与其他语言的集成**
OpenCV不仅可以与C++语言集成,还支持与其他编程语言集成,例如Python和Java。这使得开发者可以根据自己的偏好和项目需求选择合适的语言。
**5.1.1 OpenCV与Python集成**
Python是一种流行的高级编程语言,以其易用性和丰富的库而闻名。通过使用Python绑定,可以将OpenCV函数和对象无缝地集成到Python代码中。
```python
import cv2
# 读取图像
image = cv2.imread('image.jpg')
# 转换图像为灰度图像
gray_image = cv2.cvtColor(image, cv2.COLOR_BGR2GRAY)
# 显示图像
cv2.imshow('Gray Image', gray_image)
cv2.waitKey(0)
cv2.destroyAllWindows()
```
**5.1.2 OpenCV与C++集成**
C++是OpenCV的原生语言,提供了对库的直接访问。通过使用C++头文件和库,开发者可以完全控制OpenCV函数和对象。
```cpp
#include <opencv2/opencv.hpp>
using namespace cv;
int main() {
// 读取图像
Mat image = imread("image.jpg");
// 转换图像为灰度图像
Mat gray_image;
cvtColor(image, gray_image, COLOR_BGR2GRAY);
// 显示图像
imshow("Gray Image", gray_image);
waitKey(0);
destroyAllWindows();
return 0;
}
```
通过与其他语言的集成,OpenCV可以应用于更广泛的领域,满足不同开发者的需求。

 百万级
高质量VIP文章无限畅学
百万级
高质量VIP文章无限畅学
 千万级
优质资源任意下载
千万级
优质资源任意下载
 C知道
免费提问 ( 生成式Al产品 )
C知道
免费提问 ( 生成式Al产品 )
0
0
相关推荐

专栏简介
《Ubuntu系统中OpenCV安装与配置指南》专栏是一份全面的指南,涵盖了在Ubuntu系统中安装和配置OpenCV的各个方面。它从基础知识开始,逐步指导用户完成安装过程。专栏还深入探讨了OpenCV的各种功能,包括图像处理、特征提取、目标检测、视频处理、机器学习、性能优化、图像分割、立体视觉、增强现实、云计算、移动开发、医疗应用、工业应用、自动驾驶和机器人应用。通过遵循本指南,用户可以掌握OpenCV的强大功能,并构建计算机视觉应用程序。
专栏目录
最低0.47元/天 解锁专栏
买1年送3月
百万级
高质量VIP文章无限畅学
千万级
优质资源任意下载
C知道
免费提问 ( 生成式Al产品 )
最新推荐
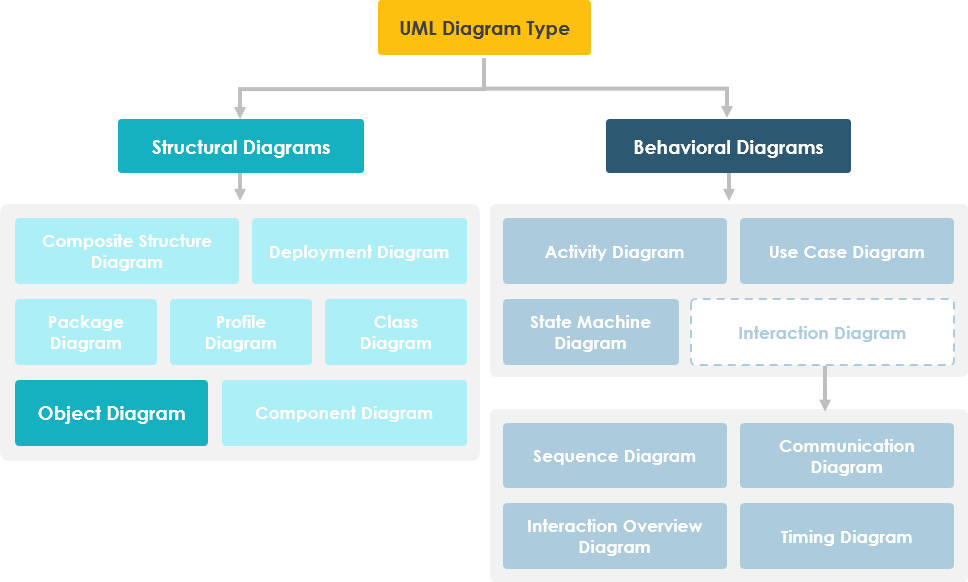
【银行系统建模基础】:UML图解入门与实践,专业破解建模难题
# 摘要
本文系统地介绍了UML在银行系统建模中的应用,从UML基础理论讲起,涵盖了UML图解的基本元素、关系与连接,以及不同UML图的应用场景。接着,本文深入探讨了银行系统用例图、类图的绘制与分析,强调了绘制要点和实践应用。进一步地,文章阐释了交互图与活动图在系统行为和业务流程建模中的设
深度揭秘:VISSIM VAP高级脚本编写与实践秘籍

# 摘要
本文详细探讨了VISSIM VAP脚本的编程基础与高级应用,旨在为读者提供从入门到深入实践的完整指导。首先介绍了VAP脚本语言的基础知识,包括基础语法、变量、数据类型、控制结构、类与对象以及异常处理,为深入编程打下坚实的基础。随后,文章着重阐述了VAP脚本在交通模拟领域的实践应用,包括交通流参数控制、信号动态管理以及自定义交通规则实现等。本文还提供了脚本优化和性能提升的策略,以及高级数据可视化技术和大规模模拟中的应用。最
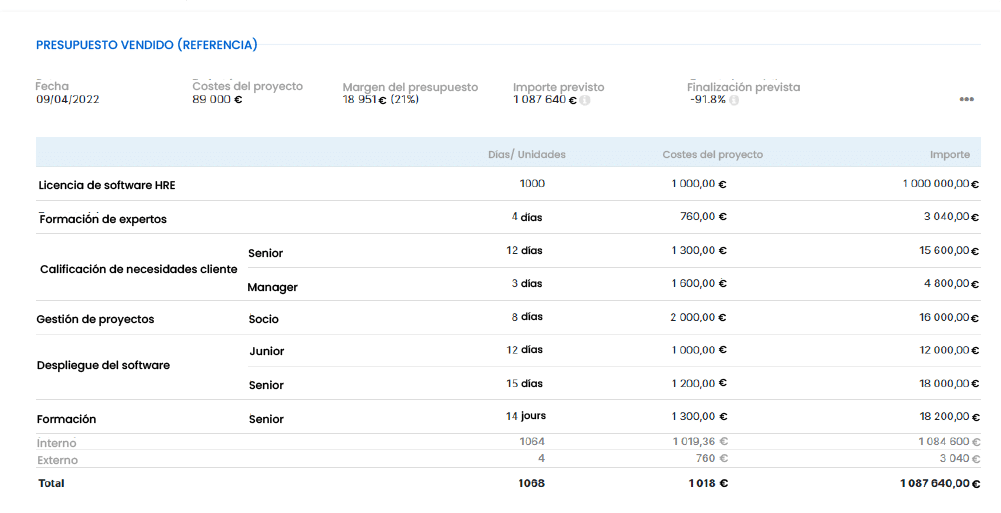
【软件实施秘籍】:揭秘项目管理与风险控制策略
# 摘要
软件实施项目管理是一个复杂的过程,涉及到项目生命周期、利益相关者的分析与管理、风险管理、监控与控制等多个方面。本文首先介绍了项目管理的基础理论,包括项目定义、利益相关者分析、风险管理框架和方法论。随后,文章深入探讨了软件实施过程中的风险控制实践,强调了风险预防、问题管理以及敏捷开发环境下的风险控制策略。在项目监控与控制方面,本文分析了关键指标、沟通管理与团队协作,以及变
RAW到RGB转换技术全面解析:掌握关键性能优化与跨平台应用策略

# 摘要
本文系统地介绍了RAW与RGB图像格式的基础知识,深入探讨了从RAW到RGB的转换理论和实践应用。文章首先阐述了颜色空间与色彩管理的基本概念,接着分析了RAW
【51单片机信号发生器】:0基础快速搭建首个项目(含教程)

# 摘要
本文系统地介绍了51单片机信号发生器的设计、开发和测试过程。首先,概述了信号发生器项目,并详细介绍了51单片机的基础知识及其开发环境的搭建,包括硬件结构、工作原理、开发工具配置以及信号发生器的功能介绍。随后,文章深入探讨了信号发生器的设计理论、编程实践和功能实现,涵盖了波形产生、频率控制、编程基础和硬件接口等方面。在实践搭建与测试部分,详细说明了硬件连接、程序编写与上传、以
深入揭秘FS_Gateway:架构与关键性能指标分析的五大要点

# 摘要
FS_Gateway作为一种高性能的系统架构,广泛应用于金融服务和电商平台,确保了数据传输的高效率与稳定性。本文首先介绍FS_Gateway的简介与基础架构,然后深入探讨其性能指标,包括吞吐量、延迟、系统稳定性和资源使用率等,并分析了性能测试的多种方法。针对性能优化,本文从硬件和软件优化、负载均衡及分布式部署角度提出策略。接着,文章着重阐述了高可用性架构设计的重要性和实施策略,包括容错机制和故障恢复流程。最后,通过金
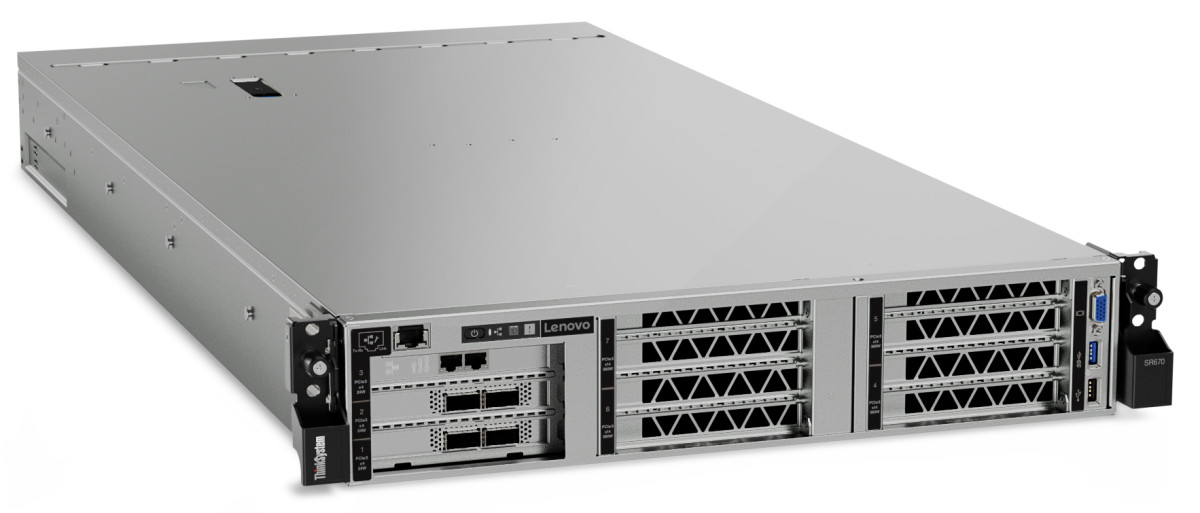
ThinkServer RD650故障排除:快速诊断与解决技巧
# 摘要
本文全面介绍了ThinkServer RD650服务器的硬件和软件故障诊断、解决方法及性能优化与维护策略。首先,文章对RD650的硬件组件进行了概览,随后详细阐述了故障诊断的基础知识,包括硬件状态的监测、系统日志分析、故障排除工具的使用。接着,针对操作系统级别的问题、驱动和固件更新以及网络与存储故障提供了具体的排查和处理方法。文章还探讨了性能优化与
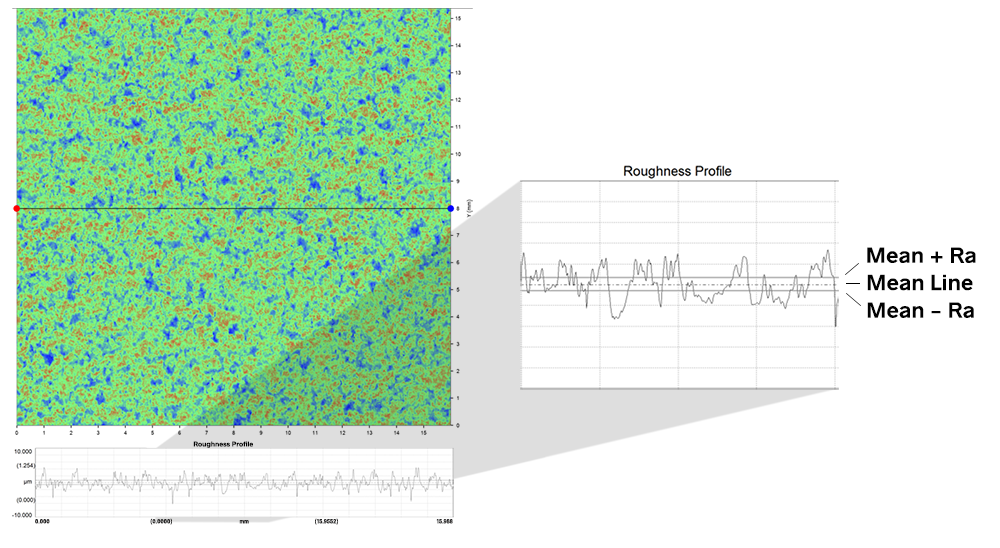
CATIA粗糙度参数实践指南:设计师的优化设计必修课
# 摘要
本文详细探讨了CATIA软件中粗糙度参数的基础知识、精确设定及其在产品设计中的综合应用。首先介绍了粗糙度参数的定义、分类、测量方法以及与材料性能的关系。随后,文章深入解析了如何在CATIA中精确设定粗糙度参数,并阐述了这些参数在不同设计阶段的优化作用。最后,本文探讨了粗糙度参数在机械设计、模具设计以及质量控制中的应用,提出了管理粗糙度参数的高级策略,包括优化技术、自动化和智能
TeeChart跨平台部署:6个步骤确保图表控件无兼容问题
# 摘要
本文介绍TeeChart图表控件的跨平台部署与兼容性分析。首先,概述TeeChart控件的功能、特点及支持的图表类型。接着,深入探讨TeeChart的跨平台能力,包括支持的平台和部署优势。第三章分析兼容性问题及其解决方案,并针对Windows、Linux、macOS和移动平台进行详细分析。第四章详细介绍TeeChart部署的步骤,包括前期准备、实施部署和验证测试。第五
资源上传下载、课程学习等过程中有任何疑问或建议,欢迎提出宝贵意见哦~我们会及时处理!
点击此处反馈


专栏目录
最低0.47元/天 解锁专栏
买1年送3月
百万级
高质量VIP文章无限畅学
千万级
优质资源任意下载
C知道
免费提问 ( 生成式Al产品 )