Selenium与BeautifulSoup的协作:解析网页数据的高效组合,事半功倍
发布时间: 2024-06-25 00:45:44 阅读量: 88 订阅数: 49 

使用Python的Requests和Selenium与BeautifulSoup结合,以爬虫和解析网页内容.txt
1. Selenium与BeautifulSoup简介
Selenium和BeautifulSoup是两个强大的Python库,用于Web自动化和数据解析。
Selenium是一个Web自动化框架,允许用户模拟浏览器行为,如加载网页、查找元素和执行操作。它广泛用于自动化测试、数据抓取和浏览器交互。
BeautifulSoup是一个HTML和XML解析库,用于从Web页面中提取结构化数据。它提供了一组丰富的解析工具,使开发人员能够轻松地从复杂的HTML文档中提取特定信息。
2. Selenium与BeautifulSoup协作基础
2.1 Selenium的基本原理和使用方式
2.1.1 Selenium WebDriver的安装和配置
安装 Selenium WebDriver
使用 pip 安装 Selenium WebDriver:
- pip install selenium
配置 Selenium WebDriver
配置 Selenium WebDriver 以使用特定的浏览器驱动程序,例如 ChromeDriver:
- from selenium import webdriver
- # 创建一个 Chrome 浏览器驱动程序
- driver = webdriver.Chrome()
2.1.2 Selenium的基本操作和定位策略
基本操作
get(url):打开指定的 URLfind_element(by, value):根据指定的定位策略查找元素find_elements(by, value):根据指定的定位策略查找所有匹配的元素click():单击元素send_keys(text):在输入框中输入文本
定位策略
By.ID:根据元素的 IDBy.NAME:根据元素的 name 属性By.CLASS_NAME:根据元素的 class 名称By.XPATH:使用 XPath 表达式By.CSS_SELECTOR:使用 CSS 选择器
2.2 BeautifulSoup的基本原理和使用方式
2.2.1 BeautifulSoup的安装和配置
安装 BeautifulSoup
使用 pip 安装 BeautifulSoup:
- pip install beautifulsoup4
配置 BeautifulSoup
- from bs4 import BeautifulSoup
- # 解析 HTML 文档
- soup = BeautifulSoup(html_doc, 'html.parser')
2.2.2 BeautifulSoup的基本解析方法和选择器
基本解析方法
find(name, attrs):查找第一个匹配指定名称和属性的元素find_all(name, attrs):查找所有匹配指定名称和属性的元素select(selector):使用 CSS 选择器查找元素
选择器
tag:匹配指定的 HTML 标签.class:匹配具有指定 class 名称的元素#id:匹配具有指定 ID 的元素[attr=value]:匹配具有指定属性和值的元素
3. Selenium与BeautifulSoup协作实战
3.1 爬取网页基本信息
3.1.1 使用Selenium获取网页源代码
代码块:
- from selenium import webdriver
- # 创建一个WebDriver对象
- driver = webdriver.Chrome()
- # 打开目标网页
- driver.get("https://www.example.com")
- # 获取网页源代码
- html_source = driver.page_source
- # 关闭WebDriver对象
- driver.close()
逻辑分析:
- 使用
webdriver.Chrome()创建了一个WebDriver对象,该对象用于控制Chrome浏览器。 - 调用
get()方法打开目标网页。 - 调用
page_source属性获取网页源代码,并将其存储在html_source变量中。 - 最后关闭WebDriver对象,释放资源。
3.1.2 使用BeautifulSoup解析网页源代码
代码块:
- from bs4 import BeautifulSoup
- # 创建BeautifulSoup对象
- soup = BeautifulSoup(html_source, "html.parser")
- # 查找标题元素
- title_element = soup.find("title")
- # 获取标题文本
- title_text = title_element.get_text()
- # 打印标题文本
- print(title_text)
逻辑分析:
- 使用
BeautifulSoup()创建了一个BeautifulSoup对象,该对象用于解析HTML文档。 - 调用
find()方法查找标题元素(<title>标签)。 - 调用
get_text()方法获取标题文本。 - 最后打印标题文本。
3.2 爬取网页动态数据
3.2.1 使用Selenium模拟用户操作
代码块:
- from selenium.webdriver.common.by import By
- from selenium.webdriver.support.ui import WebDriverWait
- from selenium.webdriver.support import expected_conditions as EC
- # 等待元素加载
- element = WebDrive

 百万级
高质量VIP文章无限畅学
百万级
高质量VIP文章无限畅学
 千万级
优质资源任意下载
千万级
优质资源任意下载
 C知道
免费提问 ( 生成式Al产品 )
C知道
免费提问 ( 生成式Al产品 )
0
0
相关推荐
百万级
高质量VIP文章无限畅学
千万级
优质资源任意下载
C知道
免费提问 ( 生成式Al产品 )

专栏简介
本专栏深入探讨了 Python 爬虫与 Selenium 的强大组合,揭示了它们在网页数据抓取中的优势。从 Selenium 的实战指南到定位技巧大揭秘,再到优化之道和与其他工具的协作,专栏提供了全面的知识和技能,帮助读者提升爬虫效率。涵盖了各种浏览器自动化技术,包括 Firefox、IE、Safari、Opera 和 Edge,以及与 PhantomJS、BeautifulSoup、Requests 等工具的联动,专栏为读者提供了丰富的实践案例和解决方案,使他们能够轻松构建自动化爬虫系统并从动态网页中获取更多数据。
专栏目录
最低0.47元/天 解锁专栏
买1年送3月
百万级
高质量VIP文章无限畅学
千万级
优质资源任意下载
C知道
免费提问 ( 生成式Al产品 )
最新推荐
戴尔笔记本BIOS语言设置:多语言界面和文档支持全面了解
# 摘要
本文全面介绍了戴尔笔记本BIOS的基本知识、界面使用、多语言界面设置与切换、文档支持以及故障排除。通过对BIOS启动模式和进入方法的探讨,揭示了BIOS界面结构和常用功能,为用户提供了深入理解和操作的指导。文章详细阐述了如何启用并设置多语言界面,以及在实践操作中可能遇到的问题及其解决方法。此外,本文深入分析了BIOS操作文档的语
【T-Box能源管理】:智能化节电解决方案详解

# 摘要
随着能源消耗问题日益严峻,T-Box能源管理系统作为一种智能化的能源管理解决方案应运而生。本文首先概述了T-Box能源管理的基本概念,并分析了智能化节电技术的理论基础,包括发展历程、科学原理和应用分类。接着详细探讨了T-Box系统的架构、核心功能、实施路径以及安全性和兼容性考量。在实践应用章节,本文分析了T-Bo
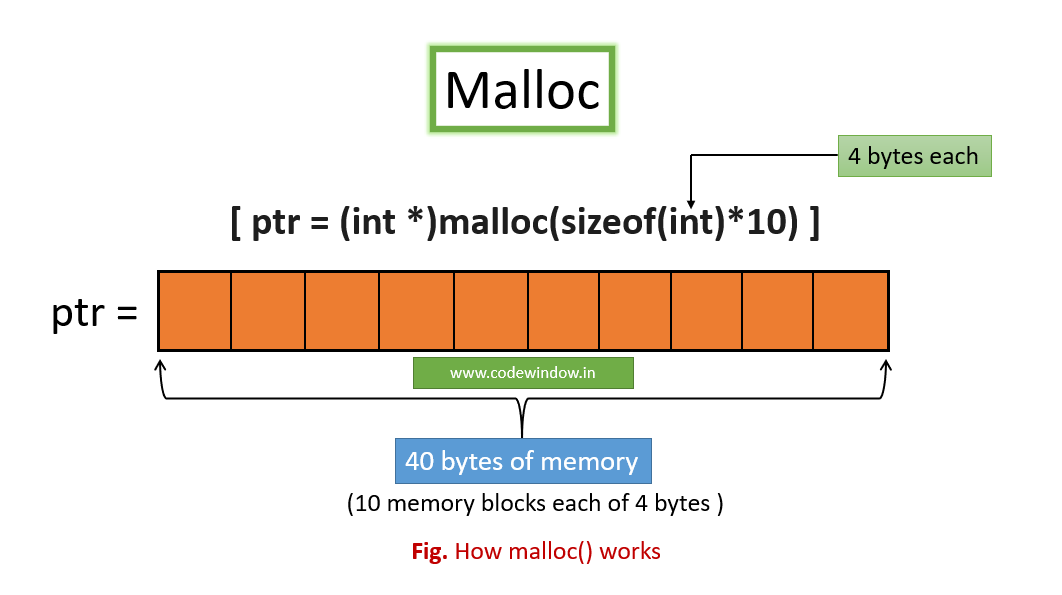
【内存分配调试术】:使用malloc钩子追踪与解决内存问题
# 摘要
本文深入探讨了内存分配的基础知识,特别是malloc函数的使用和相关问题。文章首先分析了内存泄漏的成因及其对程序性能的影响,接着探讨内存碎片的产生及其后果。文章还列举了常见的内存错误类型,并解释了malloc钩子技术的原理和应用,以及如何通过钩子技术实现内存监控、追踪和异常检测。通过实践应用章节,指导读者如何配置和使用malloc钩子来调试内存问题,并优化内存管理策略。最后,通过真实世界案例的分析
【Arcmap空间参考系统】:掌握SHP文件坐标转换与地理纠正的完整策略

# 摘要
本文旨在深入解析Arcmap空间参考系统的基础知识,详细探讨SHP文件的坐标系统理解与坐标转换,以及地理纠正的原理和方法。文章首先介绍了空间参考系统和SHP文件坐标系统的基础知识,然后深入讨论了坐标转换的理论和实践操作。接着,本文分析了地理纠正的基本概念、重要性、影响因素以及在Arcmap中的应用。最后,文章探讨了SHP文
Fluentd与日志驱动开发的协同效应:提升开发效率与系统监控的魔法配方

# 摘要
随着信息技术的发展,日志数据的采集与分析变得日益重要。本文旨在详细介绍Fluentd作为一种强大的日志驱动开发工具,阐述其核心概念、架构及其在日志聚合和系统监控中的应用。文中首先介绍了Fluentd的基本组件、配置语法及其在日志聚合中的实践应用,随后深入探讨了F
【VCS高可用案例篇】:深入剖析VCS高可用案例,提炼核心实施要点

# 摘要
本文深入探讨了VCS高可用性的基础、核心原理、配置与实施、案例分析以及高级话题。首先介绍了高可用性的概念及其对企业的重要性,并详细解析了VCS架构的关键组件和数据同步机制。接下来,文章提供了VC
【精准测试】:确保分层数据流图准确性的完整测试方法
# 摘要
分层数据流图(DFD)作为软件工程中描述系统功能和数据流动的重要工具,其测试方法论的完善是确保系统稳定性的关键。本文系统性地介绍了分层DFD的基础知识、测试策略与实践、自动化与优化方法,以及实际案例分析。文章详细阐述了测试的理论基础,包括定义、目的、分类和方法,并深入探讨了静态与动态测试方法以及测试用
Cygwin系统监控指南:性能监控与资源管理的7大要点

# 摘要
本文详尽探讨了使用Cygwin环境下的系统监控和资源管理。首先介绍了Cygwin的基本概念及其在系统监控中的应用基础,然后重点讨论了性能监控的关键要点,包括系统资源的实时监控、数据分析方法以及长期监控策略。第三章着重于资源管理技巧,如进程优化、系统服务管理以及系统安全和访问控制。接着,本文转向C
ISO_IEC 27000-2018标准实施准备:风险评估与策略规划的综合指南

# 摘要
随着数字化时代的到来,信息安全成为企业管理中不可或缺的一部分。本文全面探讨了信息安全的理论与实践,从ISO/IEC 27000-2018标准的概述入手,详细阐述了信息安全风险评估的基础理论和流程方法,信息安全策略规划的理论基础及生命周期管理,并提供了信息安全风险管理的实战指南。
资源上传下载、课程学习等过程中有任何疑问或建议,欢迎提出宝贵意见哦~我们会及时处理!
点击此处反馈


专栏目录
最低0.47元/天 解锁专栏
买1年送3月
百万级
高质量VIP文章无限畅学
千万级
优质资源任意下载
C知道
免费提问 ( 生成式Al产品 )