【实战案例解析:yolo目标检测新对象在特定领域的应用与性能优化】
发布时间: 2024-08-15 17:18:46 阅读量: 74 订阅数: 21 


YOLOv11实战指南及其应用案例解析

# 1. YOLO目标检测概述**
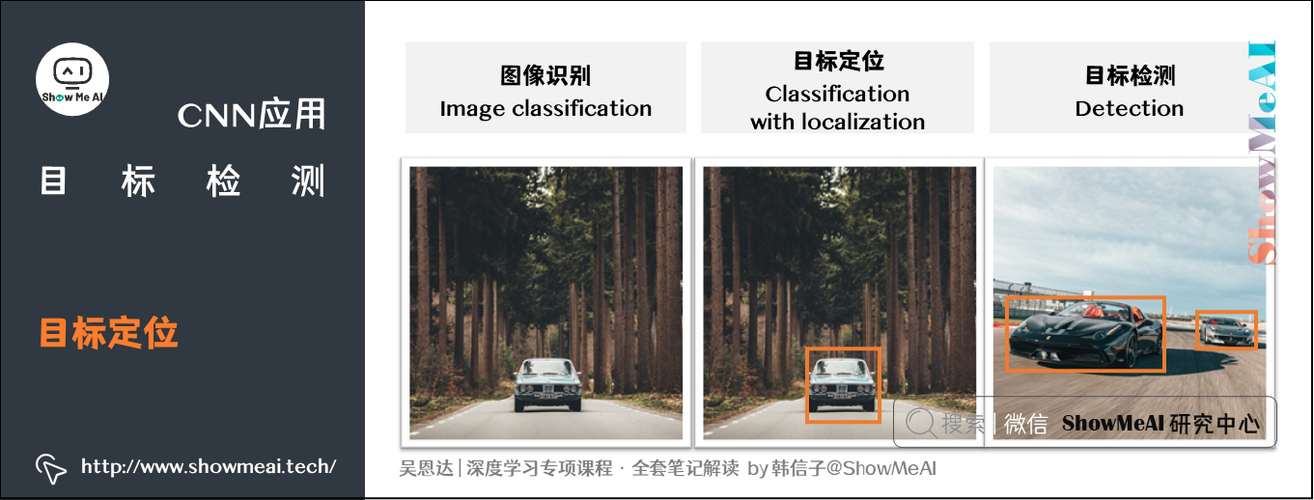
YOLO(You Only Look Once)是一种单阶段目标检测算法,因其实时性和准确性而受到广泛关注。与传统的双阶段算法不同,YOLO直接将输入图像映射到边界框和类概率,一次性完成目标检测任务。
YOLO算法的优势在于其速度快,能够实时处理视频流。同时,YOLO算法的精度也相当高,在COCO数据集上,YOLOv5模型的mAP(平均精度)可以达到56%以上。
# 2. YOLO目标检测在特定领域的应用
YOLO目标检测算法因其速度快、准确性高的特点,在特定领域得到了广泛的应用。本章节将重点介绍YOLO在医疗影像和安防监控领域的应用。
### 2.1 YOLO在医疗影像中的应用
YOLO在医疗影像领域具有广阔的应用前景,主要体现在以下两个方面:
#### 2.1.1 医疗图像分割
医疗图像分割是将医学图像中的不同组织或结构分离开来的过程。YOLO算法可以有效地用于医疗图像分割任务。
```python
import cv2
import numpy as np
# 加载医疗图像
image = cv2.imread("medical_image.jpg")
# 创建YOLO模型
model = cv2.dnn.readNetFromDarknet("yolov3.cfg", "yolov3.weights")
# 设置输入图像尺寸
model.setInput(cv2.dnn.blobFromImage(image, 1 / 255.0, (416, 416), (0, 0, 0), swapRB=True, crop=False))
# 执行前向传播
detections = model.forward()
# 解析检测结果
for detection in detections[0, 0]:
confidence = detection[2]
if confidence > 0.5:
x, y, w, h = detection[3:7] * np.array([image.shape[1], image.shape[0], image.shape[1], image.shape[0]])
cv2.rectangle(image, (x, y), (x + w, y + h), (0, 255, 0), 2)
```
**逻辑分析:**
* `cv2.dnn.readNetFromDarknet`函数加载预训练的YOLO模型。
* `cv2.dnn.blobFromImage`函数将图像预处理为模型输入。
* `model.forward`函数执行前向传播,生成检测结果。
* 遍历检测结果,过滤置信度大于0.5的检测框,并绘制在图像上。
#### 2.1.2 疾病诊断
YOLO算法还可以用于疾病诊断,通过分析医疗图像中的特征来识别疾病。
```python
import cv2
import numpy as np
# 加载医疗图像
image = cv2.imread("medical_image.jpg")
# 创建YOLO模型
model = cv2.dnn.readNetFromDarknet("yolov3.cfg", "yolov3.weights")
# 设置输入图像尺寸
model.setInput(cv2.dnn.blobFromImage(image, 1 / 255.0, (416, 416), (0, 0, 0), swapRB=True, crop=False))
# 执行前向传播
detections = model.forward()
# 解析检测结果
for detection in detections[0, 0]:
confidence = detection[2]
if confidence > 0.5:
class_id = int(detection[1])
label = classes[class_id]
x, y, w, h = detection[3:7] * np.array([image.shape[1], image.shape[0], image.shape[1], image.shape[0]])
cv2.rectangle(image, (x, y), (x + w, y + h), (0, 255, 0), 2)
cv2.putText(image, label, (x, y - 10), cv2.FONT_HERSHEY_SIMPLEX, 0.5, (0, 255, 0), 2)
```
**逻辑分析:**
* 除了检测框外,该代码还将预测的类别标签绘制在图像上。
* `classes`是一个列表,其中包含所有可能的疾病类别。
### 2.2 YOLO在安防监控中的应用
YOLO算法在安防监控领域也发挥着重要作用,主要体现在以下两个方面:
#### 2.2.1 人脸识别
YOLO算法可以用于人脸识别,通过分析人脸图像中的特征来识别身份。
```python
import cv2
import numpy as np
# 加载人脸图像
image = cv2.imread("face_image.jpg")
# 创建YOLO模型
model = cv2.dnn.readNetFromDarknet("yolov3-face.cfg", "yolov3-face.weights")
# 设置输入图像尺寸
model.setInput(cv2.dnn.blobFromImage(image, 1 / 255.0, (416, 416), (0, 0, 0), swapRB=True, crop=False))
# 执行前向传播
detections = model.forward()
# 解析检测结果
for detection in detections[0, 0]:
confidence = detection[2]
if confidence > 0.5:
x, y, w, h = detection[3:7] * np.array([image.shape[1], image.shape[0], image.shape[1], image.shape[0]])
cv2.rectangle(image, (x, y), (x + w, y + h), (0, 255, 0), 2)
```
**逻辑分析:**
* 该代码使用经过专门训练的人脸识别YOLO模型。
* 检测框绘制在人脸图像上。
#### 2.2.2 行为分析
YOLO算法还可以用于行为分析,通过分析监控视频中的动作来识别异常行为。
```python
import cv2
import numpy as np
# 加载监控视频
video = cv2.VideoCapture("surveillance_video.mp4")
# 创建YOLO模型
model = cv2.dnn.readNetFromDarknet("yolov3-actions.cfg", "yolov3-actions.weights")
while True:
# 读取视频帧
ret, frame = video.read()
if not ret:
break
# 设置输入图像尺寸
model.setInput(cv2.dnn.blobFromImage(frame, 1 / 255.0, (416, 416), (0, 0, 0), swapRB=True, crop=False))
# 执行前向传播
detections = model.forward()
# 解析检测结果
for detection in detections[0, 0]:
confidence = detection[2]
if confidence > 0.5:
class_id = int(detection[1])
label = classes[class_id]
```
0
0


