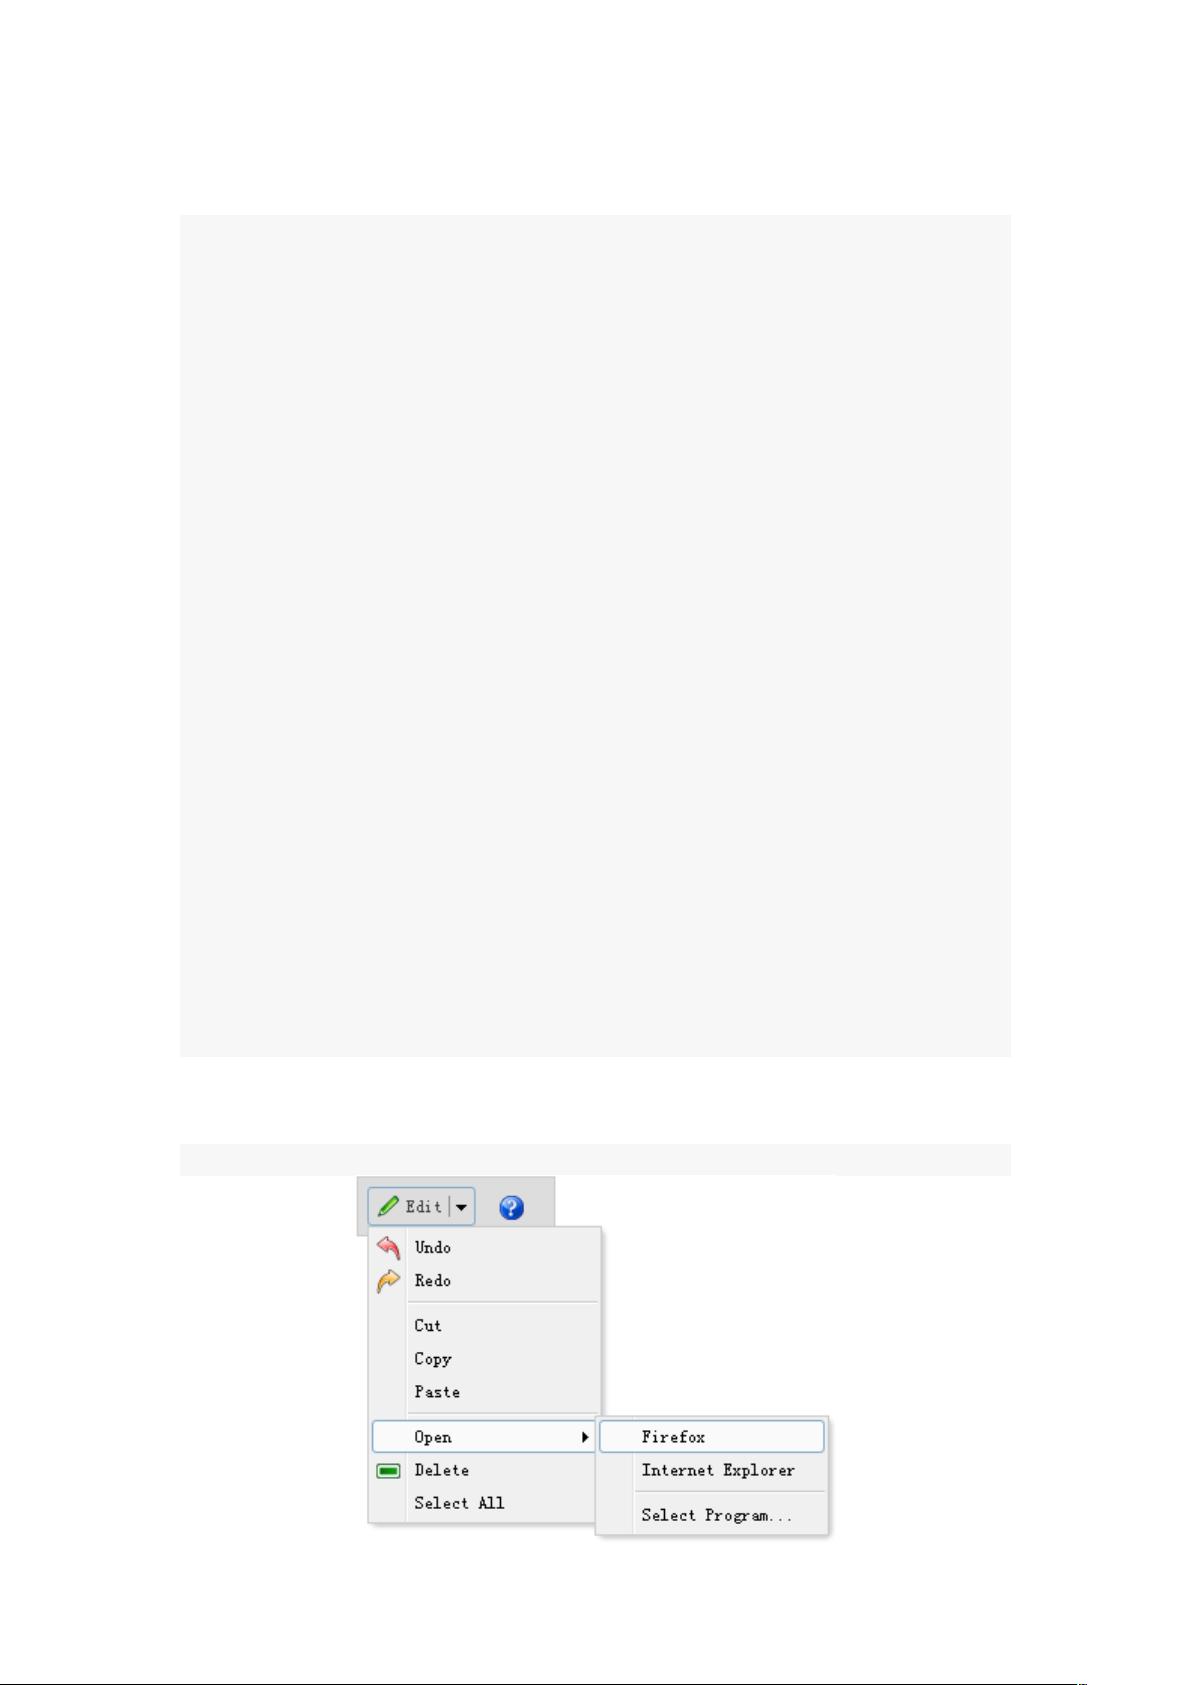
没有合适的资源?快使用搜索试试~ 我知道了~
首页jQuery_EasyUI中文教程
jQuery_EasyUI中文教程

jQuery框架提供了很多方法,但大致上可以分为3大类:获取jQuery对象的方法、在jQuery对象间跳转的方法,以及获取jQuery对象后调用的方法.本文基于jQuery1.7.1版本,...
资源详情
资源评论
资源推荐

jquery easyui 中文教程
概述
这个教程的目的是说明如何使用 easyui 框架容易的创建网页。首先,你需要包含一些 js 和 css 文
件:
<link rel="stylesheet" type="text/css"
href="../themes/default/easyui.css">
<script type="text/javascript" src="../jquery-
1.4.2.min.js"></script>
<script type="text/javascript"
src="../jquery.easyui.min.js"></script>
easyui 预定义了一些图标 css,这些 css 类可以显示图片背景(16×16)。使用这些类之前,需要
包含:
<link rel="stylesheet" type="text/css"
href="../themes/icon.css">
内容
1. 拖放
o 基本拖放
o 创建购物车式拖放
o 创建课程表
基本拖放
这个教程显示如何
使 HTML 元素变得
可拖放。这个例子
会创建 3 个 DIV 元
素然后让它们变得
可拖放。
首先,创建三个 DIV 元素:
<div id="dd1" class="dd-demo"></div>
<div id="dd2" class="dd-demo"></div>
<div id="dd3" class="dd-demo"></div>

让第一个 DIV 元素可拖放,使用默认的拖放样式。
$('#dd1').draggable();
让第二个 DIV 元素使用 proxy 来拖放,proxy:'clone'表示 proxy 使用原始元素的复制。
$('#dd2').draggable({
proxy:'clone'
});
让第三个 DIV 元素使用自定义 proxy 来拖放
$('#dd3').draggable({
proxy:function(source){
var p = $('<div class="proxy">proxy</div>');
p.appendTo('body');
return p;
}
});
构建购物车型拖放
使用 jQuery easyui,我们在 web 应用中就有了拖放的能力。这个教程显示了如何构建购物车页,
它使用户拖放他们希望购买的产品,更新购物篮的物品和价格。
显示
产品
页:
<ul
class="products">
<li>
<a href="#" class="item">
<img src="shirt1.gif"/>
<div>
<p>Balloon</p>
<p>Price:$25</p>

</div>
</a>
</li>
<li>
<a href="#" class="item">
<img src="shirt2.gif"/>
<div>
<p>Feeling</p>
<p>Price:$25</p>
</div>
</a>
</li>
<!-- other products -->
</ul>
ul 元素包含一些 li 元素以显示产品。每一个产品的名称和单价属性在 P 元素中。
创建购物车:
<div class="cart">
<h1>Shopping Cart</h1>
<table id="cartcontent"
style="width:300px;height:auto;">
<thead>
<tr>
<th field="name" width=140>Name</th>
<th field="quantity" width=60
align="right">Quantity</th>
<th field="price" width=60
align="right">Price</th>
</tr>
</thead>
</table>
<p class="total">Total: $0</p>
<h2>Drop here to add to cart</h2>
</div>
使用 datagrid 显示购物篮项目。
拖曳产品副本
$('.item').draggable({

revert:true,
proxy:'clone',
onStartDrag:function(){
$(this).draggable('options').cursor = 'not-
allowed';
$(this).draggable('proxy').css('z-index',10);
},
onStopDrag:function(){
$(this).draggable('options').cursor='move';
}
});
我们设置 draggable 属性 proxy 为 clone,所以拖曳元素使用 clone 效果。
将选择的产品放入购物车
$('.cart').droppable({
onDragEnter:function(e,source){
$(source).draggable('options').cursor='auto';
},
onDragLeave:function(e,source){
$(source).draggable('options').cursor='not-
allowed';
},
onDrop:function(e,source){
var name = $(source).find('p:eq(0)').html();
var price = $(source).find('p:eq(1)').html();
addProduct(name, parseFloat(price.split('$')
[1]));
}
});
var data = {"total":0,"rows":[]};
var totalCost = 0;
function addProduct(name,price){
function add(){
for(var i=0; i<data.total; i++){
var row = data.rows[i];
if (row.name == name){
row.quantity += 1;
return;
}
}
data.total += 1;

data.rows.push({
name:name,
quantity:1,
price:price
});
}
add();
totalCost += price;
$('#cartcontent').datagrid('loadData', data);
$('div.cart .total').html('Total: $'+totalCost);
}
当放下产品时,我们得到产品的名称和单价,然后调用 addProduct 函数更新购物篮。
创建课程表
本教程显示了如何使用 jQuery easyui 创建课程表。我们创建两个表:在左面的课程列表和右面的
时间表。你可以拖课程到时间表的单元格中。课程是<div class='item'>元素,时间格是<td
class='drop'>元素。
显示课程
<div class="left">
<table>
<tr>
<td><div class="item">English</div></td>
剩余63页未读,继续阅读


小池编程的博客
- 粉丝: 60
- 资源: 69
上传资源 快速赚钱
我的内容管理 收起
我的资源 快来上传第一个资源
我的收益
登录查看自己的收益我的积分 登录查看自己的积分
我的C币 登录后查看C币余额
我的收藏
我的下载
下载帮助

会员权益专享
最新资源
- ARM Cortex-A(armV7)编程手册V4.0.pdf
- ABB机器人保养总结解析.ppt
- 【超详细图解】菜鸡如何理解双向链表的python代码实现
- 常用网络命令的使用 ipconfig ping ARP FTP Netstat Route Tftp Tracert Telnet nslookup
- 基于单片机控制的DC-DC变换电路
- RS-232接口电路的ESD保护.pdf
- linux下用time(NULL)函数和localtime()获取当前时间的方法
- Openstack用户使用手册.docx
- KUKA KR 30 hA,KR 60 hA机器人产品手册.pdf
- Java programming with JNI
资源上传下载、课程学习等过程中有任何疑问或建议,欢迎提出宝贵意见哦~我们会及时处理!
点击此处反馈


安全验证
文档复制为VIP权益,开通VIP直接复制

评论4