OpenCV and Python Version Compatibility Table: Version Selection and Compatibility Matrix
发布时间: 2024-09-14 16:44:09 阅读量: 85 订阅数: 42 

opencv+python 程序员的浪漫:蒙太奇照片制作.zip
# OpenCV and Python Version Compatibility Matrix: Version Selection and Compatibility Guide
## 1. Overview of OpenCV and Python Versions
OpenCV (Open Source Computer Vision Library) is an open-source library that has widely been used in the fields of image processing, computer vision, and machine learning. The combination of OpenCV and Python provides powerful tools that allow developers to easily leverage computer vision technologies.
OpenCV has several major releases, each supporting different versions of Python. Selecting the appropriate versions of OpenCV and Python is crucial for ensuring compatibility and optimal performance. In this chapter, we will outline the relationship between OpenCV and Python versions and provide guidance to help you choose the right versions based on your project needs.
## 2. OpenCV and Python Version Compatibility
### 2.1 Corresponding Relationships between OpenCV Major Versions and Python Versions
The compatibility relationships between OpenCV's major versions and Python versions are as follows:
| OpenCV Major Version | Python Versions |
|---|---|
| 2.4 | 2.7, 3.4, 3.5 |
| 3.0 | 2.7, 3.4, 3.5, 3.6 |
| 3.1 | 2.7, 3.4, 3.5, 3.6, 3.7 |
| 3.2 | 2.7, 3.4, 3.5, 3.6, 3.7, 3.8 |
| 3.3 | 2.7, 3.4, 3.5, 3.6, 3.7, 3.8, 3.9 |
| 3.4 | 3.5, 3.6, 3.7, 3.8, 3.9, 3.10 |
| 4.0 | 3.6, 3.7, 3.8, 3.9, 3.10 |
| 4.1 | 3.6, 3.7, 3.8, 3.9, 3.10 |
| 4.2 | 3.6, 3.7, 3.8, 3.9, 3.10 |
| 4.3 | 3.6, 3.7, 3.8, 3.9, 3.10 |
| 4.4 | 3.6, 3.7, 3.8, 3.9, 3.10 |
| 4.5 | 3.6, 3.7, 3.8, 3.9, 3.10 |
### 2.2 Compatibility between OpenCV Minor Versions and Python Versions
The compatibility relationships between OpenCV's minor versions and Python versions are as follows:
| OpenCV Minor Version | Python Versions |
|---|---|
| 2.4.0 | 2.7, 3.4, 3.5 |
| 2.4.1 | 2.7, 3.4, 3.5 |
| 2.4.2 | 2.7, 3.4, 3.5 |
| ... | ... |
| 2.4.20 | 2.7, 3.4, 3.5 |
**Code Block:**
```python
import cv2
# Check OpenCV version
print(cv2.__version__)
# Check Python version
import sys
print(sys.version)
```
**Code Logic Analysis:**
1. Import the OpenCV library.
2. Use `cv2.__version__` to print the OpenCV version.
3. Import the `sys` module.
4. Use `sys.version` to print the Python version.
**Parameter Explanation:**
* `cv2.__version__`: OpenCV version number.
* `sys.version`: Python version number.
## 3.1 Suggestions for Version Selection in Different Project Scenarios
When choosing OpenCV and Python versions, different project scenarios must be considered to select the most appropriate combination. Here are some common project scenarios and their corresponding version selection suggestions:
- **Beginner's Guide:** For beginners, it is recommended to use OpenCV 4.5.5 with Python 3.8 or 3.9. These versions are relatively stable and user-friendly, making them perfect for learning the basics of OpenCV.
- **Image Processing:** For image processing projects, it is recommended to use OpenCV 4.6 or higher with Python 3.9 or 3.10. These versions offer advanced image processing features, such as image segmentation and object detection.
- **Computer Vision:** For computer vision projects, it is recommended to use OpenCV 4.7 or higher with Python 3.10 or 3.11. These versions provide more powerful computer vision algorithms, such as face recognition and object tracking.
- **Machine Learning:** For machine learning projects, it is recommended to use OpenCV 4.8 or higher with Python 3.11 or 3.12. These versions offer integration with machine learning frameworks (such as TensorFlow and PyTorch), making it easier to develop machine learning applications.
- **Mobile Applications:** For mobile applications, it is recommended to use OpenCV 4.6 or higher with Python 3.9 or 3.10. These versions offer optimized lightweight implementations for mobile devices.
### 3.2 Considerations for Version Upgrades and Compatibility
When upgrading OpenCV or Python versions, the following compatibility considerations should be taken into account:
- **OpenCV Major Version Upgrades:** Major version upgrades in OpenCV often bring significant changes that may cause incompatibility with existing code. Before upgrading, carefully check the upgrade guides and test code compatibility.
- **OpenCV Minor Version Upgrades:** Minor version upgrades in OpenCV typically include new features and bug fixes but usually do not break compatibility. However, it is still recommended to test code before upgrading.
- **Python Version Upgrades:** Python version upgrades generally do not affect OpenCV compatibility. Nevertheless, for code relying on specific Python features, ensure these features are available in the new Python version.
To ensure compatibility, it is advised to create a backup of your code and perform thorough testing before upgrading OpenCV or Python versions.
## 4. OpenCV and Python Version Practice
### 4.1 Installation and Configuration of OpenCV and Python Versions
#### 4.1.1 OpenCV Installation
**Windows System**
```python
pip install opencv-python
```
**Linux System**
```bash
sudo apt-get install python3-opencv
```
**macOS System**
```bash
brew install opencv
```
#### 4.1.2 Python Version Configuration
Confirm whether the Python version is compatible with the OpenCV version by running the following command:
```bash
python --version
```
If the Python version is incompatible, install a Python version that matches the OpenCV version.
### 4.2 Basic Operations Examples with OpenCV and Python Versions
#### 4.2.1 Image Reading and Displaying
```python
import cv2
# Read image
img = cv2.imread('image.jpg')
# Display image
cv2.imshow('Image', img)
cv2.waitKey(0)
cv2.destroyAllWindows()
```
**Code Logic Analysis:**
* The `cv2.imread()` function reads the image and returns a NumPy array.
* The `cv2.imshow()` function displays the image.
* The `cv2.waitKey(0)` function waits for the user to press any key to close the image window.
* The `cv2.destroyAllWindows()` function destroys all the opened image windows.
#### 4.2.2 Image Grayscale Conversion
```python
import cv2
# Read image
img = cv2.imread('image.jpg')
# Convert to grayscale image
gray_img = cv2.cvtColor(img, cv2.COLOR_BGR2GRAY)
# Display grayscale image
cv2.imshow('Gray Image', gray_img)
cv2.waitKey(0)
cv2.destroyAllWindows()
```
**Code Logic Analysis:**
* The `cv2.cvtColor()` function converts the image from the BGR color space to the grayscale color space.
* The `cv2.COLOR_BGR2GRAY` parameter specifies the conversion to the grayscale color space.
#### 4.2.3 Image Edge Detection
```python
import cv2
# Read image
img = cv2.imread('image.jpg')
# Edge detection
edges = cv2.Canny(img, 100, 200)
# Display edge detection results
cv2.imshow('Edges', edges)
cv2.waitKey(0)
cv2.destroyAllWindows()
```
**Code Logic Analysis:**
* The `cv2.Canny()` function uses the Canny edge detection algorithm to detect edges in the image.
* The `100` and `200` parameters specify the low and high thresholds, respectively, used to determine edge strength.
## 5. Advanced Applications with OpenCV and Python Versions
### 5.1 Image Processing Applications with OpenCV and Python Versions
Image processing is a fundamental task in computer vision. OpenCV provides a range of powerful image processing functionalities, and their combination with Python makes image processing tasks more efficient and convenient.
#### 5.1.1 Image Reading and Displaying
```python
import cv2
# Read image
image = cv2.imread('image.jpg')
# Display image
cv2.imshow('Image', image)
cv2.waitKey(0)
cv2.destroyAllWindows()
```
#### Parameter Explanation:
* `cv2.imread()`: Reads the image and stores it in a NumPy array.
* `cv2.imshow()`: Displays the image window.
* `cv2.waitKey()`: Waits for user input to close the window.
* `cv2.destroyAllWindows()`: Destroys all image windows.
#### Logic Analysis:
1. Use `cv2.imread()` to read the image file.
2. Use `cv2.imshow()` to display the image window.
3. Use `cv2.waitKey()` to wait for user input and close the window.
4. Use `cv2.destroyAllWindows()` to destroy the image window.
### 5.1.2 Image Transformation
OpenCV offers various image transformation features, such as grayscale conversion, color space conversion, and resizing.
```python
# Grayscale conversion
gray_image = cv2.cvtColor(image, cv2.COLOR_BGR2GRAY)
# Color space conversion
hsv_image = cv2.cvtColor(image, cv2.COLOR_BGR2HSV)
# Resizing
resized_image = cv2.resize(image, (500, 500))
```
#### Parameter Explanation:
* `cv2.cvtColor()`: Converts the image's color space.
* `cv2.resize()`: Adjusts the image size.
#### Logic Analysis:
1. Use `cv2.cvtColor()` to convert the image to grayscale.
2. Use `cv2.cvtColor()` to convert the image to the HSV color space.
3. Use `cv2.resize()` to adjust the image size to 500x500 pixels.
### 5.1.3 Image Enhancement
Image enhancement techniques can improve the visual effect of images. OpenCV provides enhancement features such as histogram equalization, sharpening, and blurring.
```python
# Histogram equalization
equalized_image = cv2.equalizeHist(gray_image)
# Sharpening
sharpened_image = cv2.GaussianBlur(image, (0, 0), 3)
# Blurring
blurred_image = cv2.blur(image, (5, 5))
```
#### Parameter Explanation:
* `cv2.equalizeHist()`: Performs histogram equalization.
* `cv2.GaussianBlur()`: Performs Gaussian blur.
* `cv2.blur()`: Performs average blur.
#### Logic Analysis:
1. Use `cv2.equalizeHist()` to perform histogram equalization on the grayscale image.
2. Use `cv2.GaussianBlur()` to apply Gaussian blur to the image, where `(0, 0)` indicates using the image's own standard deviation and `3` indicates the kernel size.
3. Use `cv2.blur()` to apply average blur to the image, where `5` indicates the kernel size.
### 5.2 Computer Vision Applications with OpenCV and Python Versions
Computer vision is the core domain of OpenCV, offering advanced features such as object detection, image segmentation, and feature extraction.
#### 5.2.1 Object Detection
```python
import cv2
# Load a pretrained object detection model
model = cv2.dnn.readNetFromCaffe('deploy.prototxt.txt', 'model.caffemodel')
# Read the image
image = cv2.imread('image.jpg')
# Prepare the image
blob = cv2.dnn.blobFromImage(image, 0.007843, (300, 300), 127.5)
# Set the input
model.setInput(blob)
# Detect objects
detections = model.forward()
# Iterate over the detection results
for i in range(detections.shape[2]):
# Get the confidence score
confidence = detections[0, 0, i, 2]
# Filter out low confidence detections
if confidence > 0.5:
# Get the bounding box coordinates
x1, y1, x2, y2 = (detections[0, 0, i, 3:7] * [image.shape[1], image.shape[0], image.shape[1], image.shape[0]]).astype(int)
# Draw the bounding box
cv2.rectangle(image, (x1, y1), (x2, y2), (0, 255, 0), 2)
```
#### Parameter Explanation:
* `cv2.dnn.readNetFromCaffe()`: Loads a pretrained object detection model.
* `cv2.dnn.blobFromImage()`: Creates an input blob from the image.
* `model.setInput()`: Sets the model's input.
* `model.forward()`: Performs forward propagation of the model.
#### Logic Analysis:
1. Load a pretrained object detection model.
2. Read the image and convert it to a blob.
3. Set the model's input.
4. Perform forward propagation of the model to get detection results.
5. Iterate over the detection results, filter out low confidence detections, and draw bounding boxes.
#### 5.2.2 Image Segmentation
```python
import cv2
# Load a pretrained image segmentation model
model = cv2.createSegmentationModelWithFCN('fcn8s-heavy-pascal.caffemodel', 'fcn8s-heavy-pascal.prototxt.txt')
# Read the image
image = cv2.imread('image.jpg')
# Prepare the image
blob = cv2.dnn.blobFromImage(image, 1.0, (512, 512), (104.***, 116.***, 122.***))
# Set the input
model.setInput(blob)
# Segment the image
segmented_image = model.forward()
# Get the segmentation result
segmented_image = segmented_image.argmax(axis=1)
```
#### Parameter Explanation:
* `cv2.createSegmentationModelWithFCN()`: Loads a pretrained image segmentation model.
* `cv2.dnn.blobFromImage()`: Creates an input blob from the image.
* `model.setInput()`: Sets the model's input.
* `model.forward()`: Performs forward propagation of the model.
#### Logic Analysis:
1. Load a pretrained image segmentation model.
2. Read the image and convert it to a blob.
3. Set the model's input.
4. Perform forward propagation of the model to get segmentation results.
5. Get the segmentation result, which is the index of the class that each pixel belongs to.
## 6. Future Development Trends for OpenCV and Python Versions
### 6.1 Latest Developments in OpenCV and Python Versions
- **OpenCV 5.0 Release:** In March 2023, OpenCV 5.0 was officially released, bringing many new features and improvements, including:
- Performance Optimization: Significant speed improvements in image processing and computer vision algorithms.
- Deep Learning Integration: Enhanced support for deep learning frameworks (such as TensorFlow and PyTorch).
- Mobile Device Support: Optimized for mobile devices, allowing OpenCV to run more efficiently on smartphones and tablets.
- **Support for Python 3.11:** OpenCV 5.0 and higher versions fully support Python 3.11, offering developers a more modern and feature-rich programming environment.
- **Community Contributions:** The OpenCV community is active and continuously growing, contributing new features, fixes, and improvements, ensuring the library's ongoing updates and enhancements.
### 6.2 Future Outlook for OpenCV and Python Versions
- **Integration with AI and Machine Learning:** OpenCV and Python versions will continue to integrate closely with AI and machine learning technologies, providing more powerful features for computer vision and image processing applications.
- **Cloud and Edge Computing:** OpenCV and Python versions will optimize for cloud and edge computing environments, enabling image processing and computer vision algorithms to run efficiently in distributed systems.
- **Mobile Devices and Embedded Systems:** OpenCV and Python versions will further enhance support for mobile devices and embedded systems, allowing computer vision and image processing applications to run seamlessly on various devices.
- **Interpretability:** In the future, OpenCV and Python versions will focus more on algorithm interpretability, enabling developers to better understand and debug computer vision models.
- **Automation and Simplification:** OpenCV and Python versions will continue to automate and simplify image processing and computer vision tasks, reducing the learning curve for developers and improving development efficiency.

 百万级
高质量VIP文章无限畅学
百万级
高质量VIP文章无限畅学
 千万级
优质资源任意下载
千万级
优质资源任意下载
 C知道
免费提问 ( 生成式Al产品 )
C知道
免费提问 ( 生成式Al产品 )
0
0
相关推荐

专栏目录
最低0.47元/天 解锁专栏
买1年送3月
百万级
高质量VIP文章无限畅学
千万级
优质资源任意下载
C知道
免费提问 ( 生成式Al产品 )
最新推荐
WinSXS历史组件淘汰术:彻底清除遗留的系统垃圾

# 摘要
WinSXS是Windows操作系统中的组件存储系统,它负责管理和维护系统文件的历史版本。随着Windows更新和功能迭代,WinSXS组件会逐渐积累,可能占用大量磁盘空间,影响系统性能。本文首先概述了WinSXS的历史及作用,随后详细分析了其淘汰机制,包括淘汰的工作原理、策略与方法。第三章提供了一套实践指南,涵盖检测、手动与自动化淘汰步骤,以及处理淘
喇叭天线仿真实战:CST环境下的参数调优秘籍
# 摘要
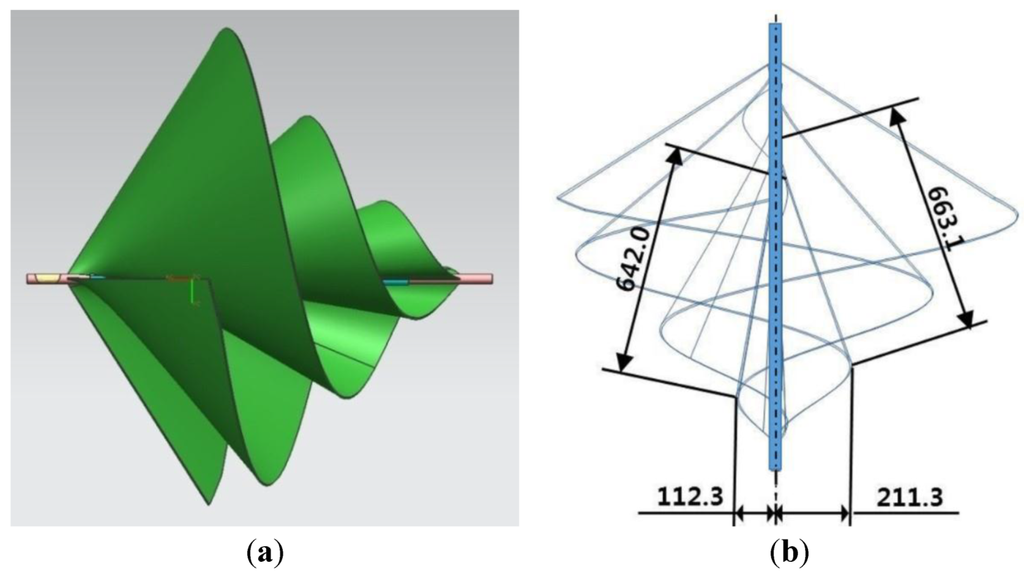
喇叭天线作为无线电频率传输的重要组成部分,在通信系统中发挥着关键作用。本文详细介绍了喇叭天线的理论基础、设计指标以及CST仿真软件的使用技巧。通过探讨喇叭天线的工作原理、主要参数以及应用场景,为读者提供了全面的基础知识。文章进一步阐述了如何在CST环境中搭建仿真环境、设置参数并进行仿真实验
UL1310中文版:电源设计认证流程和文件准备的全面攻略

# 摘要
UL1310电源设计认证是确保电源产品安全性和合规性的关键标准。本文综合概述了UL1310认证的相关内容,包括认证标准与规范的详细解读、认证过程中的关键步骤和安全测试项目。同时,本文还探讨了实战中认证文件的准备方法,成功与失败的案例分析,以及企业如何应对UL1310认证过程中的各种挑战。最后,展望了UL1310认证未来的发展趋势以及企业应如何进行长远规划以适应不断变化的行业标准和市场需求
最小拍控制稳定性分析
# 摘要
本文系统地介绍了最小拍控制的基本原理,稳定性分析的理论基础,以及最小拍控制系统数学模型的构建和求解方法。通过分析系统稳定性的定义和判定方法,结合离散系统模型的特性,本文探讨了最小拍控制系统的建模过程,包括系统响应、误差分析、约束条件以及稳定性的数学关系。进一步,文章讨论了实践应用中控制系统的设计、仿真测试、稳定性改善策略及案例分析。最后,展望了最小拍控制领域未来技术的发展趋势,包括算法优化
【离散系统分析必修课】:掌握单位脉冲响应的5大核心概念
# 摘要
本文系统地阐述了离散系统和单位脉冲响应的基础理论,介绍了离散时间信号处理的数学模型和基本操作,探讨了单位脉冲信号的定义和特性,并深入分析了线性时不变(LTI)系统的特性。进一步地,本文通过理论与实践相结合的方式,探讨了卷积运算、单位脉冲响应的确定方法以及其在实际系统分析中的应用。在深入理解脉冲响应的模拟实验部分,文章介绍了实验环境的搭建、单位脉冲响应的模拟实验和对实验结果的分析对比。本文旨在通过理论分析和实验模拟,加深对脉冲响应及其在系统分析中应用的理解,为系统设计和分析提供参考。
# 关键字
离散系统;单位脉冲响应;离散时间信号;线性时不变;卷积运算;系统稳定性
参考资源链接:
【Simulink模型构建】
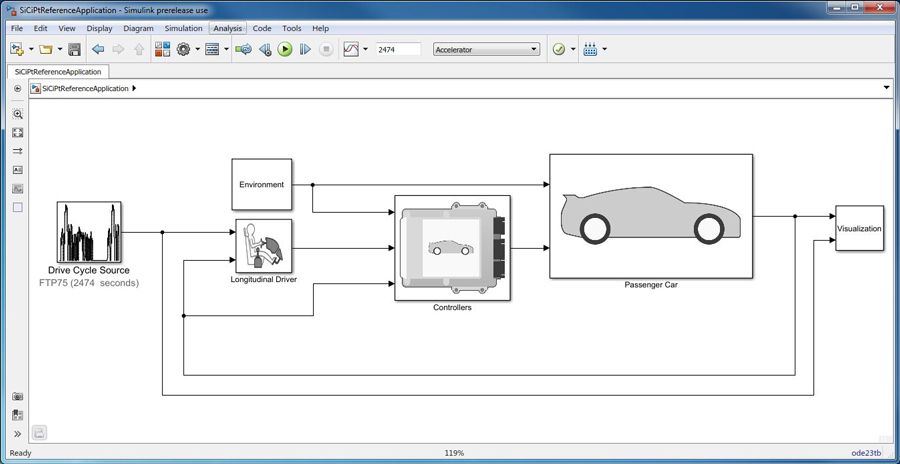
# 摘要
本文系统地介绍了Simulink模型构建的基础知识,深入探讨了信号处理和控制系统的理论与实践,以及多域系统仿真技术。文中详细阐述了Si
资源上传下载、课程学习等过程中有任何疑问或建议,欢迎提出宝贵意见哦~我们会及时处理!
点击此处反馈


专栏目录
最低0.47元/天 解锁专栏
买1年送3月
百万级
高质量VIP文章无限畅学
千万级
优质资源任意下载
C知道
免费提问 ( 生成式Al产品 )