Keil 5 Post-Installation IDE Environment Configuration Guide
发布时间: 2024-09-15 13:25:15 阅读量: 34 订阅数: 25 

Keil.MDK-Middleware.7.15.0.pack
# Keil5 Post-Installation IDE Environment Setup Guide
## 1.1 Installing and Registering Keil5 Software
The installation process for Keil5 IDE is relatively straightforward. Firstly, download the Keil5 installer from the official website. Run the installer and follow the prompts. During installation, you will need to enter a license key to activate the software. The license key can be obtained through purchase or from the Keil website.
Once the installation is complete, you need to register Keil5 to gain access to technical support and software updates. The registration process can be completed through the "MyKeil" page on the Keil website. During registration, you will need to provide personal information and the license key. Once registered, you will be able to access the technical support resources on the Keil website and download software updates.
## 2. Basic Keil5 Environment Configuration
### 2.1 Installing and Registering Keil5 Software
**Installation Process:**
1. Download the Keil5 installer from the official website.
2. Run the installer and follow the prompts to install.
3. After installation, launch the Keil5 IDE.
**Registration Process:**
1. In the Keil5 IDE, click the "Help" menu, and select "Register Keil MDK".
2. Enter your personal information and license key (if you have purchased it).
3. Click the "Register" button to complete the registration.
### 2.2 Workspace and Project Management
**Workspace:**
* The workspace is where you store and manage your project files.
* Create a new workspace or open an existing one.
* Within the workspace, you can create, open, and manage project files.
**Project Management:**
* A project is your container for developing embedded systems.
* Create a new project or open an existing one.
* A project includes source files, header files, library files, and other related files.
### 2.3 Debugger and Simulator Configuration
**Debugger:**
* The debugger allows you to step through your program and check variables and register values.
* In Keil5, the debugger is integrated within the IDE.
* Configure the debugger to connect to your target device.
**Simulator:**
* The simulator provides higher-level debugging features than the debugger.
* The simulator can emulate the hardware of your target device, allowing you to test how your code behaves on actual hardware.
* Configure the simulator to connect to your target device.
**Code Example:**
```c
// Keil5 Debugger Sample Code
#include <stdio.h>
int main() {
int a = 10;
int b = 20;
int c = a + b;
printf("a = %d, b = %d, c = %d\n", a, b, c);
return 0;
}
```
**Logic Analysis:**
* This code demonstrates how to use the Keil5 debugger to step through a program and check variable values.
* Variables `a`, `b`, and `c` are initialized and printed to the console.
* The debugger allows you to step through the code and check variable values at each step.
**Parameter Description:**
* The `printf` function is used to print formatted data to the console.
* `%d` specifies that the variable to be printed is an integer.
# 3.1 Code Editor Settings
#### 3.1.1 Syntax Highlighting and Auto-Completion
Keil5 offers powerful syntax highlighting features that color-code your code based on the grammatical rules of different languages, enhancing code readability and maintainability. It also supports auto-completion, which suggests possible matches as you type code, streamlining the coding process.
- **Syntax Highlighting:**
- Select "View" -> "Syntax Coloring" from the menu bar to open the syntax highlighting settings window.
- Choose the language to highlight and customize the color theme and font size.
- **Auto-Completion:**
- Select "Edit" -> "Completion Insight" from the menu bar to open the auto-completion settings window.
- Check "Enable Completion Insight" and set the number of characters to trigger auto-completion.
#### 3.1.2 Code Formatting and Code Folding
Keil5 allows users to customize code formatting rules to keep the code clean and consistent. Additionally, it supports code folding functionality, which can fold code blocks to hide unnecessary details and improve code readability.
- **Code Formatting:**
- Select "Edit" -> "Advanced" -> "Format Document" from the menu bar to open the code formatting settings window.
- Set indentation, line breaks, brackets, and other formatting options.
- **Code Folding:**
- Select "View" -> "Folding" from the menu bar to open the code folding settings window.
- Check "Enable Folding" and choose the folding rules.
- Click the fold/unfold icon next to the code line to fold or expand code blocks.
# 4. Keil5 Project Real-World Configuration
### 4.1 New Project and Configuration
#### 4.1.1 Choosing Project Type and Target Device
When creating a new project, you must choose the project type and target device. Project types include:
- **C Project:** Used for creating C language projects.
- **Assembly Project:** Used for creating assembly language projects.
- **Mixed Project:** Used for creating projects that include both C language and assembly language code.
The target device refers to the microcontroller or processor that you will compile and upload your program to. Keil5 supports a variety of target devices, including:
- **ARM Cortex-M Series:** Low-power microcontrollers widely used in embedded systems.
- **ARM Cortex-R Series:** High-performance microcontrollers used for real-time applications.
- **ARM Cortex-A Series:** Application processors used in devices such as smartphones and tablets.
#### 4.1.2 File Inclusion and Compilation Options
After creating a new project, you need to add source files and header files. Source files contain program code, ***
***pilation options control the compilation process, including:
- **Optimization Level:** Specifies the degree of optimization the compiler applies to the code.
- **Code Generation Options:** Specifies the type of code the compiler generates, such as optimizing for size or speed.
- **Library and Header File Management:** Specifies the libraries and header files used by the compiler.
### 4.2 Peripheral Driver and Library Configuration
#### 4.2.1 Peripheral Initialization and Configuration
Peripheral drivers are software used to control microcontroller peripherals. Keil5 provides a rich library of peripheral drivers that can simplify the peripheral initialization and configuration process.
Peripheral initialization typically includes:
- **Clock Configuration:** Providing a clock source for peripherals.
- **Pin Configuration:** Configuring the functionality and electrical characteristics of peripheral pins.
- **Register Configuration:** Setting peripheral register values to control their behavior.
#### 4.2.2 Using Library Functions and Macros
Library functions and macros are predefined blocks of code that can simplify peripheral operations. Library functions are often used to perform complex operations, while macros are used to define constants or simplify code.
For example, the following code uses the library function `HAL_GPIO_WritePin()` to set a GPIO pin to high level:
```c
HAL_GPIO_WritePin(GPIOA, GPIO_PIN_5, GPIO_PIN_SET);
```
### 4.3 Firmware Upgrade and Debugging
#### 4.3.1 Firmware Compilation and Flashing
Firmware compilation is the process of compiling source code into executable code. Firmware flashing is the process of writing the executable code into the target device.
Keil5 offers integrated compilers and flashing tools for convenient firmware compilation and flashing. The compilation process includes:
- **Preprocessing:** Expanding macros and header files into the source code.
- **Compilation:** Compiling the source code into assembly code.
- **Assembly:** Assembling the assembly code into machine code.
- **Linking:** Linking the machine code into an executable file.
The flashing process includes:
- **Selecting the Flasher:** Choosing the flasher for writing the firmware.
- **Configuring Flashing Options:** Setting options such as flash speed and address.
- **Executing Flashing:** Writing the executable file to the target device.
#### 4.3.2 Debugging and Error Tracing
Debugging is the process of identifying and fixing program errors. Keil5 provides a robust debugger that can help users quickly locate and solve problems.
The debugging process typically includes:
- **Setting Breakpoints:** Placing breakpoints in the code to pause program execution.
- **Stepping Through:** Executing the code line by line to observe changes in variable values.
- **Viewing Registers and Memory:** Inspecting register and memory contents to analyze the program state.
- **Error Tracing:** Analyzing error messages and modifying code to fix the issues.
# 5. Keil5 Advanced Configuration Techniques
### 5.1 Using Scripts and Macros
#### 5.1.1 Automating the Build Process with Scripts
Keil5 supports using scripts to automate the build process, simplifying repetitive tasks. Scripts can be written in scripting languages such as Python, Tcl, or Perl.
```python
# Keil5 Build Script Example
import os
# Set project path
project_path = r"C:\Projects\MyProject"
# Compile the project
os.system("keilc.exe -c " + project_path + ".uvprojx")
# Link the project
os.system("keillink.exe -l " + project_path + ".uvprojx")
```
#### 5.1.2 Macros Simplify Code Writing
Macros can simplify code writing and reduce repetitive code. Keil5 supports C preprocessor macros and Keil5-specific macros.
```c
// Keil5-Specific Macro Example
#define LED_PORT GPIOA
#define LED_PIN 5
// Using macros to simplify code
void led_on() {
GPIO_SetBits(LED_PORT, LED_PIN);
}
```
### 5.2 Custom Toolchains and Extensions
#### 5.2.1 Integrating Third-Party Tools and Libraries
Keil5 allows the integration of third-party tools and libraries to extend its functionality. For example, GCC compiler or third-party debuggers can be integrated.
#### 5.2.2 Extending Keil5 Functionality and Interface
Keil5 offers extension points that allow users to extend its functionality and interface. You can use plugins or modify Keil5 configuration files to achieve custom functionality.
```xml
<!-- Keil5 Configuration File Example -->
<Keil5>
<Extensions>
<Extension>
<Name>MyExtension</Name>
<Path>C:\Extensions\MyExtension.dll</Path>
</Extension>
</Extensions>
</Keil5>
```

 百万级
高质量VIP文章无限畅学
百万级
高质量VIP文章无限畅学
 千万级
优质资源任意下载
千万级
优质资源任意下载
 C知道
免费提问 ( 生成式Al产品 )
C知道
免费提问 ( 生成式Al产品 )
0
0
相关推荐

专栏目录
最低0.47元/天 解锁专栏
买1年送3月
百万级
高质量VIP文章无限畅学
千万级
优质资源任意下载
C知道
免费提问 ( 生成式Al产品 )
最新推荐
【推荐系统架构设计】:从保险行业案例中提炼架构设计实践

# 摘要
推荐系统作为保险行业满足个性化需求的关键技术,近年来得到了快速发展。本文首先概述了推荐系统在保险领域的应用背景和需求。随后,本文探讨了推荐系统的基本理论和评价指标,包括协同过滤、基于内容的推荐技术,以及推荐系统的架构设计、算法集成和技术选型。文中还提供了保险行业的推荐系统实践案例,并分析了数据安全、隐私保护的挑战与策略。最后,本文讨论了推荐系统在伦理与社会责任方面的考量,关注其可能带来的偏见
KST_WorkVisual_40_zh高级应用:【路径规划与优化】提升机器人性能的秘诀
# 摘要
本文针对KST_WorkVisual_40_zh路径规划及优化进行深入探讨。首先,概述了路径规划的基本概念、重要性和算法分类,为理解路径规划提供理论基础。接着,通过KST_WorkVisual_40_zh系统进行路径生成、平滑处理以及调整与优化的实践分析,突显实际应
一步到位:PyTorch GPU支持安装实战,快速充分利用硬件资源(GPU加速安装指南)
# 摘要
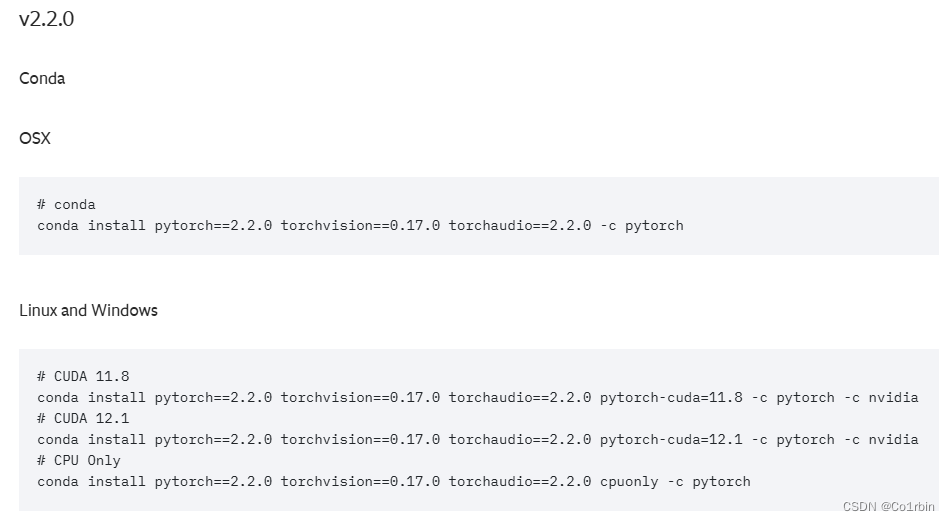
PyTorch作为一个流行的深度学习框架,其对GPU的支持极大地提升了模型训练和数据处理的速度。本文首先探讨了PyTorch GPU支持的背景和重要性,随后详细介绍了基础安装流程,包括环境准备、安装步骤以及GPU支持的测试与验证。文章进一步深入到PyTorch GPU加速的高级配置,阐述了针对不同GPU架构的优化、内存管理和多GPU环境配置。通
Overleaf图表美化术:图形和表格高级操作的专家指南
# 摘要
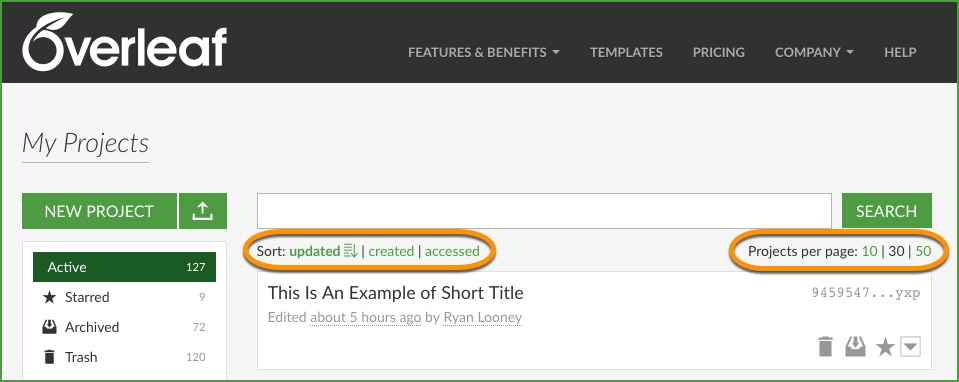
本文全面介绍了Overleaf平台中图表和表格的美化与高级操作技术。章节一概述了Overleaf图表美化的基本概念,随后各章节深入探讨了图形和表格的高级操作技巧,包括图形绘制、坐标变换、交互式元素和动画的实现,以及表格的构建、样式定制和数据处理。第四章通过综合应用示例,展示了如何将高级图表类型与数据可视化最佳实践相结合,处理复杂数据集,并与文档风格相融合。最后,文章探讨了利用外部工具、版本控制和团队协作来提升Overleaf图表设计的效
RDA5876 射频信号增强秘诀:提高无线性能的工程实践
# 摘要
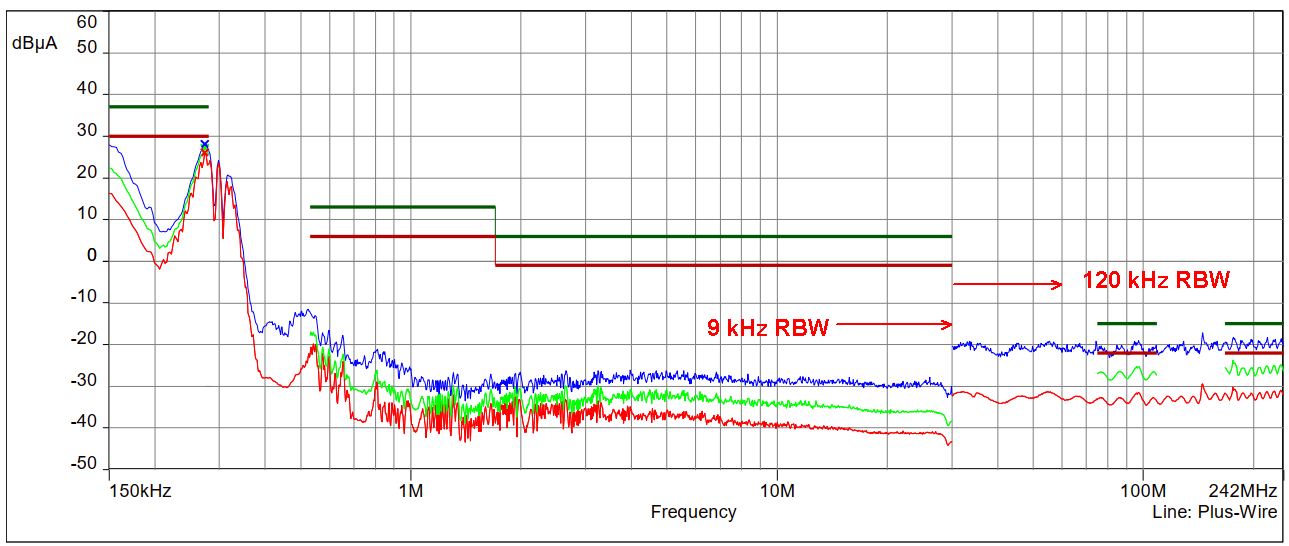
本文系统地介绍了RDA5876射频信号增强技术的理论与实践应用。首先,概述了射频信号的基础知识和信号增强的理论基础,包括射频信号的传播原理、信号调制解调技术、噪声分析以及射频放大器和天线的设计。接着,深入分析了RDA5876芯片的功能架构和性能参数,探讨了软件和硬件层面上的信号处理与增强方法。文章进一步通过实际应用案例,展示了RDA5876在无线通信系统优化和物联网设备中的应用效果。最后,文章展望
AVR微控制器编程进阶指南:精通avrdude 6.3手册,从新手到专家

# 摘要
本文全面介绍了AVR微控制器的基础知识、编程环境搭建、以及使用avrdude工具进行编程和固件更新的详细流程。文章首先提供了对AVR微控制器的概述,然后详述了如何搭建和
微信群聊自动化秘籍:AutoJs脚本开发与性能优化指南

# 摘要
微信群聊自动化技术近年来随着移动互联网的发展而兴起,本文首先概述了AutoJs及其在微信群聊自动化中的应用。接着,介绍了AutoJs脚本的基础知识,包括环境搭建、语言基础和核心组件的操作方法。本文深入探讨了通过AutoJs实现微信群消息监控、管理自动化以及用户体验增强的实战演练。针对脚本性能优化,本文提出了调试技巧、性
煤矿开采规划:地质保障技术如何发挥指导作用
# 摘要
地质保障技术在煤矿开采规划、安全性和技术创新中扮演着至关重要的角色。本文概述了地质保障技术的基本原理,详细探讨了地质数据分析在煤矿开采规划中的应用,以及如何通过地质保障技术预防地质灾害和保障煤矿安全。文章还分析了开采技术进步对地质保障的影响,地质保障技术与开采新技术的结合点,以及未来发展趋势。案例研究部分提供了地质保障技术成功应用的实例分析和经验总结。最后,文章讨论了地质保障技术面临的挑战和未来发展方向
【SOEM同步位置模式(CSP)入门与实践】:打造高性能电机控制系统
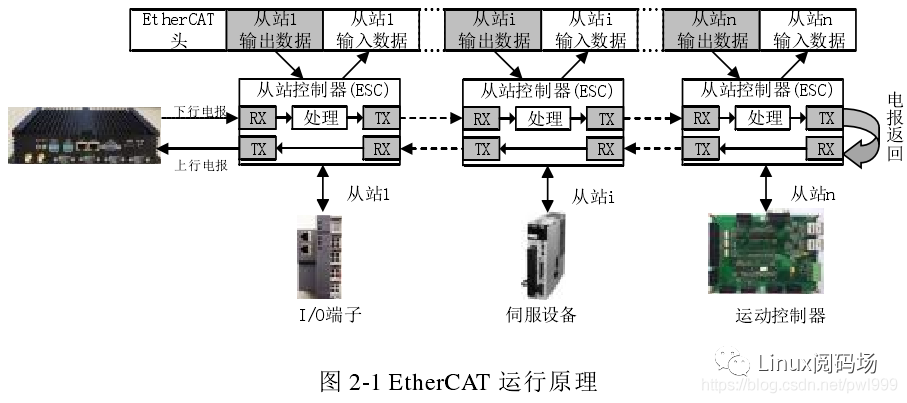
# 摘要
同步位置模式(CSP)是一种关键的同步控制技术,广泛应用于电机控制系统中,以提高运动精度和同步性能。本文首先概述了CSP的基础知识及其理论基础,包括工作原理、同步算法的数学模型以及同步机制的优化策略。接着,本文深入探讨了CSP在伺服电机、步进电机和多轴同步控制中的应用实践,分析了其在不同电机控制场景
【Python列表与数据结构】:深入理解栈、队列与列表的动态互动
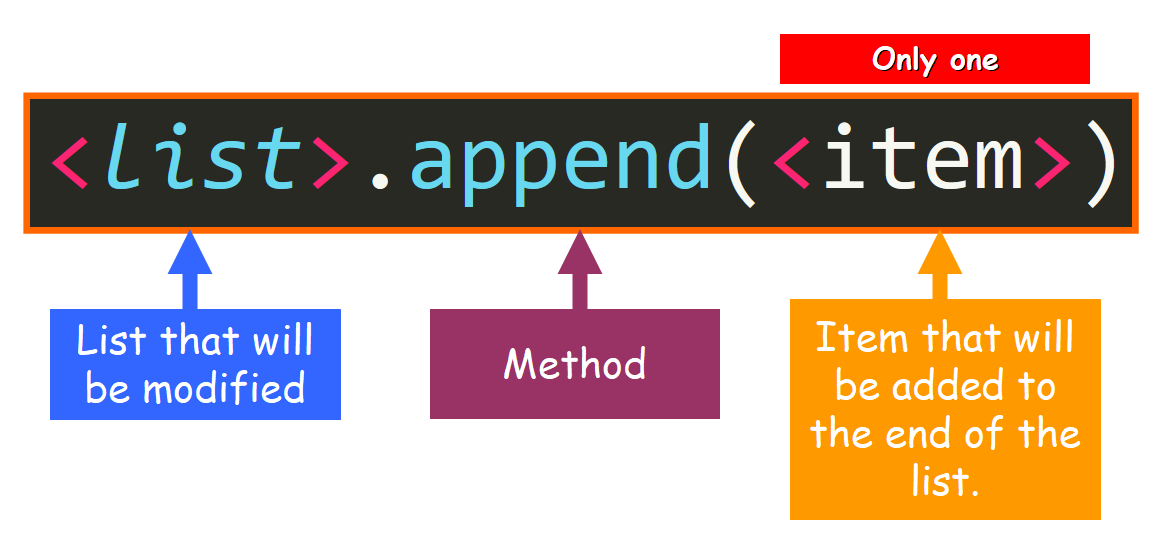
# 摘要
本文系统性地探讨了Python中列表与栈、队列等数据结构的基础知识、原理、应用和优化。章节一介绍了Python列表的基本概念和作为动态数据结构的特点。第二章和第三章深入解析了栈和队列的定义、操作原理、算法应用和内存优化策略,以及在Python中的实现。第四章探讨了列表与栈、队列的动态互动以及性能对比。第五章通过案例分析展示了这些数据结构在实际问题中的应用,如浏览器历史记
资源上传下载、课程学习等过程中有任何疑问或建议,欢迎提出宝贵意见哦~我们会及时处理!
点击此处反馈


专栏目录
最低0.47元/天 解锁专栏
买1年送3月
百万级
高质量VIP文章无限畅学
千万级
优质资源任意下载
C知道
免费提问 ( 生成式Al产品 )