Solving Common Issues with Keil5 Installation Failure
发布时间: 2024-09-15 13:24:28 阅读量: 56 订阅数: 24 

Problem Solving with C++(9th) 无水印pdf
# 1. Overview of Common Issues During Keil5 Installation
Keil5 is a popular integrated development environment (IDE) used for embedded system development. During the installation process, users may encounter various common problems that could affect the smooth progress of the installation. This chapter will outline the frequent issues encountered during the Keil5 installation process and their potential causes, providing background information for more in-depth troubleshooting in subsequent chapters.
# 2. Preparations Before Installing Keil5
### 2.1 System Environment Requirements and Compatibility
Before installing Keil5, ensure your system meets the following environmental requirements:
- **Operating System:** Windows 7 or higher (32-bit or 64-bit)
- **Processor:** 1GHz or higher
- **Memory:** 512MB or higher
- **Hard Disk Space:** 500MB or higher
- **Display Resolution:** 1024x768 or higher
Keil5 is compatible with the following operating systems:
- Windows 7
- Windows 8
- Windows 8.1
- Windows 10
- Windows 11
### 2.2 Downloading and Unzipping the Installation Package
**Downloading the Installation Package:**
Visit the Keil official website (***
***
*** "MDK," which contains the Keil5 installation program.
# ***mon Issues During the Keil5 Installation Process
### 3.1 Installation Program Fails to Start
#### Problem Description
After double-clicking the Keil5 installation program, it fails to start or displays an error message.
#### Potential Causes
* The installation package is damaged or incomplete
* The system environment does not meet the Keil5 installation requirements
* Antivirus software or firewall is blocking the installation program
#### Solutions
* Redownload and unzip the Keil5 installation package
* Check if the system environment meets the Keil5 installation requirements (see Chapter 2.1)
* Temporarily disable antivirus software or firewall and then restart the installation program
### 3.2 Incorrect Installation Path or Insufficient Permissions
#### Problem Description
During the installation process, there is an incorrect installation path or insufficient permissions to install to the specified path.
#### Potential Causes
* The installation path does not exist or is not writable
* The current user does not have sufficient permissions to install software in the specified path
#### Solutions
* Ensure the installation path exists and is writable
* Run the installation program as an administrator
* Change the installation path to a directory with sufficient permissions
### 3.3 Error Messages During Installation
#### Problem Description
Various error messages appear during the installation process, such as:
***"Cannot create directory"**
***"File already exists"**
***"Insufficient permissions"**
***"Installation program cannot continue"**
#### Potential Causes
* Incorrect installation path or insufficient permissions (see 3.2)
* Conflicting software or files with Keil5 exist in the system
* The installation package is damaged or incomplete
#### Solutions
* Check the installation path and permissions (see 3.2)
* Uninstall software or files conflicting with Keil5
* Redownload and unzip the Keil5 installation package
#### Code Example
```
try:
# Attempt to create the installation directory
os.makedirs(install_path)
except OSError as e:
# If directory creation fails, print the error message
print("Cannot create directory:", e)
```
#### Code Logic Analysis
This code attempts to create the installation directory. If the directory creation fails, it prints the error message.
#### Parameter Explanation
***install_path:** The path of the installation directory to be created
# 4. Solutions After Keil5 Installation Failure
### 4.1 Uninstall and Reinstall Keil5
**Operating Steps:**
1. Open the Control Panel, select "Programs and Features."
2. In the list of installed programs, find "Keil uVision5."
3. Click the "Uninstall" button and follow the prompts to complete the uninstallation process.
4. Redownload the Keil5 installation package and unzip it.
5. Run the installation program again, following the installation wizard.
### 4.2 Check System Environment Variables and Paths
**Operating Steps:**
1. Right-click on "This PC," and choose "Properties."
2. Click "Advanced System Settings."
3. In the "Advanced" tab, click the "Environment Variables" button.
4. In the "System Variables" list, check if the following variables exist:
- `PATH`: Contains the path to the Keil5 installation directory, e.g., `C:\Keil_v5\ARM\bin`
- `INCLUDE`: Contains the path to the Keil5 header file directory, e.g., `C:\Keil_v5\ARM\inc`
- `LIB`: Contains the path to the Keil5 library file directory, e.g., `C:\Keil_v5\ARM\lib`
5. If any are missing or the paths are incorrect, manually add or modify the variable values.
### 4.3 Try Installing as an Administrator
**Operating Steps:**
1. Right-click on the Keil5 installation program and select "Run as administrator."
2. Proceed with the installation following the installation wizard.
**Code Block:**
```
if (path_to_keil_bin not in os.environ["PATH"]):
os.environ["PATH"] += ":" + path_to_keil_bin
```
**Logic Analysis:**
This code checks if the system environment variable `PATH` contains the path where the Keil5 executable files are located. If not, it adds this path to the `PATH` variable so that the system can find the Keil5 command from any directory.
**Parameter Explanation:**
- `path_to_keil_bin`: The path where the Keil5 executable files are located.
**Flowchart:**
```mermaid
graph LR
subgraph Solutions After Installation Failure
A[Uninstall and Reinstall Keil5] --> B[Check System Environment Variables and Paths]
B --> C[Try Installing as an Administrator]
end
```
# 5.1 Check if Keil5 is Installed Successfully
After completing the installation of Keil5, follow these steps to verify if the installation is successful:
1. **Start Keil5:** Double-click the Keil5 icon on the desktop or start Keil5 from the Start menu.
2. **Check Version Information:** In the Keil5 main interface, click the "Help" menu, then select "About Keil." This will display the Keil5 version information, including the installed version number.
3. **Create a New Project:** Create a new project to test the Keil5 compiler and debugger. Click the "File" menu, then select "New" > "Project." In the "New Project" dialog box, select a template and specify the project name and path.
4. **Compile the Project:** Click the "Build" menu, then select "Compile." If the compilation is successful, Keil5 will display a "Compilation successful" message in the output window.
5. **Debug the Project:** Click the "Debug" menu, then select "Start Debugging." If debugging is successful, Keil5 will display the program's execution status in the debug window.
If all the above steps are successfully executed, it indicates that Keil5 has been successfully installed.

 百万级
高质量VIP文章无限畅学
百万级
高质量VIP文章无限畅学
 千万级
优质资源任意下载
千万级
优质资源任意下载
 C知道
免费提问 ( 生成式Al产品 )
C知道
免费提问 ( 生成式Al产品 )
0
0
相关推荐

专栏目录
最低0.47元/天 解锁专栏
买1年送3月
百万级
高质量VIP文章无限畅学
千万级
优质资源任意下载
C知道
免费提问 ( 生成式Al产品 )
最新推荐
深入理解锂电池保护板:电路图原理与应用实践详解
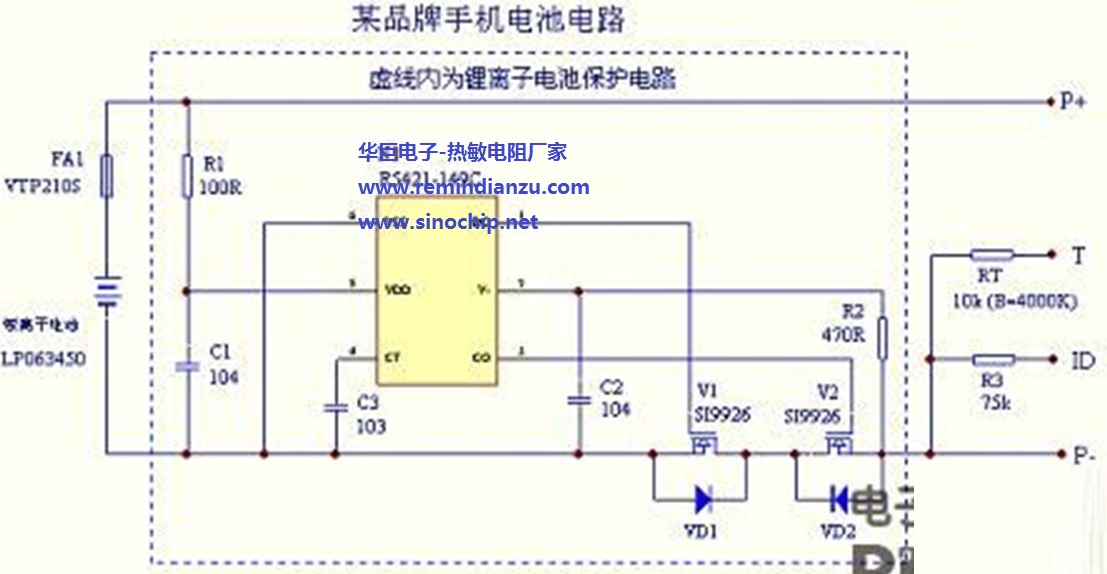
# 摘要
锂电池保护板作为关键的电池管理系统组件,对于确保电池安全、延长使用寿命至关重要。本文对锂电池保护板进行了全面介绍,分析了其电路图原理,并探讨了在不同电池类型中的应用与设计实践。文中详细解读了保护板的主要电路设计原理,包括过充、过放、短路和过流保护机制,以及微控制器集成与通信协议的应用。同时,本文也指出了保护板设计过程中的挑战,并通过案例分析提出了相应的解决方案。最后,本文展望了保护板的未来发展趋势,重点在于新型材料的应用以及智能化和物
【自动化操作录制系统】:易语言构建稳定可靠的实践教程

# 摘要
本文系统地介绍了自动化操作录制系统的设计与实现,包括易语言的特性、开发环境的搭建、基础语法,以及自动化操作录制技术的原理和脚本编写方法。通过对易语言的详细介绍和案例分析,本文阐述了如何构建稳定可靠的自动化操作录制系统,并探讨了进阶应用中的功能扩展、网络分布式处理和安全性管理。文章旨在为开发者提供一套完整的自动化操作录制解决方案,帮助他们在易语言环境下快速开发出高效且安
高级VLAN配置案例分析:企业级应用全面解读
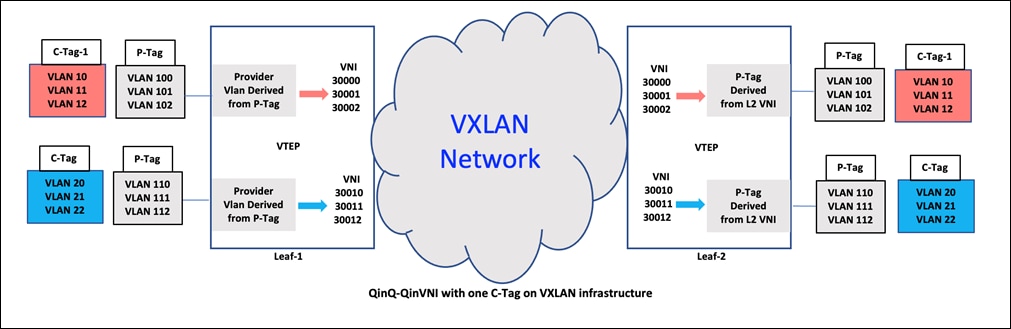
# 摘要
虚拟局域网(VLAN)技术是现代企业网络设计中的关键组成部分,其目的是为了提高网络资源的灵活性、安全性和管理效率。本文首先介绍了VLAN的基本概念和企业需求,接着深入探讨了
ROS新兵起步指南:Ubuntu下“鱼香肉丝”包的安装全教程

# 摘要
本文提供了ROS(Robot Operating System)的概述、安装与设置指南,以及基础概念和进阶操作的详细教程。首先,本文概述了ROS的基本架构和核心组件,并指导读者完成在Ubuntu环境下的ROS安装和配置过程。随后,深入探讨了ROS的基础概念,包括节点、话题、消息、服务和工作空间等。在此基础上,介绍了如
复变函数绘图秘籍:Matlab中三维艺术的创造与优化
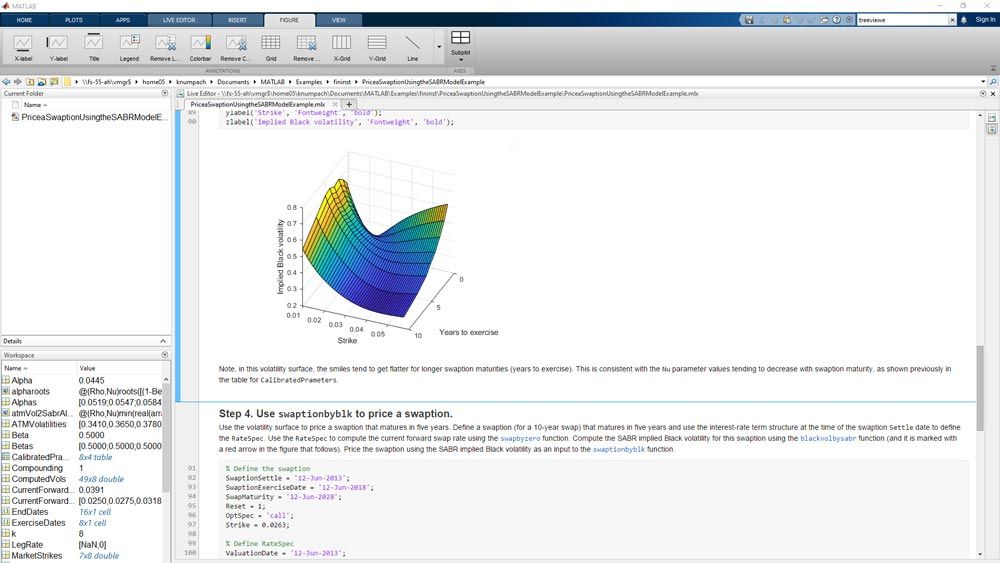
# 摘要
本文全面探讨了复变函数绘图的数学基础及其在Matlab中的应用。文章首先回顾了复变函数绘图的数学基础和Matlab的基本
【CPCI标准2.0中文版:全面入门与深入解析】:掌握核心应用与行业实践的终极指南
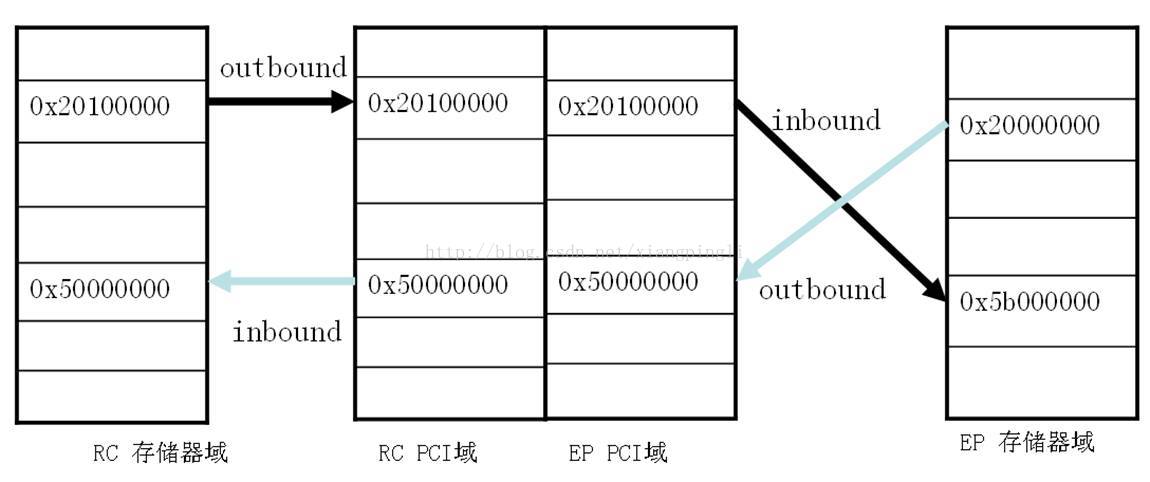
# 摘要
本文旨在全面介绍CPCI标准2.0的核心原理、技术规范及在不同行业中的应用。文章首先回顾了CPCI标准的发展历程,然后深入剖析其框架结构和关键技术,包括与PCI及PCI-X的对比、PCIe技术的演进及其可
计算机视觉目标检测:案例分析与实战技巧

# 摘要
计算机视觉中的目标检测是图像分析的核心问题之一,旨在识别和定位图像中特定物体的位置。本文首先概述了目标检测的发展历程和理论基础,然后深入分析了经典算法如R-CNN、YOLO和SSD的原理及性能。接着,文章探讨了目标检测在实战中的数据处理、模型训练和调优技巧,并通过多个行业案例加以说明。此外,本文还介绍了模型压缩、加速技术以及部署框架和工具,以实现
虚拟串口驱动7.2嵌入式系统集成与测试:专家指导手册
# 摘要
本文系统地阐述了虚拟串口驱动的概念、在嵌入式系统中的集成基础及其测试方法论,并通过实践案例分析来探讨驱动集成后的功能验证和故障诊断。文章首先介绍了虚拟串口驱动的基本概念,然后详细探讨了嵌入式系统的集成,包括驱动程序的作用、集成步骤和关键的技术要求。在实践部分,本文详细说明了集成前的准备工作、集成过程中的关键步骤以及集成后如何进行功能和性能测试。最后,文
资源上传下载、课程学习等过程中有任何疑问或建议,欢迎提出宝贵意见哦~我们会及时处理!
点击此处反馈


专栏目录
最低0.47元/天 解锁专栏
买1年送3月
百万级
高质量VIP文章无限畅学
千万级
优质资源任意下载
C知道
免费提问 ( 生成式Al产品 )